Welcome to the ninth step in our free professional learning series on class and student blogging!
The aim of this step is to:
- Provide an overview of creating and using videos with students
- Help get you started using video or get more out of using videos
Why Educators Use Video
Educators use videos for a wide range of purposes including:
- To motivate and engage students — students enjoy using technology to create their own videos.
- To supplement or enhance a lesson to bring the topic to life.
- To provide instructions that students can review anytime, anywhere. This is handy for when students are absent, to help students with extension or extra support, and for exam revision.
Below is an overview of using videos to help get you started. We’ve embedded examples and included video tutorials where appropriate.
Video can be used in so many different ways and it’s impossible to cover them all. Feel free to share your own favorite ideas and examples!
Back to Top
Video Creation And Editing
There is a wide range of video creation and editing tools and apps available. You can use these to quickly create and/or edit videos.
Back to Top
Animoto
Animoto allows you to create videos from photos, video clips, and music either on the web or on an app on your mobile device.
Animoto is a wonderful tool to use with students because it’s quite intuitive. It allows students to focus on content creation without needing to learn video editing or manipulation.
Using Animoto is as simple as uploading your images, video, and audio, or selecting files from Animoto’s media files, and then letting Animoto mix the images, video, and music together to create a professional-looking video in minutes.
Educators can sign up for a free account which comes with 50 student accounts.
Here’s a very simple example of an Animoto made for a Cross Country event. Like a lot of these tools, you can add a lot more detail if you want to.
Check out more examples of Animotos created by students.
Book Creator
Book Creator allows students to quickly create their own beautiful books. We’ve included Book Creator in our video section because books created using this app are often shared as a video.
Karen Arrington has some great posts about using Book Creator with her students:
- Learn all the different ways you can share your books including sharing as a video.
- Numerous ideas for using Book Creator with different ages.
The free plan allows you to create one library of up to 40 books.
Check out this short video by Holly Clark that demonstrates how to get started with Book Creator.
Explain Everything
Explain Everything is an app that lets you annotate, animate, and narrate explanations and presentations.
Here is another video tutorial series on using Explain Everything.
Here’s an example of Grade 2 student using Explain Everything for increasing patterns.
Instagram is a social networking platform that is designed for sharing photos and videos. Users can apply digital filters to their images and share them on a variety of social networking services, such as Facebook, Twitter, Tumblr, and Flickr.
Read Larry Ferlazzo’s article on using Instagram videos with students. Also, check out his vocabulary videos by English Language Learners.
Watch this video created by one of Larry’s students using Instagram.
Instagram is restricted to those who are 13+.
You can learn more about using Instagram here.
iMovie
iMovie is a free video editing software application for Mac computers and iOS devices.
Educators use iMovie if they want to use free software to create or edit movies on their Apple devices.
iMovie allows you to easily combine your images and photos, with audio or music, to make professional looking movies.
The iMovie app is an essential app for quickly creating movies on iOS devices.
Watch this video to learn how to use iMovie on an iPad.
Loom
Loom is a free screencasting tool available via Chrome extension. You can use on Mac, Windows, and Chromebooks. Loom allows you to record your camera and screen with audio directly from your Chrome browser. You can then download your video, embed it on your blog, or share it via social media or email etc.
Screencasting is such a versatile way to use video in the classroom. Not only can teachers make tutorials, but students can share their learning as a screencast by narrating their digital creations.
For a very simple example, students could narrate a Google Slide presentation.
Below is an example of a Loom created by Kathleen Morris.
PhotoPeach
PhotoPeach allows you to quickly upload photos to create great looking slideshows and simple quizzes. Refer to these instructions for creating PhotoPeach quizzes.
Learn more about animals on PhotoPeach
PowToon
PowToon allows you to create animated videos and presentations.
Here is an example of a PowToon created by an educator.
Screencast-O-matic
Screencast-O-matic is an easy, free way to record screencasts on your computer. You can record the screencast online using their website or download their app onto your computer.
Tom Perran uses Screencast-O-matic with a Wacom Pen tablet to make instructional videos for his math classes using his laptop.
Here is an example of a video created using Screencast-O-Matic.
Lots of educators also use Screencast-O-matic to create how-to screencasts.
This video on “How to Participate in a Twitter Chat‘ by Vicki Davis was created using Screencast-O-matic.
Lumen5
Lumen5 offers a simple way to make a slideshow type video.
It can even “automagically” make your blog post into a video (for best results you’ll need to edit it slightly).
Lumen5 contains a library of Creative Commons Zero images and music so you don’t need to search for content either (although you can use your own pictures and video).
The only downside (apart from it being a 13+ tool) is you can’t embed your video directly onto your blog. So you have to put it on social media or YouTube first and then get the embed code from there (see below for instructions). Or you could download the video and upload it directly into your post/page.
Early in 2018 we made a promo video for our Better Blogging With Students course.
Video Techniques
Creating videos can be as simple as recording a video on your phone, tablet, or camera and then sharing it with the world. Of course, a lot more elaborate techniques and editing can go into video creation as well.
Below are some examples of different video techniques used with students.
Back to Top
Digital Storytelling
Digital storytelling refers to a short form of digital media production that allows everyday people to create and share stories.
Stories through the lens is an excellent resource to help you and your students create great images and video for digital storytelling.
RSA Animate Style Videos
RSA Animate style videos combine illustrations that follow along with what the speaker is saying.
Here is an example of a well known RSA Animate video.
You’ll find detailed instructions for creating RSA Animate Style videos with students here.
Stop Motion Video
Stop motion is an animation technique to make a physically manipulated object appear to move on its own. The object is moved in small increments between individually photographed frames, creating the illusion of movement when the series of frames is played as a continuous sequence.
Dolls or Lego with movable joints, or clay figures are often used in stop motion for their ease of re-positioning.
Here is an example of a Lego stop motion video.
Learn more about making stop motion movies with students here.
Using A Green Screen
Some educators use a green background in front of which moving subjects are filmed so they can add a separately filmed background to their video.
This technique is known as chroma keying. It is commonly used for weather forecasts, news telecasts, special effects in movies, and video games.
Check out the green screen video Linda Yollis’ students put together for a global project.
Want to learn more about green screens?
- Tony Vincent has compiled some different green screen set ups.
- Jonathan Wylie has compiled green screen tips from teachers on Twitter.
Copyright And Videos
Video is more confusing than images because you see a lot of remixed videos online or videos using commercial music, especially on YouTube.
You are free to embed any video from YouTube, Vimeo on your blog or website as long as it gives you the embed option.
That being said, you (or your students) can’t necessarily use parts from videos on YouTube (or other sources) to make mashups or as part of another video.
If you use any video that you are cutting, making changes to, or adding to a project (or adding audio) it is better to either:
- use Creative Commons content
- use free or public domain content
- request permission from the copyright holder
You can read more about Creative Commons and free or public domain content here. Refer to The Educator’s Guide to Copyright, Fair Use, and Creative Commons for comprehensive information on the use of images, curriculum docs, text and quotes, music, videos.
YouTube Copyright Basics
If you do use copyright content on YouTube this is what might happen:
- The video and/or audio is pulled because of a DMCA complaint, copyright infringement or content ID match.
- No action is taken but they might add an advertisement to your video that says ‘Buy this song’.
The following videos are good for explaining video copyright to younger students.
Video Hosting Websites
Videos from video hosting websites such as YouTube, Vimeo, Media Core, SchoolTube and Google Drive can be easily embedded into posts or pages.
This is handy when you:
- have large video files you want to add to your blog posts
- want to play your video within an embedded player, or
- want to embed a video created by someone else into your posts.
Back to Top
YouTube
YouTube is the most popular video sharing and viewing website on the Internet.
While some schools block YouTube there are lots of educators who use YouTube to share videos. These videos could be created by the teachers, the students, or someone else.
We recommend you set up a class or teacher YouTube account if you plan to upload videos or create YouTube Playlists because this helps separate your work videos from your personal videos.
YouTube Playlists are a fantastic way of compiling a list, or group, of videos that play in order to share with students.
When one video finishes playing the next video starts. Using YouTube playlists you can control the start and finish times of each video — this is handy if you want students to watch specific parts of videos.
Watch this video tutorial to learn more about YouTube Playlists.
Vimeo
Vimeo is another popular video sharing and viewing website. Less videos are hosted on Vimeo compared to YouTube.
Vimeo is less likely to be blocked in schools compared to YouTube which is why it’s a popular video hosting website for uploading videos for class and for finding videos to use in class.
The free plans have some restrictions such as 500MB per week of upload space, up to 5GB total account storage.
Back to Top
Google Drive
Google Drive allows you upload video files up to 10 GB in size on your desktop computer or using the Google Drive app on your mobile app. You can then share them with specific people or embed them into posts and websites.
Google Drive is a popular video hosting option for schools using Google Apps for education. Many of our Google Apps for education schools upload their videos to Google Drive and use the embed code to add to their posts.
Once you’ve uploaded your video to Google Drive you need to:
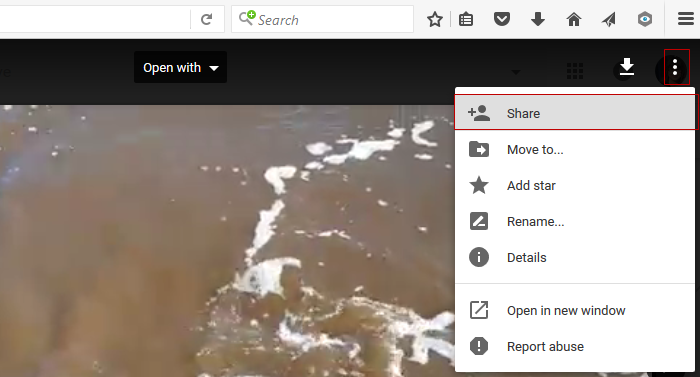
1. Click on the video or photo you want to embed and then click on the More icon and select Share.
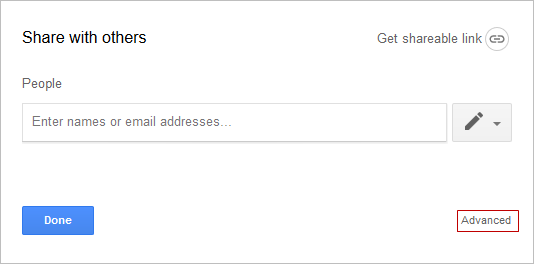
2. Click on Advanced option in Share window.
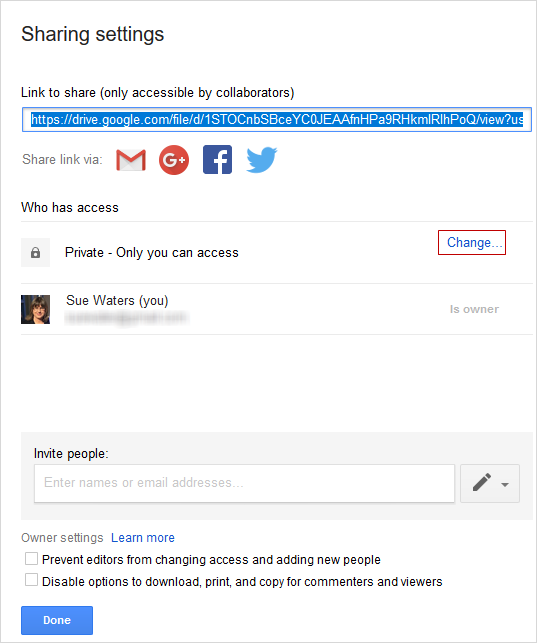
3. Click on Change next to Private.
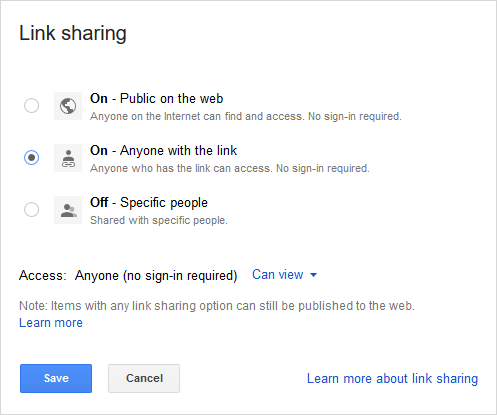
4. Click on On – Anyone with a link or On – Public on the web and then click on Save.
5. Click on Done to close the Share window.
6. Click on the More icon and then Open in new window link.
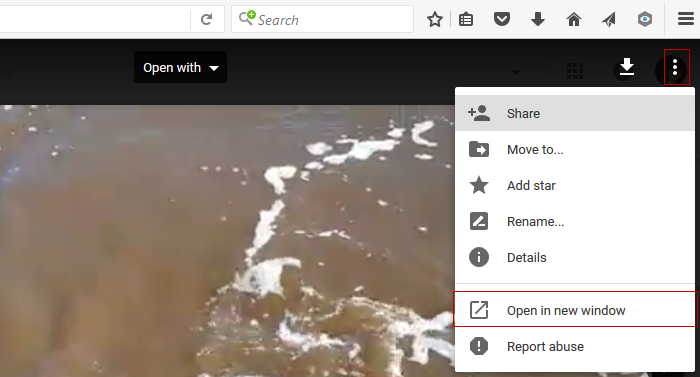
7. Click on the More icon in the new window and select Embed Item.
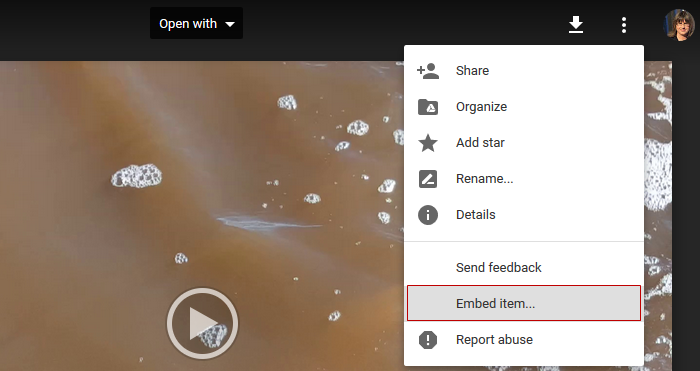
8. Copy the embed code.
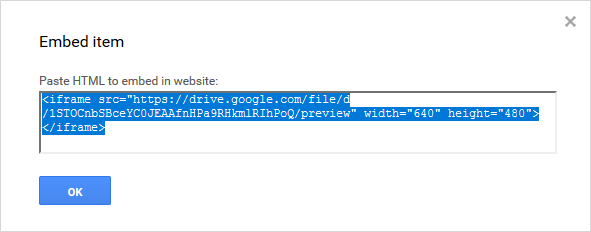
9. Paste the embed code into your post using Insert Embed in the Add Media Window and then click Insert into Post.
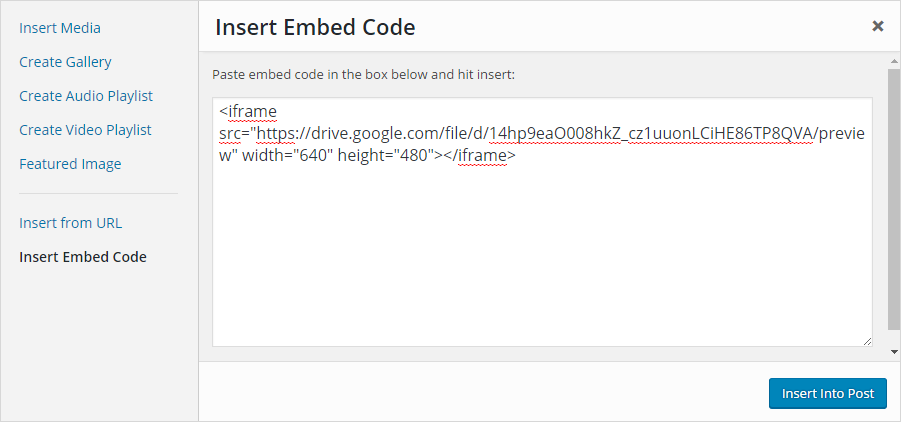
12. Once your post is published you’ll see your photo or video embedded.
Embed videos in posts
Videos from video sharing websites can be embedded into posts or pages by either using:
- The video URL
- The embed code
Note: Due to misuse by spammers, videos can only be embedded on Pro blogs, student blogs attached to a Pro blog, or CampusPress blogs. If you have a free blog, you can use the URL method which we explain below.
Using the Video URL
Edublogs allows you to quickly embed videos, images, and other content such as Tweets and Scribd into a post or page using their URL.
Websites that you can embed using their URL are:
- DailyMotion
- Flickr – videos and images
- Photobucket
- Scribd
- Viddler
- Vimeo
- YouTube – public videos only
- WordPress.tv
You embed a video using the URL as follows:
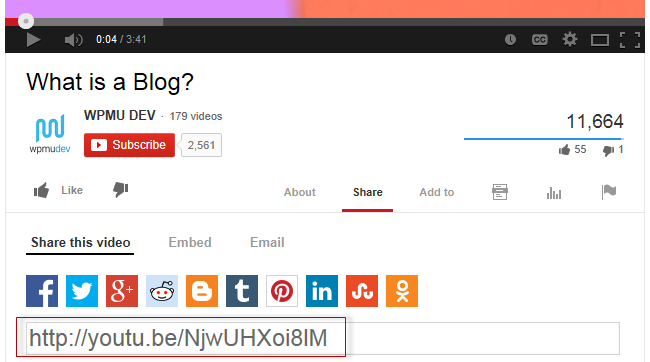
1. Copy the video’s URL from your web browser’s address bar while viewing the video.
- For YouTube videos, you need to use the video URL listed in Share this video.
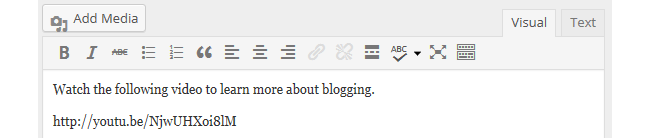
2. Go to Posts > Add New or Pages > Add New or open an existing post or page in editing mode.
3. Paste the URL on a line by itself in your post/page editor.
Important URL Embed Tips
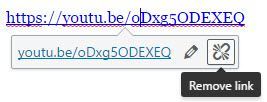
The link must be on its own line without any characters or whitespaces before or after the URL and must not be hyperlinked otherwise it won’t embed.
You can tell if a URL is hyperlinked by clicking on the link. If the hyperlink button in the toolbar highlights and a link box with the option to edit appears, like the screenshot below, it means your link is hyperlinked.
Click on Remove Link icon to remove the hyperlink.
Using Embed Code
You can also embed videos using their embed code.
This is handy when you:
- want to change the size of the video embed
- want to remove related videos when embedding YouTube videos, or
- are embedding from a video sharing websites where you can’t use the video URL (e.g. Ted Talks, SchoolTube, or TeacherTube).
Here is how you remove suggested videos using the embed code:
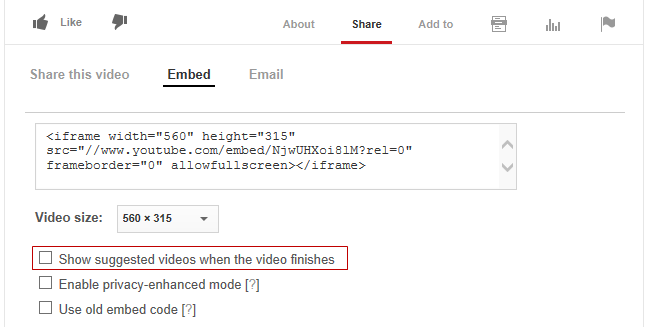
1. Click on Share underneath the YouTube video you want to embed.
2. Click on Embed and then on Show More.
3. Deselect Show suggested videos when the video finishes.
4. Copy the embed code.
5. Go to Posts > Add New or Pages > Add New.
6. Place your cursor where you want the video to appear and then click on the Add Media button.

7. In the Add Media window click on the Insert Embed Code tab.
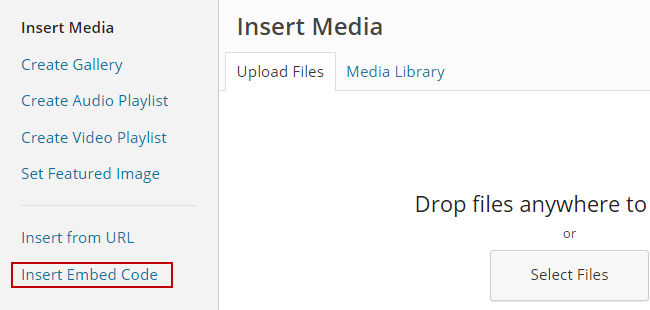
8. Paste the video embed code into the embed code field.
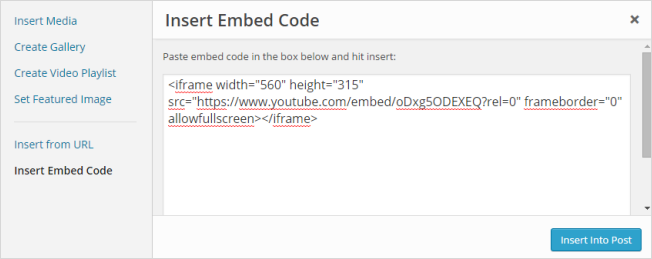
9. Click on Insert into Post.
10. Your Add Media window will close and the embed will appear in the visual editor as shown below.
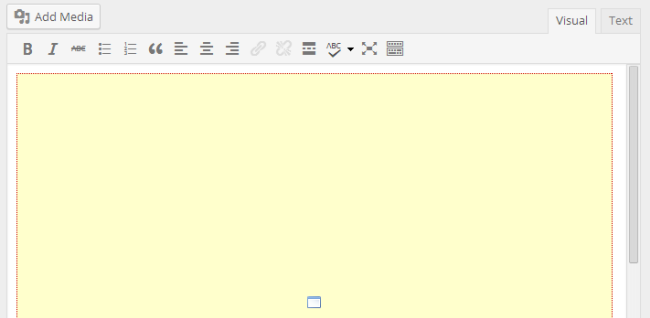
11. When you view your published post you will see your video.
Your Task
We’d like you to add your voice and ideas to our ongoing conversation about student blogging by completing the following tasks:
- Find a video on YouTube or Vimeo that you would like to share with students and embed it into a blog post using the URL method. Or choose one or more of the video creation and editing tools listed and try using the tool with or for your students. For example, you could create an Animoto to introduce yourself to your students and parents then embed it into your About page, or you could get your students to bring photos of their holidays and create their own Animoto. Leave a comment with a link to where you’ve embedded the video so we can check out how you went.
- Read through the most recent comments in reply to this step and leave a response to another person’s comment.
Hi Sue,
As stated in previous comment (step 8) I attempted to upload a video to the class blog but it is too large. However, I have been able to embed YouTube clips. Please see http://pnpsstage1.edublogs.org
I have used several of these, and am excited to add some of our videos to the blog. With all of these tools, our blog will become much more of our public face and open access for more interaction with parents and the community. I am adding our PSA videos from the 7th grade that I uploaded to YouTube. I just wonder with all of the extra videos and other tools if I will hit some sort of data limit.
http://mrskoudelka.edublogs.org/psa-project/
I have been using PhotoPeach but had never created a quiz. I did this for this challenge and imbeded it into my blog for my 6th graders. I was really happy to have in one place all of these video sources along with tutorials. I have struggled with iMovie and worked with editing some of the videos I had loaded. I ran out of time to finish these to post. I have a premium Glogster account and my students are really into Powtoons. Examples of student work can be found on my blog. I am going to play with Explain Everything will on spring break.
Thanks again and again for all of this knowledge!
Shane
http://sbharrison.edublogs.org/
I normally use either iMovie (if I’m using an iPad) or Movie Maker (if I’m on my computer) to create videos for our blog. I find both programs really easy to navigate and simple to create videos with. I’ve also had my students create videos using the PuppetPals app recently. A few of the videos are on our blog- http://103classblog.global2.vic.edu.au/
Can’t wait to have a look at a few of those other programs as well.
Great post, Sue! We love hearing about teachers implementing video in their classroom. Have you tried WeVideo? A lot of teachers love it because it is easy to use on Chromebooks, integrates seamlessly with Google products and it offers some of the great features you mentions like slow-mo and green screen.
Once again, I tried to embed a video into my blog post, but this requires you to upgrade to a paid blog subscription. http://arkelly.edublogs.org/2015/03/15/woodrow-wilsons-14-points/
My students are currently working on creating a WWII timeline in a creative video fashion. Some ideas to get them started included a Magic Schoolbus Tour or a History Channel special.
MovieMaker and Wevideo were my suggested editors, but they usually know more than I do, so I will also be open to anything they come up with.
Hi Mrs Kelly
If the videos are uploaded to a service like YouTube or Vimeo you can add using their video URL – http://help.edublogs.org/embedding-with-a-url/ Using the URL is easier than using embed code.
Sue Waters
Support Manager
Edublogs | CampusPress
Hi all,
I embedded a YouTube video on gestures and body language into a nonverbal communication blog post using the URL method. The following is the link: http://wjsheban.edublogs.org/2015/03/15/nonverbal-communication/.
I also created a PhotoPeach quiz to test my student’s recognition of nonverbal communication by uploading images from my Colourbox.com account. The quiz is embedded in the same post: http://wjsheban.edublogs.org/2015/03/15/nonverbal-communication/.
Once my students are comfortable navigating video tools, I would introduce them to digital storytelling. They are newcomers to Canada so they would have interesting stories to share about their journey over and/or settlement challenges.
Thanks for reading,
William
I love adding videos – they are right up my alley, as I have a library blog and so love adding book trailers.
Here is one: http://esclibrary.edublogs.org/2014/11/06/great-read-wool/
Also have created an animated gif. – but this was done a while ago, so not sure about copyright here. May have to look at it again.
cheers,
Tracey
One of the video tools that I really enjoy is photo story. I use this every year for our end of the year presentation in Kindergarten. It’s free to use and it lets you use whatever music you want, provided you have the mp3. However, I wanted to try out something new for my blog, so I made a photopeach! I had a lot of fun creating it, and it was very easy to use. I think the best thing about photo peach is that you can use youtube music and you don’t have to actually own the mp3 for the music you want. I made a new post about plants, since we are starting that unit this week. I wanted to use the video to introduce the topic and ask some questions, and hopefully get the students excited about our plant unit. I also embedded a vimeo for “Green Eggs and Ham” into my “Cat In The Class” post. Here is the link to my blog! http://mholley.edublogs.org/
Can’t embed but uploaded a link:
http://mrssimonssays.edublogs.org/2015/03/10/what-does-the-tooth-fairy-do-with-all-those-teeth/
Hi,
You can embed videos on your blog using the URL method. If you look at your post, you’ll see I was able to add a YouTube video by just pasting the URL onto a line all by itself.
I am using Screen-o-matic to show my students how to add an “About Me” page tomorrow to their blogs for the week 1 student blog challenge activity. It is very helpful! I also like to incorporate videos whenever I can to catch students interested and get them thinking. I want to work on student made videos next.
http://nmccammond.edublogs.org/
I’m so happy you’ve shown us how to embed video! I hadn’t even thought of that. I used clips of a movie version with students reading a novel and it would have been great to embed, but now I’m really happy because my students will be creating iMovies and I can teach them how to embed them into their own posts! Yahoo! Thank you so much. We will also be utilizing animation apps. Can iBooks be embedded easily?
I am fairly sure they can be added as long as the file type you upload to the site is an .epub file. I’m not 100% certain though. If you want to upload one and run into issues, email our support team and we’ll be glad to help.
Hi Ms McFadden
Karen Arrington wrote a detailed post to explain how to create a share iBooks using Book Creator. You can read her detailed tips here – http://tvstechtips.edublogs.org/2015/02/22/workflow-and-book-creator-sharing-the-creations/
Sue Waters
Support Manager
Edublogs | CampusPress
Hello!
I did it!
With your tips, I could introduce the movie on my blog.
You can see it here: http://espacocrescer.edublogs.org/3-historias-com-todos/
Thanks!
Great stuff! Glad these tips pointed you in the right direction!
Thanks again 🙂
I have used several times the Movie Maker to produce videos about the activities we have done.
Here is one:
– http://www.educaovamosconversar.blogspot.pt/2014/12/reportagem-de-natal.html
I hope you enjoy!
Sónia Abrantes
I enjoy using Windows Movie Maker. I often use it as a tool to create work and for students to respond/ reflect or evaluate. I found it a little tricky using google to get the embed code… but perservered and got it!
http://qpsit.edublogs.org/2015/03/09/windows-movie-maker/
Thanks for the challenges
Thanks for your comment. I’m glad to hear you are making progress with Movie Maker, and with the Google embed code! 🙂
Not strictly a video but a slide share presentation that I have made to teach students how to use the online citation generator, Cite This For Me.
Creating online videos and slide shares for instruction is ‘flipping the learning’ so that students can watch as many times as they need, slow it down, speed it up, so that valuable class time can be spent on improving student learning.
Here is my link: http://jenncain.edublogs.org/2015/03/08/academic-honesty/
I have created several book trailers using PhotoStory, Animoto, and Movie Maker. I have the free version of Edublogs, however, so I was not quite sure how I would be able to post a video. As it turns out, I was able to insert a book read aloud for The Diary of a Worm video from Vimeo on my blog with a URL link and it works!
I have learned how important it is to make the blog interactive, so I have asked the students to post comments using the video as their resource comparing and contrasting the book character with real worms. My second grade students will be so excited to watch the video and respond using the blog. They will be engaged in the whole reading, writing, and listening experience using the blog as a tool. This is an awesome way to incorporate so many of those English Language Arts Common Core Standards.
The link for my inserted video on the blog is: http://mrsholley2.edublogs.org/2015/03/08/diary-of-a-worm/
Hi Sue
This all makes sense now with the change that you made to when i was trying to add the video about positive commenting by the wonderful Mrs Yollis’.
Have updated another post that I did regarding Chinese New Year and the Zodiac to apply the skills that I have just got my head around for this challenge. It all seems to be falling into place at http://mrspayne143.edublogs.org
Thank you for your help and encouragement!
Ellen
I do a variety of video projects – both with my students and for sharing what’s happening in my class.
My fifth grade classes use iMovie for a big video production project. The first year that I did the project, I had the kids create Internet Safety PSAs. I thought the students were really creative. Last year (and currently this year) the content of the project has been changed to have the students create videos for the Admissions department. This has turned out really well because the videos are used for a real purpose and an authentic audience. We aren’t finished with this year’s videos yet, but here is a link to a playlist of last year’s videos: http://www.youtube.com/playlist?list=PLsA1FcZKE_0Q-pyGovRqoecrMxtgEnsvh.
I really liked the YouTube Copyright School video! I will now share this with my fifth graders for their video production project. I plan to post it in our Fifth Grade Computer Class Edmodo group. This Edmodo group is an excellent way for the students and myself to share resources and communicate in a secure way.
I am currently working on a new video project with my second grade students using the Green Screen app by Do Ink. We are creating video diaries of Native American tribes based on research that they have done. I don’t have a finished product to share quite yet, but so far so good. One tip about the app to save others from being initially confused like I was… All of the tutorial videos that I viewed (one of them on the app itself!) indicated that your video clip should be placed on the second layer of the timeline, but when I tried this, it didn’t seem to work properly. I discovered that it works if we put the video on the top layer and the images on the second layer. I think that you are supposed to put your video in the second layer only if you have the add-on animation features in the top layer of the timeline.
One video creation tool that I did not see listed is called Splice (iPad app). I love this one! I haven’t used it with students, but I use it to put together my own videos to share what’s happening in class. I often send out a tweet with a link to the video. It’s really simple to use. I just use the free version, but I think there is a paid version for more features, however I have found the free version to be sufficient. You are able to upload still images and videos, add transitions, music and text. Once the video is complete, I save it to the camera roll and then upload it to YouTube. Here is an example of a video that I created with Splice: http://youtu.be/raiDrr3MYXM.
I forgot to include a link to a good tutorial that I found for Green Screen by Do Ink if anyone is interested in checking it out: Do Ink Green Screen Basics – http://youtu.be/LWAHxtpPp24
I use video extensively in my flipped classroom – I use the pro version of screencast o’matic – it is only $15 and gives many extra options. Other programs can be really costly for similar options. I then embed my videos in educanon, so I can track student use, assign specific questions and gather feedback.
I really like the idea of stop-motion video. I don’t know if I would use it on my blog, except maybe to post an example of work, but I am having the students use stop motion apps on their phones to model some of the biological processes we are studying.
Jen K
Hi Jen
Thanks for sharing how you use Screencastomatic and educanon. Are you able to share a link to your videos on educanon? Would love to have a closer look at how the videos are managed on educanon. Would also love to check out any student videos created using the Stop motion app. Please let us know if you have any you can share.
Have you tried the Explain Everything app with your students?
Sue Waters
Support Manager
Edublogs | CampusPress
Sue Waters
Support Manager
Edublogs | CampusPress
I can’t use videos from You Tube at school because they will only play if a teacher is logged in. I am not very familiar with Vimeo, but I added a video from their site to a new page on my blog. It explains using blogging in the writing process, really more from a teacher perspective, but older students would benefit from watching it as well. The link to the page I added it to is: http://msvotaw.edublogs.org/videos/
I usually use Pinnacle to edit my videos because of the green screen technology. I do a weekly news broadcast, edit using Pinnacle and upload it onto School Tube. I then embed the video in our school website the first day of the week for students to watch.
My students uploaded their book trailers made in imovie to the blog. We sent them from imovie to Google Drive, then used cloud convert to make them into an mp4 for easy upload to edublogs. http://blogs.neisd.net/jodiharris/category/realistic-fiction-book-trailer/
Hi Jodi
You can embed videos from Google Drive into blog posts using their embed code. Let me know if you would like instructions on how to embed directly from Google Drive.
Sue Waters
Support Manager
Edublogs | CampusPress
I love using video in my library. My students all seem to be pretty comfortable in front of the camera. I have a group of 5th graders who meet before school and create a show called Tiger News. They write, perform, and tape the entire show themselves. I do most of the editing. Our video are uploaded to Vimeo so I was very interested in trying to add a video to a blog post by using the URL. The method worked perfectly. The video popped up almost instantaneously upon pasting the address in. I usually use the embed code to add the videos to the school webpage. I may have to re-think this for next year because this was so easy.
You can see the latest edition of Tiger News on this blog page : http://swiseman.edublogs.org/
Kindergarten students created trailers for the shapes they were learning about in class using iMovie. To share we uploaded the videos to YouTube from within iMovie. The link to the post is below. http://amyard.edublogs.org/2015/03/04/shape-videos/
Kids could do the same type of project using many of the sites listed above. For classrooms with mobile devices it is so easy to use apps where students can take their picture with the mobile device, edit the video, add text, and publish their work all in one place. I find for younger learners the mobile devices are the way to go for video publishing. If you do not have access to the free download of iMovie to recommend Animoto.
I love adding other features to my site but alas, without a paid Edublogs Pro account, I cannot embed widgets.
My attempts at adding my Twitter feed widget can be seen at: http://nancyvculture.edublogs.org/, where a link will take you to the feed.
I have successfully embedding code into Moodle and into the Desire2Learn LMSs, though.
I’m really intrigued by Explain Everything, and will explore that next.
Hi Nancy
I’m sorry but you can only add embed code to Edublogs Pro blogs and student blogs attached to a Pro blog via My Class. We can’t allow it on free blogs due to misuse by spam blog creators (people who create blogs to promote products and websites).
You are able to add videos using URLs on all blogs including free blogs – http://help.edublogs.org/embedding-with-a-url/
Sue Waters
Support Manager
Edublogs | CampusPress
I am very familiar with using Youtube and Schooltube. I have also used a variety of other sites such as Animoto and Vimeo to work with videos. We use Schooltube daily to upload our daily broadcast and place the link onto our school page. I also use Youtube every Monday to share a math video with the students. After exploring, I chose to insert a URL into a newly created post. The URL will take you to our Schooltube page. I also placed our school logo as a picture on the post. http://swatkins.edublogs.org/
The video I added was from Vimeo. I choose this website as it is not blocked from our school. You can see it on my page called Blog Guidelines at http://sjaslmc.edublogs.org/blogging-guidelines/. It was a little tricky because I added it to a page I had text written on it. I had to write a short code in front of the url to make it work.
I used Animoto to display students projects and activities on my About page. I will definitely allow my students to use this tool to make videos for their blogs.
I am planning to have my newspaper staff use Powtoon to introduce their topics they will blogging about. I will ask them to write a 250 script, record it, and then add images. Students will publish it and embed it into their post.
I liked the 50+ Web 2.0 Ways to Tell A story because it had so many video tools be used to tell the story. He did a great job of putting these tools together to make a video that is so helpful to educators. I am familiar with most of the video tools in that video and mentioned on this post, but have not used all of them. My favorite video editor for teachers and students is Windows Movie Maker because it is readily available on all district computers and it is easy to use. The only drawback is that is does not have green screen capabilities. I use a software called Pinnacle for green screen purposes.
I teach a class that introduces teachers to Photo Peach and Photo Story. Both use pictures to create a video and both are free to use. I was not able to embed Photo Peach because that is a feature of the Edublogs Pro version, but I did link my Photo Peach on a new post.
http://dspears.edublogs.org/2015/02/20/photo-peach/? preview=true&preview_id=43&preview_nonce=369c2097d6&post_format=standard
Hi dspears
Alan Levine’s 50 Ways to Tell a Story is inspirational. It is packed with so much usual information. You may find Laura Moore’s poster series helpful for your teachers and students – http://mooreti.edublogs.org/2014/09/01/what-will-you-create-today-2/ Laura’s created a series of posters that you can display around the room.
We had to restrict ability to embed to Edublogs Pro blogs and student blogs attached to a Pro blog via My Class because spam blog creators (people who create blogs to promote products and websites) misuse it. I’ve embedded your Photo Peach into your post.
Sue Waters
Support Manager
Edublogs | CampusPress
Thanks for all the information. I have previously used iMovie and photopeach. I made an Animato of my cat (but it has the water mark on it) as well as embeding a YouTube clip that I used with the children this term. The Animato can be found under the About Me tab. The link is here: http://library1884.edublogs.org/about/ and the You Tube clip can be found under the Botany tab – Stage 2B tab. The link can be found here: http://library1884.edublogs.org/2014/08/31/welcome-to-stage-2-blog-2/#comments
I also embedded a Photopeach that I made with the children in 2012. Currently it is on the home page but I would like it on the general page and I don’t know how to move the post to a particular page. Help with that please. The link to the photopeach is http://library1884.edublogs.org/2014/09/26/jack-and-jill-photo-peach/
My blog can be found at library1884.edublogs.org
Hi library1884
Thanks for sharing a link to your videos! I can’t remember if we helped you move the Photopeach via email or not. Please let us know if we didn’t and you still need assistance with this.
Sue Waters
Support Manager
Edublogs | CampusPress
In order to introduce my high school students to blogging I embedded the Edublogs video “An Introduction to Blogging” into a blog post. http://mrscapalbo.edublogs.org/2014/09/18/sub-plans-for-918/ I incorporated it into a lesson plan for a substitute teacher while I was out with laryngitis. It worked perfectly to deliver all of the information I wanted them to familiarize themselves with before doing some research on their own.
I am working on a lesson combing Animoto and the photos that students take for my class. I think it will be a meaningful way to combine their artwork and music to create a powerful presentation of work.
Amy Capalbo
Hi Amy
Thanks for sharing a link to your student “Intro to blogging” post. It is really great! I’ve scheduled it to tweet out later today to share with others.
It was great to see how you were able to use your blog to support the substitute teacher while you were out with laryngitis. Hope you are feeling better?
Love the work you are doing with your class and student blogs. Please keep us updated with how their work goes!
Sue Waters
Support Manager
Edublogs | CampusPress
Thanks Edublogs for the great ideas. I have been using Vimeo as it is so easy to use and insert videos into the blog. I have also used Explain Everything with students on ipads but have not yet included any on the blog but is something to work toward. I have also started to investigate Photopeach so will hopefully be using this soon.
http://yrprepj.edublogs.org/
Hi Jenny
Hope the ideas helped! Explain Everything is a great app. I really need to make time to test out all the different features Explain Everything offers! Photopeach has been quite popular.
Sue Waters
Support Manager
Edublogs | CampusPress
i Have used animoto before and like the idea of creating an intro video for this years open house and posting it on my about page. I plan to do this this week and will post a link in a later comment. I also checked out explain everything and powtoon. Powtoon looks like lots of fun and I may actually use this to create the about (me) video. I will also create a blog post -for later in the semester- explaining why we use video and introduce my class to a couple of the tools you have suggested. here. Thanks for all the great links and instruction!
Mrs. C
HI Mrs C
Animoto has been a popular choice for Open house and meet the teachers this year. Explain everything and powtoon are both also very popular and used for a range of different purposes.
Looking forward to checking out the innovative ways you use these different video tools!
Sue Waters
Support Manager
Edublogs | CampusPress
I love using Explain Everything both for me to explain a concept to my students and for them to demonstrate learning to me. Although I like it with almost any subject, I think math adapts really well for this. I had students make review videos in class and then I posted them to our class blog for them to use as a study tool for their tests. Here is a blog post I wrote explaining how we used it: http://pwillemse.wordpress.com/2011/11/24/reviewing-integers-with-ipads/
Hi Petra
Thanks for sharing how you use Explain Everything! Learning how to use Explain Everything is on my to-do list because it has been a very popular app with educators.
Sue Waters
Support Manager
Edublogs | CampusPress
This challenge really opened my eyes in how to create an excellent blog. I know that over the school year, I will continue to add more neat videos! I had forgotten the importance of citing your sources even when using pictures and videos too! It is my hopes that some day I will be able to update to the pro version of Edublogs, so I can do even more with my blog.
I wish that my after school program would have more technology because it would be so fun for them to create an Animoto telling the other children what they did over the summer or just a little bit about themselves. I am sure the parents would love to see what their child would come up with.
I also know that my boss loves my blog and wants other after school teachers to do something similar. I am going to recommend Edublogs because they are very helpful with getting everything started!
Thanks for everything!
Roxanne
Check out my current Blog….must say I am proud and have many more ideas…
rkorte78.edublogs.org
Hi Roxanne
You should be very proud of your blog! As I’ve mentioned before you’ve done a truly incredible job with customizing the look and feel! Design is one area I struggle with so it is great to see others do an incredible job.
Sue Waters
Support Manager
Edublogs | CampusPress
I would like to try and use the Animoto app with my classroom. It would be neat for students to try and advertise I book they have read
Hi Dallas,
Yes, that would be a great application of using video with your students! I’m sure they’ll love the Animoto app; it’s fun and easy to use.
Dan Leeman, Edublogs Support
I have used Vimeo before but have deaf students in my class who require subtitles so I have not been able to look much further into it – is there a video sharing tool that allows you to insert subtitles into videos?
Hi Katie,
Yes, YouTube supports video closed captions and subtitles: https://support.google.com/youtube/answer/2734796?hl=en
I don’t have experience with it, but it looks like Vimeo supports it as well: http://vimeo.com/help/faq/managing-your-videos/captions-and-subtitles
Thanks,
Dan Leeman, Edublogs Support
It is quite a thrill to use video in class and creating video lessons too. I have used Teachem for videolessons sometimes with my students, here you go the link: stopandlearnenglish.blogspot.com.es/p/video-lessons.html
You can create virtual video classrooms or embed your video lessons in your blog.
Collaborative video creation is also a good way to foster team work, digital skills and to motivate students. I ask them to create video trailers for their own projects, or to recommend books and so forth. Then we upload them to our Youtube Channel, http://www.youtube.com/user/majegsm/videos?view=0&sort=dd&shelf_id=3 and embed them in various posts. Here you are some examples:
stopandlearnenglish.blogspot.com.es/2014/05/density-experiment-breaking-science.html
stopandlearnenglish.blogspot.com.es/2014/05/ready-to-dance-samba.html
PowToon is another nice tool to create animated video clips and tutorials and them embed them in a blog: stopandlearnenglish.blogspot.com.es/2014/05/mad-about-pencils-and-music.html
But the sample I am most proud about is a vide clip one bunch of students created and blogged for me to give me a surprise as an end of the school year present. I was humbly honoured by their gift: stopandlearnenglish.blogspot.com.es/2014/05/to-our-great-professor-m-jesus.html
I hope you enjoy it all.
Best regards
Hi Maria,
I was so impressed by your YouTube channel! It was great to see how you and your students have used collaborative video. What a special moment to have received that video clip from your students at the end of last school year. That made me smile; they must have a great teacher 🙂
Thanks for sharing all of your examples!
Dan Leeman, Edublogs Support
Thank you very much, I do appreciate your comment.
It was a special moment indeed, one of those that boosts us teachers up to keep going.
I am really happy to have found you all at this challenge and hope we all collaborate and keep on working together, it is being a real pleasure to share with you all and learn so much from what you are sharing.
Best regards
Just wondering if anyone out there can recommend any good and low cost apps or programs for putting videos together. i took a few little clips i’d like to combine to add to my blog page. Thanks in advance 🙂
Hi Leah
Are you using an iPad or an Android? iMovie is a good option for combining videos on an iPad.
Sue Waters
Support Manager
Edublogs | CampusPress
getting the hang of this now, we did some powerpoint presentations last term using soft toys and taking photos to create a story, i have just added one of them to our blog using slide share 🙂 it’s great so much potential with this. My next step is to get the pinterest added and able to link up 🙂 need to get some photos uploaded there first. Hoping to get students doing their own video presentations that can be added to the site. For an art blog i am impressed with how much i can use ICT in my program now. Thanks heaps for all the good ideas and shares from everyone. check out my latest post here
http://leahsharp.global2.vic.edu.au/2014/09/09/photo-stories-from-34/
Hi Leah
The Slideshare looks excellent embedded into the post. Let me know once you’ve set up Pinterest so I can add the pinterest widgets to your sidebar. You may also like to have a look at our Pinterest account for ideas of all the different types of media you can add to boards – http://www.pinterest.com/edublogs/boards/
Sue Waters
Support Manager
Edublogs | CampusPress
I used a video from this learning challenge on writing comments:
http://mrsmacinnis.edublogs.org/2014/09/03/comments-that-get-more-comments/
The problem I ran into was that YouTube is cyblocked on the student computers in my school. I showed them the video from my laptop and told them they could rewatch it at home. There are many sites cyblocked at my school, including most blogs. I told the administration that students would need access to edublogs, so that was opened up, but the majority of sites with “blog” in the name are blocked.
It’s frustrating.
Hi Mrs Macinnis
Sites being blocked is very frustrating. It is worth checking to see if Vimeo and Media Core are blocked on your student computers. You may find they aren’t blocking Media Core and that might be your better option. You can test it using our Media Core channel here – http://edublogs.mediacore.tv/guide
Let us know if Media Core works so we can explain how you can use it directly from inside your dashboard.
Sue Waters
Support Manager
Edublogs | CampusPress
Thank you edublogs for such innovative ideas and approaches. This change my whole outlook how
I can enhance my students outcome by using video creatively.
Thanks for some great ideas. Have used Photopeach, Explain Everything and Vimeo. There are just so many options now! All great apps. Vimeo is particularly easy, we had to upgrade to achieve privacy settings. You can see some Vimeo inserts here.http://prepg.edublogs.org Thank you.
Hi Fiona
Do you have a favorite video creation app for on your iPads?
Sue Waters
Support Manager
Edublogs | CampusPress
http://leahsharp.global2.vic.edu.au/2014/09/07/henri-rousseaus-jungles-grade-56/ is the latest post i love the idea of videos in the blog especially as i use a lot of clips to tune in at the start of art sessions. I’m hoping to do some of our videos on artists or how to clips with students hosting them. This is such a useful tool. thanks heaps for the clear instructions on this one.
HI Leah
There are so many different ways you can use videos with art. Do you have a pinterest account? I’m thinking you could also curate the different videos into Pinterest boards and add the Pinterest boards to your sidebar.
Sue Waters
Support Manager
Edublogs | CampusPress
So funny! In our latest blog post, my students chose to write about the brain breaks we take in class using gonoodle.com. They asked me to video them taking a brain break so their parents would be able to see it. I filmed them on Friday, uploaded to Vimeo, and embedded it into my post. To accommodate specific safety concerns, I removed the ability to share and reminded parents not to share this information on social media.
http://Www.amandalevine.weebly.com
Hi Amanda
Really sweet that the students wanted their parents to be able to see what they are doing. There are also some video options that allow you to make your videos entirely private only viewable to selected people. Let us know if you want to know about these options.
Sue Waters
Support Manager
Edublogs | CampusPress
I embedded a video of an author speaking about a particular book within my most recent post. Shortly, I hope to get the kids to be able to do that as well, but it will take them some time to feel more comfortable with their blogs.
Hi Brandon
You use videos really well in your posts. I’m adding a link to your blog so others can have a look – http://brandonch58.edublogs.org/
Thanks!
Sue Waters
Support Manager
Edublogs | CampusPress
Thank you for the amazing resources! I have bookmarked the page for future reference. I haven`t used these resources before, but will now that I have the blog. I have also been playing around with a few that I think will be easy for my ones to use. I have embedded the Linda Yollis video from one of the previous challenges into our Blogging and Commenting guidelines page. http://essexcounty.edublogs.org/blogging-and-comment-writing/
I also created a VERY short Animoto that introduces me and our classroom. http://essexcounty.edublogs.org/aboutus/
Hi Mrs Essex
Glad our information on videos helped! It was one of the harder steps to write because there are some many different ways you can use video.
Animoto is a great way of creating a quick video. Thanks for sharing a link so others can check out your Animoto.
Sue Waters
Support Manager
Edublogs | CampusPress
Thank you for the countless resources you continue to pour into my teacher toolbox. Sometimes, I’m overwhelmed by all of the technology that beckons exploration. When that happens, I remind myself that I can cherry pick whatever I like–choosing just one or two new ways to incorporate video into my classroom instruction makes me a teacher who’s striving to connect with her students in meaningful ways. For my first class blog post since school began, I chose to embed a few YouTube videos. I will definitely tap into Vine and Vimeo once I have parental permission to photograph my newest charges. Thanks for all of these invaluable resources. So happy I am an Edublogs educator. 🙂 http://mrsrombachreads.edublogs.org/2014/09/06/top-10-things-i-loved-about-the-first-week-of-school/
Martha Rombach
Sixth Grade Language Arts Teacher
Hi Martha
All the options can be overwhelming but the key is as you highlight — cherry pick whatever I like. Work out what you are trying to achieve and then choose how you want to achieve it.
Glad the resources helped. Thanks for sharing your first week of school post. Great example of sharing the highlights of the week with other classes and your families.
Sue Waters
Support Manager
Edublogs | CampusPress
I love using video!! I use iMovie, Smilebox, Youtube, etc. I have never used Animoto and because I am looking for ways that are easy for my students to put together a video I chose to explore Animoto. I made a little video using some pictures to highlight some of our learner profiles and attitudes. Here is my link 🙂
http://kidblog.org/MrsLeonardandMrsDsKindergarten/
Hi Bernice
You’ve created a lovely Animoto. I’m adding a link to the post with the Animoto so others can check it out – http://kidblog.org/MrsLeonardandMrsDsKindergarten/a38ce426-c793-4fbf-9419-11cc6a3db262/our-learner-profiles-and-attitudes-in-action/
I’m also adding a link to your Smilebox – http://kidblog.org/MrsLeonardandMrsDsKindergarten/a38ce426-c793-4fbf-9419-11cc6a3db262/124/
Thanks for sharing.
Sue Waters
Support Manager
Edublogs | CampusPress
http://karabeal.edublogs.org/2014/09/05/hunger-games-vs-the-giver/
I have made a new post for students to compare and contrast a Vlog Brother discussion about “The Hunger Games” and President Snow to what has occurred in “The Giver.”
Hi KBeal
I’ve added your YouTube video as an embed so your students can watch the video directly in your post and so you can see how easily it is to embed video and other tools using their URLs – http://help.edublogs.org/embedding-with-a-url/
Sue Waters
Support Manager
Edublogs | CampusPress
For now, I’ve embedded the You Tube copyright video on my parent page. I thought both the students and their parents should be aware of these rules.
Hi Linda
Great idea to include information on YouTube copyright on your Fair use page.
Sue Waters
Support Manager
Edublogs | CampusPress
Sue:
Many thanks for the hints about using video productively in the classroom. In my case, when teaching Geopolitics and current Affairs at university, I created a blog mainly for posting supplementary material for my students. Some of this consisted of video clips with transcripts in pdf which they could download from the blog. My problem is that while many news organisations do provide good transcripts, not all do, and so I can not use some very good clips. While I am aware that good software is available for the Microsoft universe, I have not been ale to find any for the Mac, so if you can point me in the right direction I would be most appreciative.
Ours sincerely,
Warwick Francis