Step 9: Creating and Using Video
Welcome to the ninth step in our free professional learning series on class and student blogging!
The aim of this step is to:
- Provide an overview of creating and using videos with students
- Help get you started using video or get more out of using videos
Why Educators Use Video
Educators use videos for a wide range of purposes including:
- To motivate and engage students — students enjoy using technology to create their own videos.
- To supplement or enhance a lesson to bring the topic to life.
- To provide instructions that students can review anytime, anywhere. This is handy for when students are absent, to help students with extension or extra support, and for exam revision.
Below is an overview of using videos to help get you started. We’ve embedded examples and included video tutorials where appropriate.
Video can be used in so many different ways and it’s impossible to cover them all. Feel free to share your own favorite ideas and examples!
Back to Top
Video Creation And Editing
There is a wide range of video creation and editing tools and apps available. You can use these to quickly create and/or edit videos.
Back to Top
Animoto
Animoto allows you to create videos from photos, video clips, and music either on the web or on an app on your mobile device.
Animoto is a wonderful tool to use with students because it’s quite intuitive. It allows students to focus on content creation without needing to learn video editing or manipulation.
Using Animoto is as simple as uploading your images, video, and audio, or selecting files from Animoto’s media files, and then letting Animoto mix the images, video, and music together to create a professional-looking video in minutes.
Educators can sign up for a free account which comes with 50 student accounts.
Here’s a very simple example of an Animoto made for a Cross Country event. Like a lot of these tools, you can add a lot more detail if you want to.
Check out more examples of Animotos created by students.
Book Creator
Book Creator allows students to quickly create their own beautiful books. We’ve included Book Creator in our video section because books created using this app are often shared as a video.
Karen Arrington has some great posts about using Book Creator with her students:
- Learn all the different ways you can share your books including sharing as a video.
- Numerous ideas for using Book Creator with different ages.
The free plan allows you to create one library of up to 40 books.
Check out this short video by Holly Clark that demonstrates how to get started with Book Creator.
Explain Everything
Explain Everything is an app that lets you annotate, animate, and narrate explanations and presentations.
Here is another video tutorial series on using Explain Everything.
Here’s an example of Grade 2 student using Explain Everything for increasing patterns.
Instagram is a social networking platform that is designed for sharing photos and videos. Users can apply digital filters to their images and share them on a variety of social networking services, such as Facebook, Twitter, Tumblr, and Flickr.
Read Larry Ferlazzo’s article on using Instagram videos with students. Also, check out his vocabulary videos by English Language Learners.
Watch this video created by one of Larry’s students using Instagram.
http://youtu.be/ClL1VminenQ
Instagram is restricted to those who are 13+.
You can learn more about using Instagram here.
iMovie
iMovie is a free video editing software application for Mac computers and iOS devices.
Educators use iMovie if they want to use free software to create or edit movies on their Apple devices.
iMovie allows you to easily combine your images and photos, with audio or music, to make professional looking movies.
The iMovie app is an essential app for quickly creating movies on iOS devices.
Watch this video to learn how to use iMovie on an iPad.
Loom
Loom is a free screencasting tool available via Chrome extension. You can use on Mac, Windows, and Chromebooks. Loom allows you to record your camera and screen with audio directly from your Chrome browser. You can then download your video, embed it on your blog, or share it via social media or email etc.
Screencasting is such a versatile way to use video in the classroom. Not only can teachers make tutorials, but students can share their learning as a screencast by narrating their digital creations.
For a very simple example, students could narrate a Google Slide presentation.
Below is an example of a Loom created by Kathleen Morris.
PhotoPeach
PhotoPeach allows you to quickly upload photos to create great looking slideshows and simple quizzes. Refer to these instructions for creating PhotoPeach quizzes.
Learn more about animals on PhotoPeach
PowToon
PowToon allows you to create animated videos and presentations.
Here is an example of a PowToon created by an educator.
Screencast-O-matic
Screencast-O-matic is an easy, free way to record screencasts on your computer. You can record the screencast online using their website or download their app onto your computer.
Tom Perran uses Screencast-O-matic with a Wacom Pen tablet to make instructional videos for his math classes using his laptop.
Here is an example of a video created using Screencast-O-Matic.
Lots of educators also use Screencast-O-matic to create how-to screencasts.
This video on “How to Participate in a Twitter Chat‘ by Vicki Davis was created using Screencast-O-matic.
Lumen5
Lumen5 offers a simple way to make a slideshow type video.
It can even “automagically” make your blog post into a video (for best results you’ll need to edit it slightly).
Lumen5 contains a library of Creative Commons Zero images and music so you don’t need to search for content either (although you can use your own pictures and video).
The only downside (apart from it being a 13+ tool) is you can’t embed your video directly onto your blog. So you have to put it on social media or YouTube first and then get the embed code from there (see below for instructions). Or you could download the video and upload it directly into your post/page.
Early in 2018 we made a promo video for our Better Blogging With Students course.
Video Techniques
Creating videos can be as simple as recording a video on your phone, tablet, or camera and then sharing it with the world. Of course, a lot more elaborate techniques and editing can go into video creation as well.
Below are some examples of different video techniques used with students.
Back to Top
Digital Storytelling
Digital storytelling refers to a short form of digital media production that allows everyday people to create and share stories.
Stories through the lens is an excellent resource to help you and your students create great images and video for digital storytelling.
RSA Animate Style Videos
RSA Animate style videos combine illustrations that follow along with what the speaker is saying.
Here is an example of a well known RSA Animate video.
You’ll find detailed instructions for creating RSA Animate Style videos with students here.
Stop Motion Video
Stop motion is an animation technique to make a physically manipulated object appear to move on its own. The object is moved in small increments between individually photographed frames, creating the illusion of movement when the series of frames is played as a continuous sequence.
Dolls or Lego with movable joints, or clay figures are often used in stop motion for their ease of re-positioning.
Here is an example of a Lego stop motion video.
Learn more about making stop motion movies with students here.
Using A Green Screen
Some educators use a green background in front of which moving subjects are filmed so they can add a separately filmed background to their video.
This technique is known as chroma keying. It is commonly used for weather forecasts, news telecasts, special effects in movies, and video games.
Check out the green screen video Linda Yollis’ students put together for a global project.
Want to learn more about green screens?
- Tony Vincent has compiled some different green screen set ups.
- Jonathan Wylie has compiled green screen tips from teachers on Twitter.
Copyright And Videos
Video is more confusing than images because you see a lot of remixed videos online or videos using commercial music, especially on YouTube.
You are free to embed any video from YouTube, Vimeo on your blog or website as long as it gives you the embed option.
That being said, you (or your students) can’t necessarily use parts from videos on YouTube (or other sources) to make mashups or as part of another video.
If you use any video that you are cutting, making changes to, or adding to a project (or adding audio) it is better to either:
- use Creative Commons content
- use free or public domain content
- request permission from the copyright holder
You can read more about Creative Commons and free or public domain content here. Refer to The Educator’s Guide to Copyright, Fair Use, and Creative Commons for comprehensive information on the use of images, curriculum docs, text and quotes, music, videos.
YouTube Copyright Basics
If you do use copyright content on YouTube this is what might happen:
- The video and/or audio is pulled because of a DMCA complaint, copyright infringement or content ID match.
- No action is taken but they might add an advertisement to your video that says ‘Buy this song’.
The following videos are good for explaining video copyright to younger students.
Video Hosting Websites
Videos from video hosting websites such as YouTube, Vimeo, Media Core, SchoolTube and Google Drive can be easily embedded into posts or pages.
This is handy when you:
- have large video files you want to add to your blog posts
- want to play your video within an embedded player, or
- want to embed a video created by someone else into your posts.
Back to Top
YouTube
YouTube is the most popular video sharing and viewing website on the Internet.
While some schools block YouTube there are lots of educators who use YouTube to share videos. These videos could be created by the teachers, the students, or someone else.
We recommend you set up a class or teacher YouTube account if you plan to upload videos or create YouTube Playlists because this helps separate your work videos from your personal videos.
YouTube Playlists are a fantastic way of compiling a list, or group, of videos that play in order to share with students.
When one video finishes playing the next video starts. Using YouTube playlists you can control the start and finish times of each video — this is handy if you want students to watch specific parts of videos.
Watch this video tutorial to learn more about YouTube Playlists.
Vimeo
Vimeo is another popular video sharing and viewing website. Less videos are hosted on Vimeo compared to YouTube.
Vimeo is less likely to be blocked in schools compared to YouTube which is why it’s a popular video hosting website for uploading videos for class and for finding videos to use in class.
The free plans have some restrictions such as 500MB per week of upload space, up to 5GB total account storage.
Back to Top
Google Drive
Google Drive allows you upload video files up to 10 GB in size on your desktop computer or using the Google Drive app on your mobile app. You can then share them with specific people or embed them into posts and websites.
Google Drive is a popular video hosting option for schools using Google Apps for education. Many of our Google Apps for education schools upload their videos to Google Drive and use the embed code to add to their posts.
Once you’ve uploaded your video to Google Drive you need to:
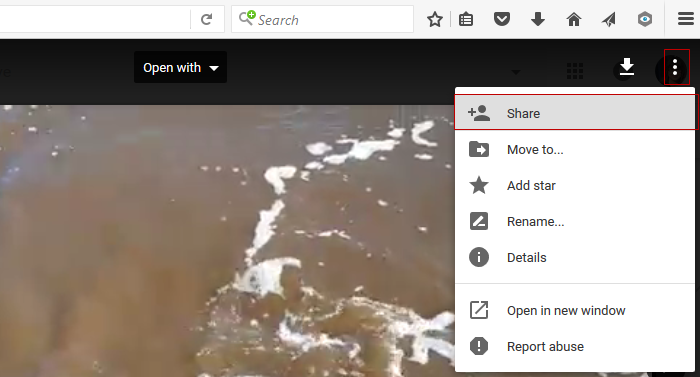
1. Click on the video or photo you want to embed and then click on the More icon and select Share.
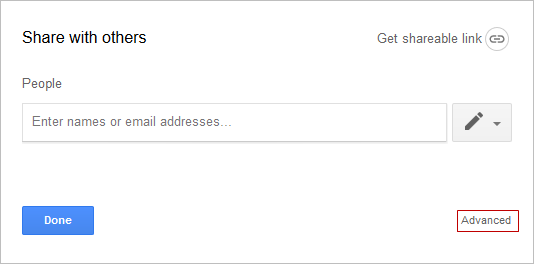
2. Click on Advanced option in Share window.
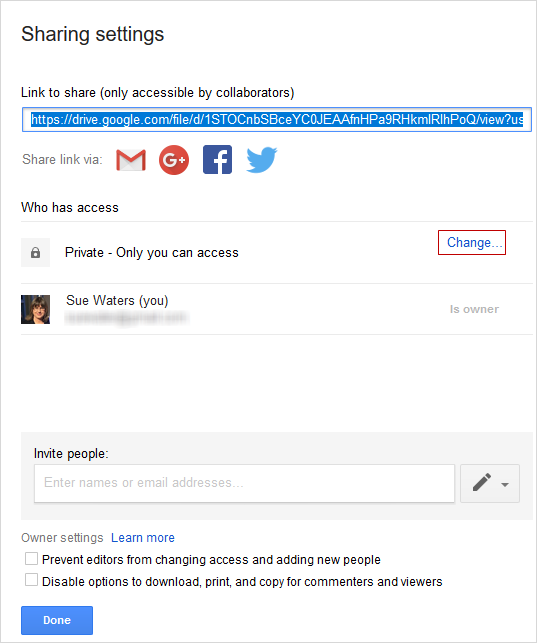
3. Click on Change next to Private.
4. Click on On – Anyone with a link or On – Public on the web and then click on Save.
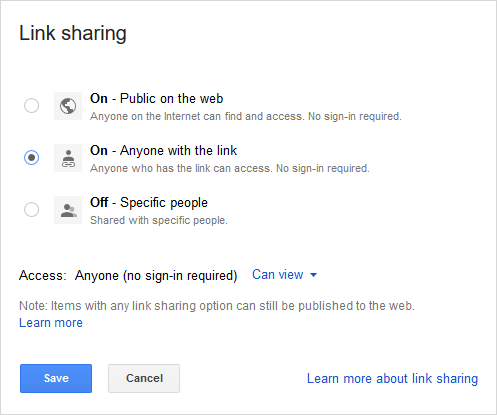
5. Click on Done to close the Share window.
6. Click on the More icon and then Open in new window link.
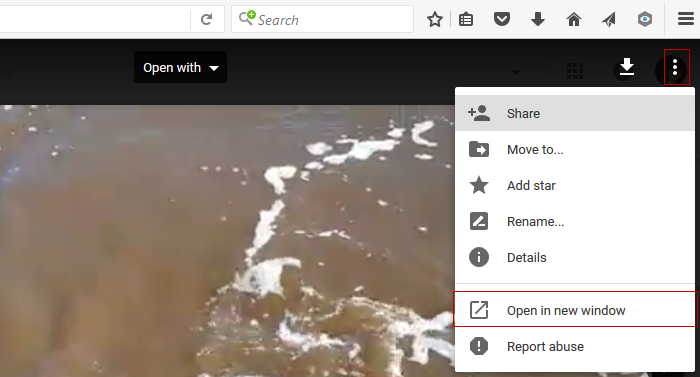
7. Click on the More icon in the new window and select Embed Item.
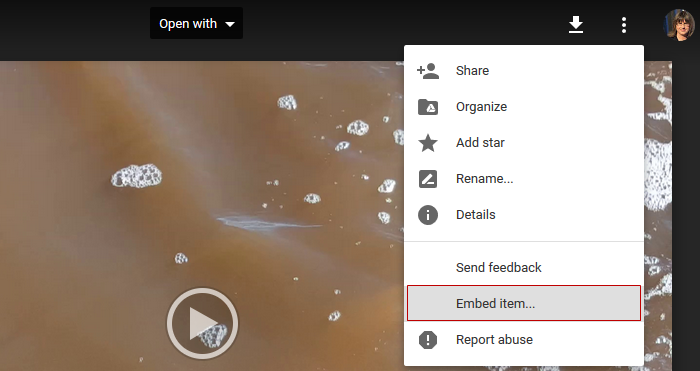
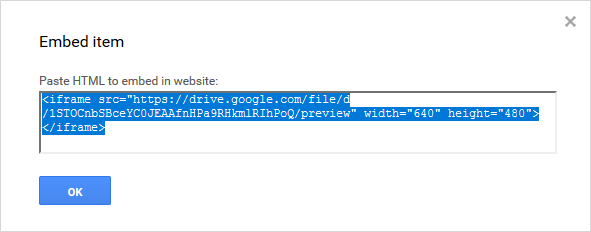
8. Copy the embed code.
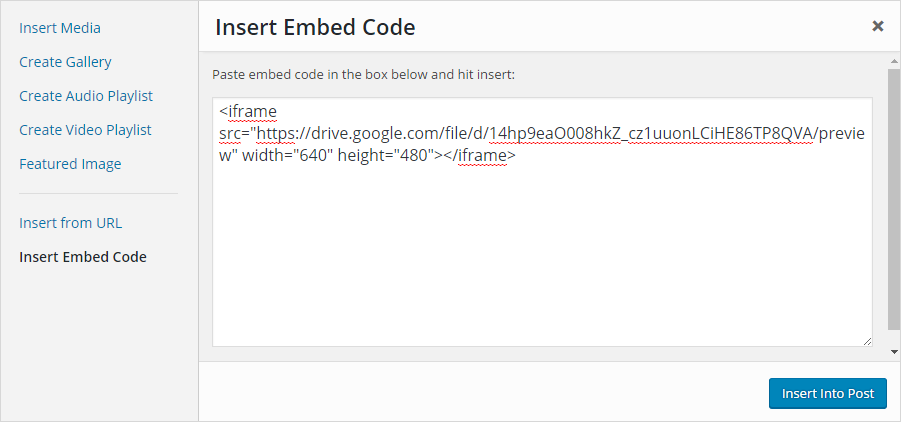
9. Paste the embed code into your post using Insert Embed in the Add Media Window and then click Insert into Post.
12. Once your post is published you’ll see your photo or video embedded.
Embed videos in posts
Videos from video sharing websites can be embedded into posts or pages by either using:
- The video URL
- The embed code
Note: Due to misuse by spammers, videos can only be embedded on Pro blogs, student blogs attached to a Pro blog, or CampusPress blogs. If you have a free blog, you can use the URL method which we explain below.
Using the Video URL
Edublogs allows you to quickly embed videos, images, and other content such as Tweets and Scribd into a post or page using their URL.
Websites that you can embed using their URL are:
- DailyMotion
- Flickr – videos and images
- Photobucket
- Scribd
- Viddler
- Vimeo
- YouTube – public videos only
- WordPress.tv
You embed a video using the URL as follows:
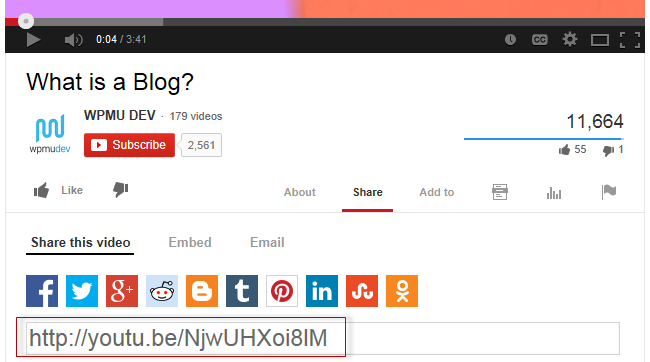
1. Copy the video’s URL from your web browser’s address bar while viewing the video.
- For YouTube videos, you need to use the video URL listed in Share this video.
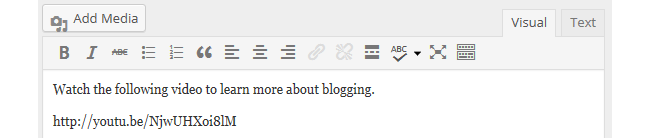
2. Go to Posts > Add New or Pages > Add New or open an existing post or page in editing mode.
3. Paste the URL on a line by itself in your post/page editor.
Important URL Embed Tips
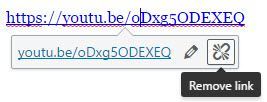
The link must be on its own line without any characters or whitespaces before or after the URL and must not be hyperlinked otherwise it won’t embed.
You can tell if a URL is hyperlinked by clicking on the link. If the hyperlink button in the toolbar highlights and a link box with the option to edit appears, like the screenshot below, it means your link is hyperlinked.
Click on Remove Link icon to remove the hyperlink.
Using Embed Code
You can also embed videos using their embed code.
This is handy when you:
- want to change the size of the video embed
- want to remove related videos when embedding YouTube videos, or
- are embedding from a video sharing websites where you can’t use the video URL (e.g. Ted Talks, SchoolTube, or TeacherTube).
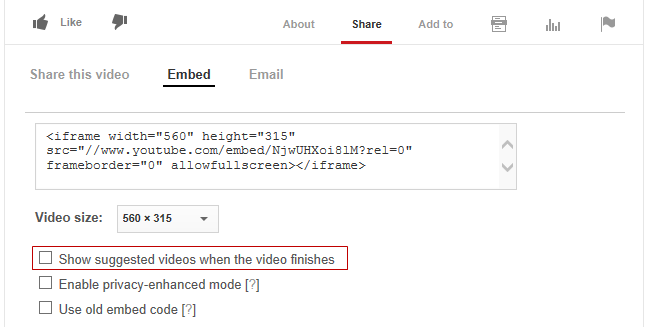
Here is how you remove suggested videos using the embed code:
1. Click on Share underneath the YouTube video you want to embed.
2. Click on Embed and then on Show More.
3. Deselect Show suggested videos when the video finishes.
4. Copy the embed code.
5. Go to Posts > Add New or Pages > Add New.
6. Place your cursor where you want the video to appear and then click on the Add Media button.

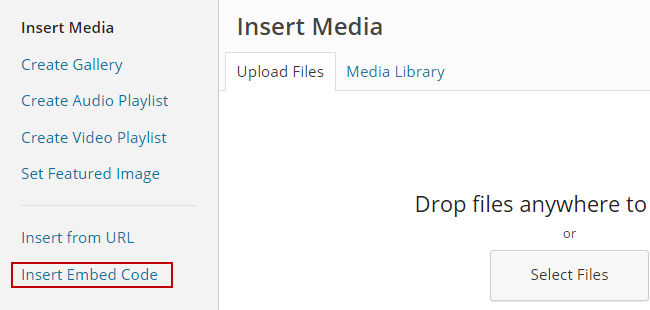
7. In the Add Media window click on the Insert Embed Code tab.
8. Paste the video embed code into the embed code field.
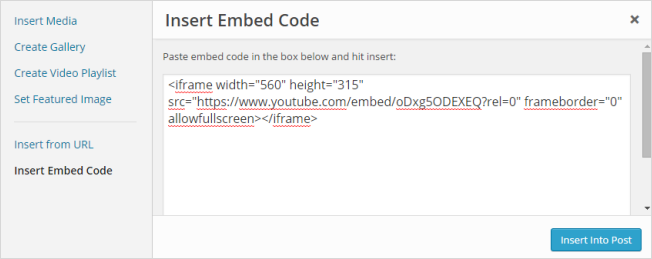
9. Click on Insert into Post.
10. Your Add Media window will close and the embed will appear in the visual editor as shown below.
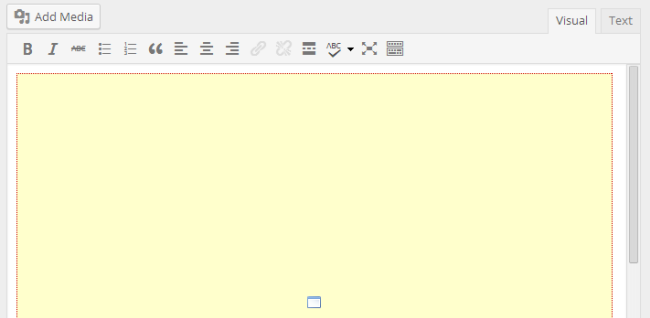
11. When you view your published post you will see your video.
Your Task
We’d like you to add your voice and ideas to our ongoing conversation about student blogging by completing the following tasks:
- Find a video on YouTube or Vimeo that you would like to share with students and embed it into a blog post using the URL method. Or choose one or more of the video creation and editing tools listed and try using the tool with or for your students. For example, you could create an Animoto to introduce yourself to your students and parents then embed it into your About page, or you could get your students to bring photos of their holidays and create their own Animoto. Leave a comment with a link to where you’ve embedded the video so we can check out how you went.
- Read through the most recent comments in reply to this step and leave a response to another person’s comment.
222 comments on “Step 9: Creating and Using Video”
Here is a short video lesson to teach student blogging!
https://drdriggers.edublogs.org/2025/01/21/student-blogging/
I linked the YouTube Copyright videos to a Resources page on my blog..
https://kaustin343.edublogs.org/resources/
I very much appreciate it. Thank you for this excellent article. Keep posting!
https://tashielletam1.edublogs.org/2022/10/14/lets-learn/
That was easy. https://studentsofknowledge610.edublogs.org/
Hello,
Here is my blog post with a YouTube video from a school I work with.
https://maria248.edublogs.org/2021/12/20/roscommon-news/
Maria
Hey,
Nice post!
I like the video with the students presenting. It is more meaningful when they are involved! Looks great!
I will be embedding my own videos as we progress through the year from my teacher YouTube Channel: https://www.youtube.com/channel/UCEbU5bTwBTQT9fG5HrsFpHw/featured
I like the idea of you embedding your own videos from throughout the year! That’s a great way to make your post more personal. I love the idea!
I enjoyed watching your videos, and thought the inclusion of stress-relieving tips in preparation for the SOLs was awesome. Including a visual component to the blog-especially since it’s you, who your students already know and feel connected to-is a great engagement tool!
I’ll be using Common Sense Media this year in my new role as Media Lab teacher. Really excited that they have SO many awesome resources ready to use! Love CSM!
https://popcsmedialab.edublogs.org/2021/08/16/fun-smart-songs/
I agree Common Sense Media have really worthwhile resources. Do you get learners to create resources as well?
Common Sense Media has great resources for sharing with students. Your Blog is Awesome, very complete!!!
This section led me down a rabbit hole of looking at RSA Animate style videos! It’s something I’ve always wanted to learn how to do. Thanks to the linked blog, I have a greater understanding of how these work. Also, I see how much work they are! I’m still contemplating writing a unit in which students make their own rsa videos, but I don’t know how far I’ll go with it!
Me too! This post snowballed for me and I stated exploring so many of the options available for video use. I was surprised I didn’t see Flip listed as it is one of my favorite video tools to use with my students.
Sorry, I cannot imbed until I go pro. But I plan on using Explain Everything so students can add this to their blogs and use it for presenting their work and projects.
I definitely will be embedding videos in the future with my students. There are wonderful review videos available that I know they would benefit from having linked to my blog.
posted a video on compound words. https://ksredl.edublogs.org/2021/02/05/learning-compounding-words/
I love Jack Hartman videos. They are both educational and fun.
https://kamaambong.edublogs.org/2020/06/25/50/
This is a great way for educators to learn about helpful YouTube channels and videos from other teachers for their classrooms.
you are right.
I agree.
https://bhilditch.edublogs.org/2020/02/15/water-cycle-resource/
https://emilyscuteri.edublogs.org/2020/02/10/defining-attributes-video-week-1/
I used this YouTube video for math.
Hi Bloggers,
I attached a music video about photosynthesis for students to watch for homework. It’s got great content and a really catchy tune! I posted a link if you’d like to check it out. I’m warning you ….it may be hard to get the melody out of your head:)
https://vblasberg.edublogs.org/homework/
Hello guys,
I attached a fun YouTube video about vertebrates that I want my class to watch for this weeks lesson. I attached the link to my blog where you will see it in a post. Just click the link and watch. Have fun!
http://kennedyclassadventures.edublogs.org/2020/02/08/watch-this-awesome-video/
I posted a video for students as well! I think it’s such a good idea t have videos for class whether viewed in class or not, available for the students so they can watch it as much as they need! Great job!
Great video .
http://alainacianchetti.edublogs.org/important-video/
I have started to embed lots of videos onto the Hospitality Classroom. Here is the link if you wish to check it out: http://hospitalityclassroom.edublogs.org/
I could sit for hours watching. Well done!
Mrs. Aristidou,
You have a great variety of videos posted on your blog! Great Job!
These are great! You utilized this very well.
I embedded the “What is a Blog?” from Edublogs for my students to view the day I introduced their blogs. http://mrsldewar.edublogs.org/2019/09/18/what-is-a-blog/
I now have a full resource folder of video options for my students to use throughout the year. Thank you.
I love this! Great way to make sure everyone know what the purpose of blogging is!
Mrs. Dewer,
Glad you posted that you used the “What is a Blog” video. Good reminder of a great resource. That would be a great video to share with parents as well:)
Really like this video and your blog! I hadn’t seen this video yet and like it for students and families. It’s clear for purpose and explanation of why the kids will be blogging – along with their teacher!
I can’t embed because I don’t have an upgraded version. I did share a youtube link though on my recommendations page: http://laurasnowed.edublogs.org/recommendations/
Hey Laura,
If you haven’t yet, feel free to email support @ edublogs . org and they’ll organise the Pro upgrade for you. It’s currently 1 month for starting a course and 12 months free when you finish!
Kathleen Morris
Edublogs Community Manager
@kathleen_morris