Step 9: Working With Plugins
Welcome to the ninth step in our free self-paced course to help you set up your own personal or professional educator blog!
The aim of this short activity is to:
- Help you understand how plugins are used on blogs.
- Show you how to activate and deactivate plugins.
- Activate plugins.
What Are Plugins?
Plugins extend functionality or add new features to your blog such as extra widgets, an easy way to add images to posts, the ability to embed documents, add sliders, add contact forms and more.
Plugins On Personal Educator Blogs
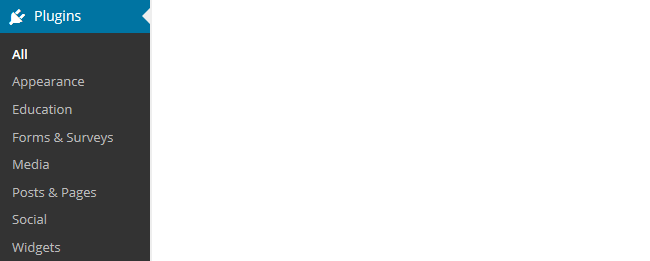
There are numerous plugins that you can activate in Plugins > All in your dashboard. Plugins should only be activated if you plan to use the functionality provided by the plugin. You shouldn’t activate plugins you don’t use.
Here are just some of the plugins you might find helpful to activate on your blog:
| Plugin | Used For |
|---|---|
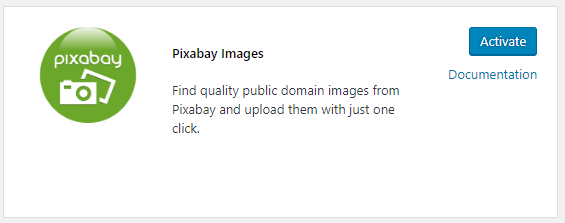
| Pixabay | Easy tool to quickly find and add Creative Commons images to your posts with attribution. Once activated it adds a Pixabay icon to your visual editor which you use to search and insert images using Pixabay. |
| Easy Tables | Quick and easy tool designed to help you add tables to your posts and pages. |
| Embed Any Document | Enables you to embed any document into a post or page. |
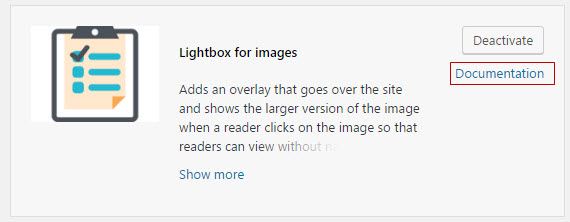
| Lightbox for Images | Adds an overlay that goes over the site and shows the larger version of the image when a reader clicks on the image so that readers can view without navigating away from the page. |
| Supreme Google Webfont | Adds Google webfonts into a nice dropdown list in your visual editor which you can use to change your font type and/or font size. |
| Visual Editor Widget | Adds a new ‘Visual Editor’ widget to Appearance > Widgets which makes it easy to add links, images and more to a widget. |
You’ll find a complete list of plugins here!
How To Activate Plugins
You activate plugins as follows:
1. Go to Plugins > All in your dashboard.
2. Click on Activate below the plugin you want to use.
Some plugins have an administration page where you can set options specific for that plugin.
- Plugins with configuration options add a new item under the Settings menu.
- Some plugins also add widgets to Appearance > Widgets
- Click on the Documentation link on the plugin for more information on how to use the plugin.
3. Click on Deactivate if you want to turn a plugin off.

Plugins To Try On Your Blog
Here are some of the plugins we recommend you try:
You should always test a plugin once you’ve activated the plugin to see how it works and then deactivate the plugin if you don’t intend to use.
To test Pixabay and Easy tables plugins you need to write a new post. The Pixabay plugin adds a Pixabay icon to your visual editor that enables you to quickly find and add Creative Commons images to posts. The Easy Table plugin adds a tables tool to your visual editor for adding simple tables to posts.
To test the image widget and visual editor widget plugins you need to go to Appearance > Widgets and add their widget to your sidebar.
Remember you’ll see numerous plugins that you can activate in Plugins > All in your dashboard. But you should only activate plugins you plan to use. Don’t activate plugins you don’t use. If you decide to activate other plugins remember to test the plugin after you’ve activated it and deactivate it if you don’t like.
The documentation link under a plugin takes you to the support page that explains how the plugin is used.
Your Task
- Activate Pixabay , Easy Tables and the Visual Editor plugins in Plugins > All.
- Test each plugin and then write a post to discuss what you learned about plugins or tell us which plugin(s) you liked and why. Remember to leave a link to your post in a comment here so we can have a look at your new post.
How to leave a comment: Scroll down to find the comment box. Write your comment, then enter your name and email address (email addresses are not published). Enter the anti-spam word. Press submit and we will moderate your comment ASAP.