Step 7: Cools Tools To Embed
Welcome to the seventh step in our free self-paced course to help you set up your own personal or professional educator blog!
The aim of this step is to introduce you to a range of easy to use online tools that you can embed into posts and pages.
Why Enhance Posts With Interactive Tools?
Originally, blogs used to be all about text but now the web is a much more visual place; blogs that contain only text are less likely to stand out or be shared.
From time to time, bloggers use cool interactive tools embedded in posts and pages. These tools might include slides, videos, comic strips, quizzes, or polls. Educators use these in posts because they grab attention, engage, and create opportunities for interaction in ways not achievable using plain text or images.
Most online tools provide embed code. You use this code to embed what you’ve found or created into posts. Don’t worry, you don’t need to know anything about coding to do this!
Below are popular tools used by educators by activity type to help get you started. We’ve included so you can check how they work.
The examples we’ve included are far from exhaustive and we encourage you to share your own favorite tools in a comment.
Back to Top
Audio Tools
Audio is used for a wide range of purposes in the classroom including grammar and fluency reading practices; delivering content; and engaging auditory learners.
Outside of the classroom, audio consumption is becoming more popular than ever — think of how much growth there has been with things like podcasts and voice searches (Google Home, Alexa, Siri etc.).
Educators use audio hosting websites when they want to embed their audio within embedded players rather than uploading them directly to posts as a link. Anchor.fm and SoundCloud are the most commonly used audio tools.
Anchor.fm
Anchor.fm is an excellent free service for recording, hosting, and distributing podcasts.
![]()
You can create and edit recordings on your computer or on the mobile app.
Richard Byrne has created a short screencast to demonstrate how to embed an Anchor podcast into an Edublogs blog.
Note: If you don’t want to work with the text editor as demonstrated above, you can just click on Add Media > Insert Embed Code > Insert Into Post. If you need more help with embedding an HTML code, check out these instructions.
SoundCloud
SoundCloud is an online audio distribution platform that allows users to upload, record, promote and share their own sounds.
The Soundcloud embedded below was used by the teacher to engage the students, showcase their creativity while summarizing the essence of a story into something memorable. You can read more about the activity and check out more of their Soundclouds here.
Brainstorming Tools
Brainstorming tools help generate new and creative ideas quickly and easily. There are a number of brainstorming tools that can be embedded in blog posts.
Popplet
Popplet is a collaborative brainstorming tool that can be used to create graphic organizers, timelines, and many other visual organization forms. Popplet is also a powerful presentation tool. Popplets can be created on computers or using the iOS app.
Check out Mr. Tompkins guide to using Popplet.
Padlet
Padlet is a popular tool that can be as simple or as complex as you like. It’s basically an online bulletin board where you add ‘notes’.
Years ago, Padlet was called Wallwisher and you could only add text and images. Padlet has evolved a lot and you can now add notes containing audio recordings, video, maps, drawings, files etc.
It can be used collaboratively. You might like to ask other educators to contribute to a Padlet that you embed in your blog post.
Shannon McClintock Miller created this Padlet to share books for International Dot Day with other educators.
Comic and Cartoon Tools
Comic and cartoons tools can be very engaging for readers and may make your post more shareable.
ToonDoo
ToonDoo is a comic strip and comic book creation tool. Here’s an example of a Toondoo comic strip from What Ed Said.

Curation Tools
Curation tools allow you to collect, preserve, maintain, archive, and share information. The goal of content curation is to find the most relevant content pertaining to a specific category and funneling this information for yourself and your readers in a very targeted way.
If you’re interested in finding out more about content curation, check out our guide in the Building Your PLN free course.
LiveBinders
LiveBinders allows you to curate webpages, PDF, document, image, or video into a digital 3 ring binder. Content can be curated by tab and subtabs within tabs.
The LiveBinder below was used to curate all the resources shared during ISTE 2018.
Click here to open this binder in a new window.
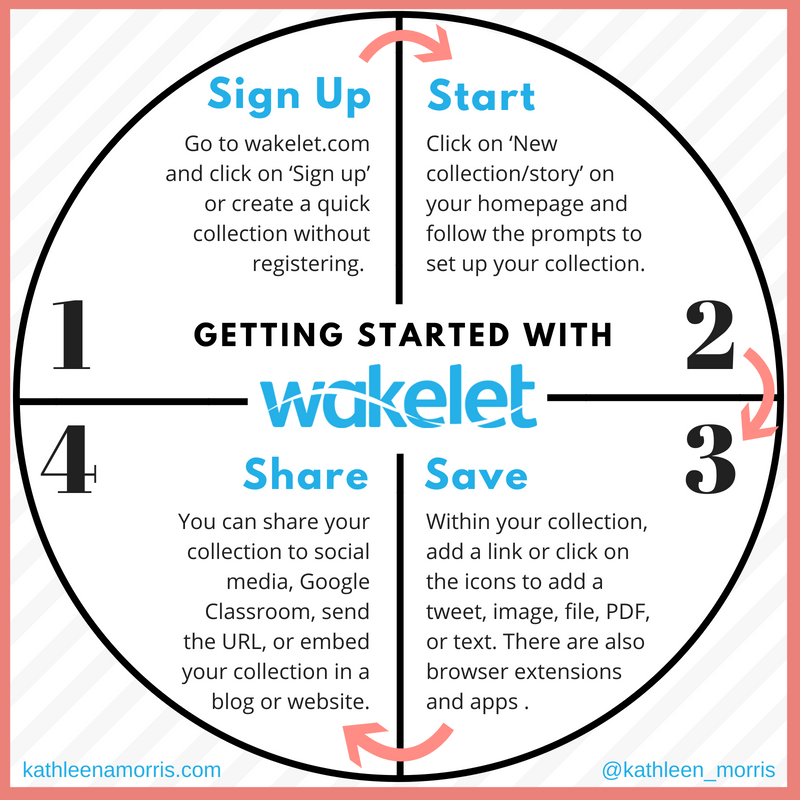
Wakelet
Wakelet allows you to save, organize, and tell stories with content from around the web.
You can sign up for free or create a quick collection without signing up. There’s also a browser extension to save links from the web.
Your collections can be public or private. You can also embed collections on any blog or website.
Here’s a simple example of an embedded Wakelet so you can see what it looks like. You’ll get a clearer idea of what it looks like if you view the example on the Wakelet website.
Read more about getting started with Wakelet.
Google Forms: Poll, Survey, And Quizzes
Online polling and survey tools help you gather opinions, collect votes, and see and share results immediately.
Google Forms allows you to do all this. It is part of the freeware web-based office suite offered by Google within Google Drive.
Google Forms can be used for planning events, surveys, student quizzes, and collecting other information in an easy, streamlined way.
The Google Form embedded below is an example of how you can use it for a simple poll.
Check out how Dan Gallagher uses Google Forms for quizzes.
Watch Chad Brandt’s video What Are Google Forms? (for Teachers).
Presentation Tools
Presentation tools allow you to create, publish, and share presentations in a range of formats online.
Animoto
This is a popular tool for businesses or individuals to create a video slideshow using your own images and videos. There is a range of templates to drop your content into, and lots of music to choose from as well.
The good news is, educators can apply for a free Animoto Classroom account (you get accounts for 50 students as well).
Merry Beau is an Irish teacher with a great blog called If Only The Best Birds Sang…
Merry uses Animoto a lot in a variety of ways. Here are a few examples.
HELLO from some new friends in Ireland
Prezi
Prezi is an online presentation and story telling tool that uses a single canvas instead of traditional series of slides. The images, text, videos and other objects are placed on the canvas and users can zoom in and out.
Here is an example from Laura Randazzo which explains Joseph Campbell’s archetypal Hero’s Journey.
SlideShare
SlideShare is a site where you can host your presentations and share with others. Slideshare is ideal for those who want to embed presentations in their posts and websites rather than upload their PowerPoints directly and insert as a link.
It’s also an excellent site for locating presentations created by others.
Here’s an example from Gwyneth Jones. She has used Slideshare a lot for presentations that she embeds on her blog.
Shell Terrell is another teacher who regularly embeds Slideshare presentations on her blog. Here is an example:
Google Slides
Google Slides is a presentation tool that lets you present your work in a visual way. It forms part of the Google Drive suite of online office applications.
It’s similar to PowerPoint or keynote but you don’t need to download any software and can build presentations straight from your web browser.
Here’s an example of a Google Slides presentation I put together as a challenge for students.
PhotoPeach
PhotoPeach allows you to quickly upload photos to create great looking slideshows and even simple quizzes. Refer to these instructions for creating PhotoPeach quizzes.
How To Embed In Posts
Once you’ve created your content using one of the above online tools, you embed into a post as follows:
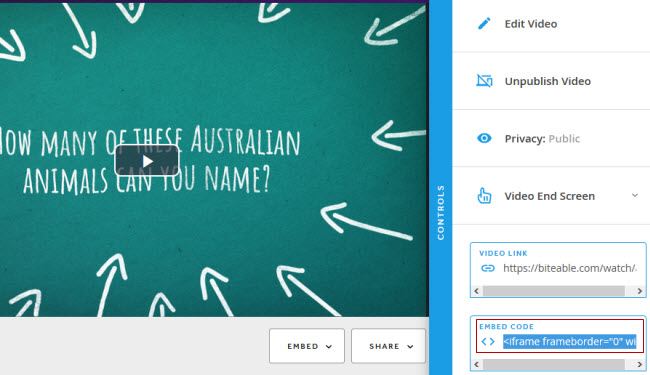
1. Copy the embed code.
- Websites use a range of different icons to represent embed code.
- Look for icons like </>, the word Embed, Share, the share icon, HTML or hover your mouse over icons until you see the word Embed.
For example, if you created a Biteable video the embed code is located in the control panel when you view your video:
2. Go to Posts > Add New

3. Place your cursor where you want the video to appear and then click on the Add Media button.

4. In the Add Media window click on the Insert Embed Code tab.

5. Paste the embed code into the Insert Embed code box and click Insert into post.
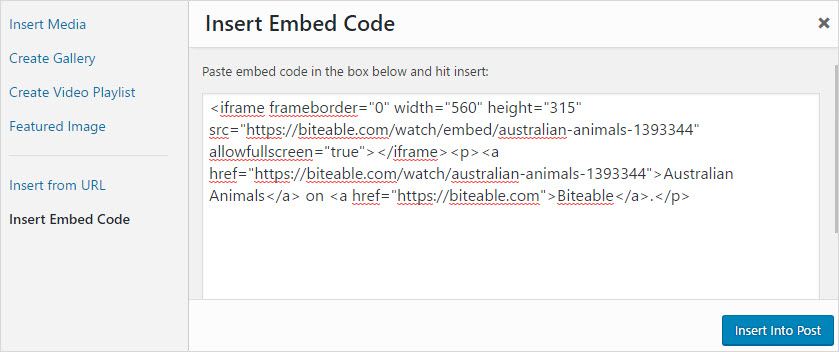
6. When you have finished writing your post click Publish.
7. You should see your embedded content when you view the published post.
How To Embed Cheat Sheet
If you’d like to save some instructions on how to embed to your computer, just scroll down and look for the ‘download’ button under this document.
 Loading...
Where To Find More Tools
If you’re keen to keep up to date with online tools, here are three blogs you might like to check out and/or subscribe to:
- Larry Ferlazzo’s Website of the Day
- Richard Byrne’s Free Technology for Teachers
- Educational Technology and Mobile Learning by Med Kharbach
Your Task
Add your voice and ideas to our ongoing conversation about blogging by undertaking one or more of these challenges:
- Have we missed one of your favorite tools? Tell us about it! Write a post on the tool to explain how and why you use it. Don’t forget to include the URL of the tool. Leave a comment with a link to your post.
- Choose one or more of the cool tools embedded in this post, copy the embed code, and try adding it to a post on your blog. Here are the instructions for embedding it into a post. Leave a comment with a link to where you’ve embedded the tool so we can check out how you went.
Also feel free to comment with any questions, tips, or advice.
Remember, embedding isn’t enabled on free blogs to prevent misuse by spammers. If you have a free blog, you’re welcome to just use one of the tools and share the link, or accept a complimentary upgrade to complete the course and try embedding.
How to leave a comment: Scroll down to find the comment box. Write your comment, then enter your name and email address (email addresses are not published). Enter the anti-spam word. Press submit and we will moderate your comment ASAP.
129 comments on “Step 7: Cools Tools To Embed”
https://dasarayransberry.edublogs.org/2023/04/24/blog-tools/
no tools were left out in my opinion
I used a Youtube video-sharing embed. Very cool!
https://tr0m3r07.edublogs.org/2023/03/21/23/
This had lots of great tools available to learn about.
I used Youtube for one of my post that I use to help me when I study. “Lofi Girl” has tons of music videos made for that exact reason, I hope others find it helpful like I do.
https://mvillagomez2.edublogs.org/
I like using PowerPoint presentation slides, it gives you various options for style, design and overall set up.
I like using Google Slides to create online slide shows. Google Slides also, help to build beautiful presentations.
This was enjoyable to use
I used YouTube on my page for funa dn relaxing music for the classroomhttps://mswashingtonweeklywinddown.edublogs.org
Hi everyone! I used a Google Poll for my Blog. I’ve always have seen this at work and had use them to vote for important things at work such as union voting and other school related matters. Kind of cool I now know how to do it. Its amazing how far removed our students are getting away from using actul books to learn.
I love using google forms. It is such an easy and simple way for teachers to send out a survey for the students.
One tool that wasn’t mentioned in the blog but that I have always enjoyed using is google slides.
I decided to use Abode Express in my blog. Abode express is a creative online and mobile app where you can create digital experiences.
In this day and age it never hurts to make your content as interactive as possible. The apps mentioned in this lesson are great tools to ensure that your readers can engage with your work in a welcoming manner.
I have used goggle form, because it is a good tool to know what other people want to see. https://docs.google.com/forms/d/e/1FAIpQLSehUD4kunO_7MLf5Q_XSTT7p3ie1VYU0lnAVOuL_EPbXNgw3A/viewform?usp=sf_link
I added Google Forms to my contact page as a way for people to send me questions and comments. I couldn’t embed it because I am using a free blog. Here’s a link: https://malakhamed.edublogs.org/contact/
The one tool that I chose to embed was google slides. I think it’s cool to have a presentation option when viewing someones blog post.
Google Forms are my favorite way to incorporate everyones feedback in my posts. Here is the link to my blog to see how I incorporated the use of google slides:
https://shareenkhalifa.edublogs.org
Reading this gave me a lot of tools that I can use in my blog, but the one thing that was not mentioned that I love is google slides. In google slides you can create a presentation and share the link to others to use and add their own ideas.
One of the tools that wasn’t mentioned in the blog but I have always loved using is google slides. I believe this tool is such an easy way to include information in your blog in an organized way and sort your main ideas.
ttps://www.google.com/slides/about/
I love the appearance tool. This was a creative tool to help enhance the stories in which I have written.
https://kyrasavage.edublogs.org/wp-admin/themes.php?page=multisite-theme-manager.php
I decided to use Padlet in my blog. Padlet is a way to interact with peers in a new and creative way.
https://misskaitlyn.edublogs.org/2022/11/15/padlet/
Haneen Yousef
One slide tool that I have added to my blog was google slides. I have embedded it onto my blog. I feel that adding slides to your blog can assist in giving more information when needed.
hyousef3@student.govst.edu
https://haneenyousef.edublogs.org/wp-admin/post.php?post=53&action=edit
SOOOOOOO….I have tried several options to embed something on my blog with no luck. I only get links to the materials and never an embedding. I get an error everytime. So I left a link and here’s access to the blog.
https://kwalker8.edublogs.org/2022/11/04/embed-content-who-knew/
All of my favorite tools were added, and some I had never heard of before! I was unaware of how many tools there are! When I set up my blog I want to include padlet in my blog.
I am excited with these lessons, this step gives me more excitement in developing my blog. I really love it all and have some great ideas to embed materials on my blog.
I think, Blogging is a great tool to use.
This is great information
Absolutely!!!!!
There were no tools that were missed. The tools that were provided were great. I were even familiar with some of them, especially Google Slides. I have been using Google Slides for as long as I can remember. This time I decided to use a different tool, which is Padlet. Unfortunately I was not able to embed my Padlet. So instead I posted the regular link to my creation.
https://amartin16.edublogs.org/
I was not able to properly embed with my blog since I am using the free version but here was my attempt
https://jackiedonalds.edublogs.org/2022/04/03/my-early-education-journey/
With this subscription, I was not able to embed or copy code in so it was a bit more difficult and harder than I remember. Regardless, I used a Pallet and I think it looks cool on my page!
The link for my blog is
https://moldingminiminds.edublogs.org/
I just realized that the free version does not support embeds.
But one tool that I am using and did not see mentioned is Canva.
Here is my blog post about how I use Canva in my class: https://ruthmangum.edublogs.org/2022/01/29/canva-a-teachers-best-friend/
rmangum@greenville.k12.sc.us
First of all, I just spent two days trying to figure out why the instructions were not the same as the wordpress site I created from your EduBlog site. Come to find out WordPress has updated their version, but your instructions are still from the old site. Severely disappointed.
Also, you fail to mention that ANY embed requires an upgrade to EduBlogs pro.
As a teacher with very little time to play around, I feel like this course needs a major re-haul. Or at the very least a comment at the START of the process about the upgrades in instructions.
There was not any tools that you missed that I can think of, the tools provided in the post are awesome tools to use in a blog post. I especially liked that Google Slides was in there as an option. I enjoyed that because I have used that tool before when creating a presentation. I did enjoy reading the comments to see what other people suggested for other tools that were not mentioned in the post. The tool that I am going to use in my blog is Amimoto. I created a 15 second slide show playing clam music. Here is the link to my blog to check out the tool I used: https://testtakingtipsforstudents.edublogs.org/2021/11/03/test-taking-tips-slideshow/
Amimoto was very ease to use and I enjoyed playing around with it. Thank you.
One of the tools I didn’t see mentioned here was Wakelet.
Here is my tool that I decided to use !!
https://educator21.edublogs.org/2021/10/19/check-out-my-padlet/
Google slide presentation is something students would love because they are always interested in trying new things.
I like using Google forms for simple data collection, but it could also work as a contact form, which is what I’ve done. Unfortunately, I can’t embed it since I don’t have a pro account but I can add a link.
I have been wanting to learn more about Padlet and I did. I was able to create one and add it to my page.
A tool I am learning how to use is https://screencast-o-matic.com/
This tool allows you to share videos with students to improve discussions, cover content, and recap learning. The students can watch the video as many times as they need to so that they can gain an understanding of the content.
I really enjoyed this lesson on embedding. I use a lot of Google Slides/Google Forms, and I’ve used Animoto and Prezi before, but I am interested in using some of the other tools mentioned here. I had a blog years ago, but I don’t think many of these tools were available (or I didn’t try to use them). This is pretty awesome.
I have used Photo Peach in the past. I had forgotten about it until this training course. I returned to the site to look at my old projects. The site will be closed down at the end of the year due to the end of Flash Player. I am disappointed. I want to try using Animoto. I can see making a video of student work for a presentation in a class blog that would be shared with students and parents. Many of the tech tools mentioned here I have briefly encountered in professional development classes, but have never found a way to use to present content. Popplet looks fairly easy to use. I think I will set a goal of trying one new tech tool a month in lesson planning.
I am just getting started on creating my personal blog.
Class Dojo was something used in Florida where I used to teach but I don’t see it used where I live now. I like the animoto, the graphic organizers and the digital note-taking tools as well. I won’t need them for my page but I have used these type of tools for other projects. Voki is something I like to use as well to create animated powerpoint presentations where you can make the cartoon characters talk and stuff and create a whole lesson with them. Kind of like an animated powerpoint puppet show.
SagartJDP
I was going to add a Google form, but I kept getting this message: Due to spam protection, you must upgrade to Pro to enable this functionality. I was looking forward to utilizing this tool, but sadly I could not. I was going to embed the check in form that I use weekly for my classes. It is a quick two question emotional gauge of how my students feel and if there is anything I need to know.
One tool not mentioned is Class Dojo. I like this tool because it allows teachers to track student behavior. Students can earn points for displaying desired behavior, such as: no missing work, no discipline referrals and perfect attendance. Points can also be deducted for distracting/off task behavior. Parents can also track their child’s Dojo balance.
I love Forms! Forms are a great way to collect data from a variety of stakeholders and it doesn’t need to always be a poll; there are many ways to use Forms. Moving forward, if I had a classroom blog, I would like to try Padlet. The examples I have seen appear to be an interesting way to do brainstorming where ideas can be added simultaneously.
I decided to use Live Binders. It will definitely be a tool I plan on using in the future.
http://morganalbright.edublogs.org/2020/01/24/live-binders/
I decided to try Wakelet because I will need a user-friendly curation tool as I continue in my new role as school librarian. I could not embed without upgrading.
Here is a link to what I did: http://agreatdayinthelibrary.edublogs.org/2020/01/24/wakelet-curation…racy-night-ideas/
The first link didn’t work….maybe this will? http://agreatdayinthelibrary.edublogs.org/2020/01/24/wakelet-curation-tool-family-literacy-night-ideas/
Cannot copy embed code into posts without upgrading to pro.
Added link to Google form though.
http://longlearners.edublogs.org/2019/09/15/whats-next/
I love using Google Forms in my classroom! I look forward to finding ways to use it on my blg as well.
Collaborating tools are one of the most effective ways to show your viewers how to access the information and contents easier! I am thinking about using some of the tools suggested above when I set up my own blog!