Step 3: Write your first posts
Welcome to the third step in our free professional learning series on class and student blogging!
The aim of this step is to:
- Help you understand how posts are used on class blogs.
- Provide tips on how to write effective posts.
- Teach you how to publish your first posts.
Introduction To Posts
Your posts are where you’ll publish your main content such as:
- showcases of student work
- information about what’s been happening in class
- assignment information or learning resources
They are commonly displayed in reverse-chronological order with the most recent post at the top of the page.
By default, your home page is your blog post page and this is where you’ll see your new posts published.
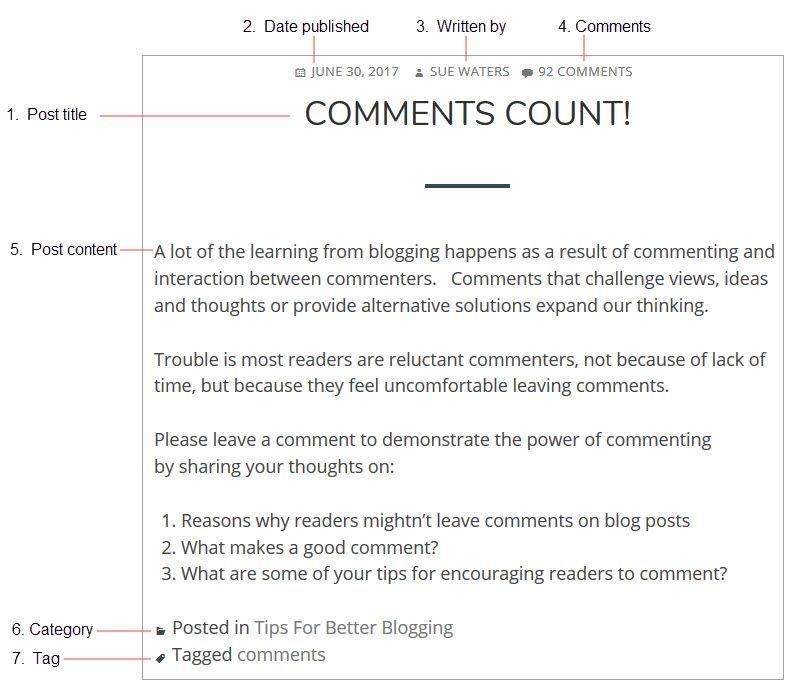
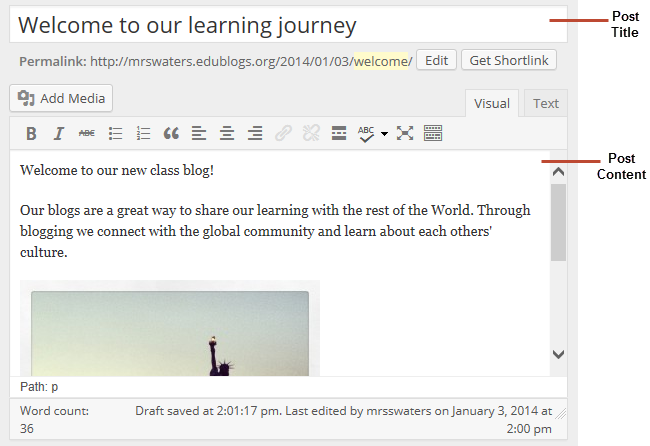
If you look closely at a post you will see it is normally made up of:
- Post title – This tells the reader what the post is about. Be specific. A great post title grabs your reader’s attention and makes them want to read on.
- Date published – You’ll normally see this displayed at the top of the post.
- Written by – Most themes display the name of the post author. Your username is automatically displayed unless you have changed your display name. Even if the teacher is the only one with an account, student work can still be showcased. You could introduce the name(s) of the students at the top of the post.
- Comments – Readers can click on the word ‘comments’ or click on the post title and scroll down to write a comment in response to your post. Comments allow students and other readers, to engage in discussions, share their thoughts, and connect with your class blog. We will be exploring the topic of quality commenting in step four.
- Your post content – This is the main information that you want to share or reflect on. It could be a mixture of text, links, images, videos etc.
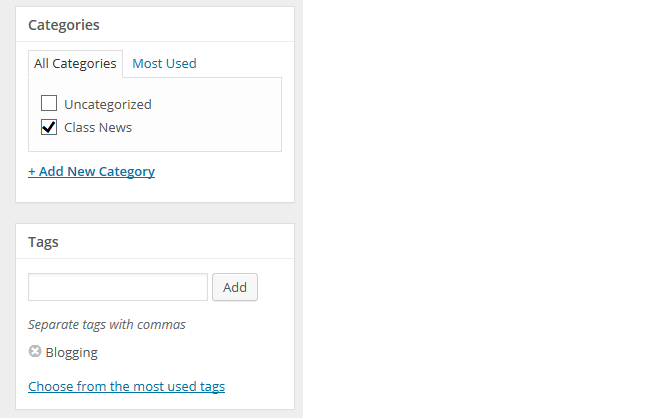
- Categories – These are used to help readers locate posts on your blog. Categories are often used like chapters of a book; they provide a general overview of the topics you blog about.
- Tags – These are used to help readers locate posts on your blog. Tags are more like the index at the back of the book and explode the topic into many bits.
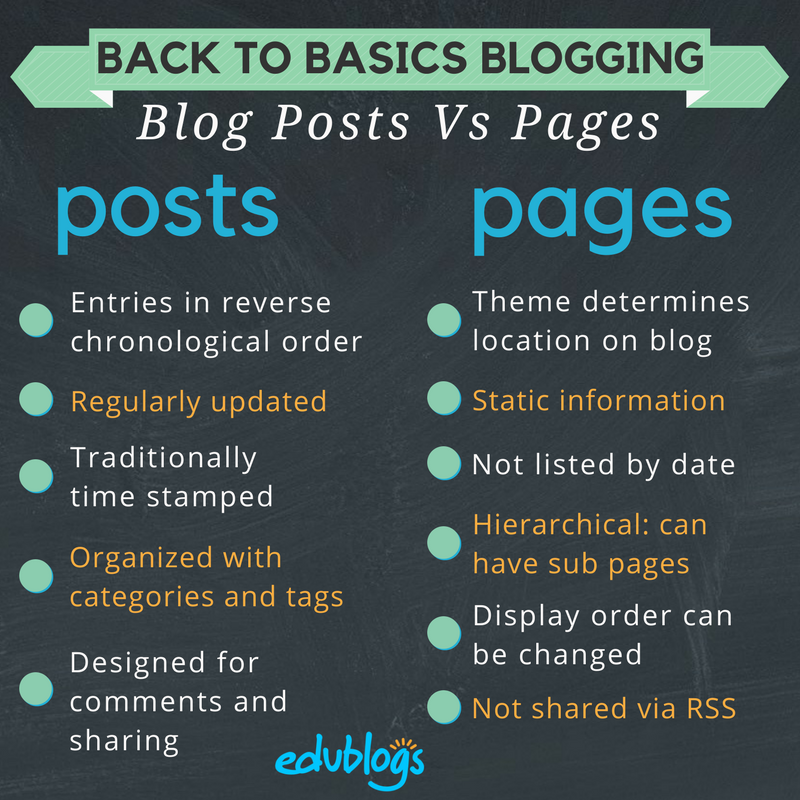
Watch the following video to learn more about the difference between pages and posts.
Here’s a quick summary of the difference between posts and pages.
Who Writes Posts On Class Blogs?
If you look closely at class blogs you’ll see on some blogs only the teacher publishes posts. On other blogs, both the teacher and students publish posts — or the students publish posts on their own student blogs. Some class blogs are written entirely by students.

Different Approaches To Publishing On Class Blogs
Here are a few examples to check out of different ways that posts are published on class blogs.
- On blogs like Swoop Into Kindergarten and Room Three @ Auroa Primary School the teacher publishes all the posts, however, student work is showcased in the posts. For example: photos of work, videos, slideshows etc.
- Becky Versteeg also weaves links to student blogs in posts on the Team 2 Eagles class blog. The student blogs are also listed on the sidebar of these two blogs.
- In Blogging with 2/3 Moore, Julie Moore publishes some posts and allows students to guest post as well (student blogs are also earned and these are listed on the sidebar).
- On the Chickering Reports blog, all the posts are by students. They often create audio and video interviews with members of their community. Most of the posts on the Live Learn Blog are written by students.
It’s really up to you which approach you use.
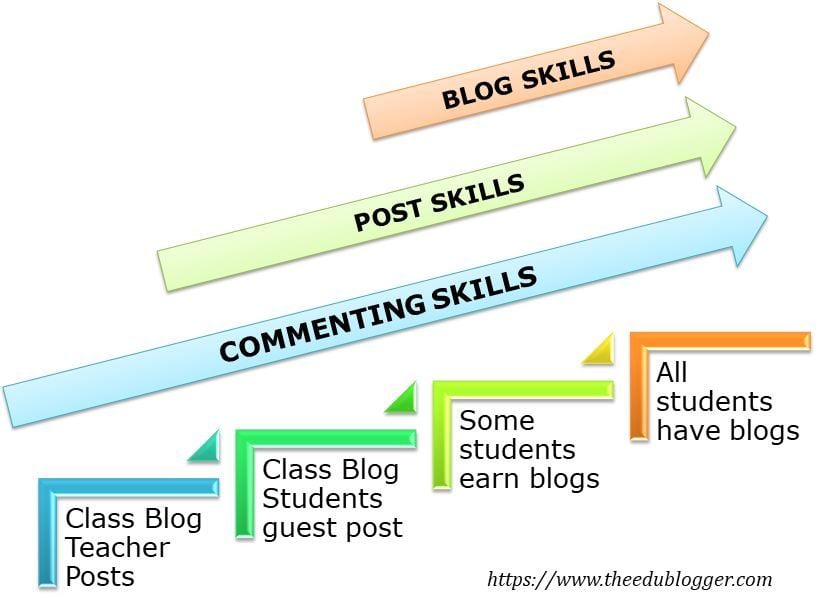
Consider A Progressive Approach
If you do decide you want your students to publish posts we recommend the best approach, regardless of student age, is to introduce blogging slowly in the following order:
- The teacher writes posts on the class blog.
- Students write comments in response to posts (the focus is on teaching students quality commenting skills).
- Students write posts on the class blog or their own student blog.
Many educators with successful blogging programs use the following scaffolded approach:
As Jan Smith says:
The big idea is to go slow to go fast.
If you don’t lay the groundwork by building a community of trust, risk, support with your kids they fail big.
Reading and commenting have to be the core, or else a blog is just a digital bulletin board.
The progressive model Kathleen Morris has used is as follows:
- I establish the class blog and wrote the posts while teaching the students to write quality comments.
- As students became more familiar with blogging, some students started publishing guest posts on the class blog and learned posting skills.
- Depending on student age and computer access, either certain students who have demonstrated enthusiasm, parent support, and blogging skills, earned their own blog or all students had their own blogs as digital portfolios.
Throughout all stages, quality commenting and parent participation is taught and encouraged. Starting initially with more of a teacher-controlled blog is a great way to get comfortable and set expectations.
We’ll show you how to teach quality commenting skills, how to connect parents with your class blog, and how to add students to blogs so they can publish posts later in this professional learning series on class and student blogging.
For now, we’ll focus on teaching you how to write your first posts.
Back to Top
First Post Examples
What do you publish as posts on your class blog? Pretty much anything you want to share with students, families, or other educators you’ll publish as a post. What’s been happening in class, student work, assignments, homework information, documents — there’s so much you can share!
Here are some examples of first posts, or posts for the new school year, to check out for ideas:
- Mrs. Yollis’ Welcome Back :: 2017-2018. This includes a personal video message from Mrs. Yollis and a screencast showing how to leave a comment.
- Baldock & Grantham Class blog — A Sneak Peak at your new classroom for 2018. The teachers published a few images of the classroom a week prior to school starting.
- Mrs. C Class Connection — Welcome to blogging. High school teacher Kae Cunningham included a video to explain what a blog is. She also included links to the history of blogging and asked students to respond in a comment.
- Welcome to Mrs. Fernandes’ First Grade Class 2018-2019! Mrs. Fernandes has written a welcome post to new students prior to the summer holidays. It includes a list of school supplies.
- Mrs. Moore’s Class Blog — Our First Week. This includes a video overview of what the students have been doing in the first few days of school.
- The Cross Chronicles — Kelly Cross published a series of welcome posts over a week or so.
- The first post was a short welcome video from Kelly.
- The second post included photos and student work from the first day of school.
- The third post has some fun photos of students celebrating their third day of third grade.
Check out The Edublogger’s Class Blog list for more ideas on what the teachers post on their class blogs!
Back to Top
Integrating Blogging Into Your Day
Integration is key. No teacher has time for add-ons, so it’s a case of considering how can a blog enhance your regular classroom program.
Consider this:
- Can some traditional analog tasks be replaced (and enhanced) with digital tasks in your classroom? For example, well known blogger, Linda Yollis, swapped a traditional pencil and paper history lesson for a blogging task. Students responded to one another in the comment section from the point-of-view of the biography figure they studied. Helen Keller was responding to Louis Braille and President Lincoln. Neil Armstrong had a conversation with astronaut Mae Jemison. Parents got involved as well. Here blogging wasn’t an add-on but a swap for a more effective activity.
- Can certain tasks be done better or more quickly with a blog? For example, can you spend less time on things like publishing assignments or parent newsletters by housing all this information on your blog?
- Where can you slot blogging into the day? Many teachers start the day (or class) with a routine. It might be running around the oval, silent reading, doing a weather report or looking at the news of the day. Are these routines still valuable? Could they be discarded, rescheduled or alternated? Could blogging be slotted into your opening routine?
Also consider:
- Can you add blogging to your literacy block instead of a traditional writing or reading task?
- Could a maths prompt be posted on the blog and students share their explanation through a comment or post?
- Could your inquiry or social studies topic be explored through creating a post or multimedia for the blog?
- Could some physical displays of artwork and other creations become digital displays on the blog with rich reflections?
- Could traditional homework tasks become more meaningful blogging tasks? Eg. working with a family member to share insights in a comment.
Once you get the hang of it, it becomes easier to understand how blogging can be integrated into your classes.
How To Publish A Post
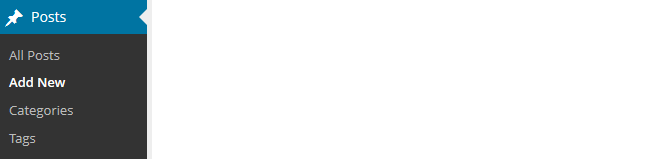
1. Go to Posts > Add New.
2. Give your post a title and add your content.
3. Add your tags and categories (learn about categories and tags here).
4. When finished writing click Publish.
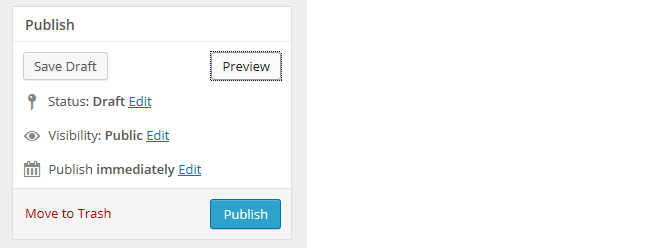
3. Presto! Your post will now display on your blog so others can read!
Below is a quick video tutorial on publishing a new post:
Previewing Your Draft
Before you publish your post it is a good idea to use the Preview option to see what it looks like to your readers.
You preview a post by clicking on Save Draft and then click Preview. This opens up a draft version of your post in a new tab.

Then just go back to your draft and make any changes you want!
Introduction To The Visual Editor
The area where you write your post is by default in Visual Editing mode which uses WYSIWYG (What You See Is What You Get) option for formatting.
It works similar to any word processing software.
Simply write your post, highlight any text you want to format and then click the appropriate button in the toolbar to add formatting such as bold, italics, number list.
The Toolbar toggle icon is used to view the advanced formatting options including heading styles, underlining, font color, custom characters, undo, redo.
You switch between Visual Editing mode and HTML editing mode by clicking on the Visual or Text tab.

Below is a quick video tutorial on the visual editor:
Putting It All Together: PDF Guide
Feel free to print the following PDF guide on how to publish a post, or download it to your computer and then upload it to your blog for your students to refer to.
These instructions explain how you would do that.
 Loading...
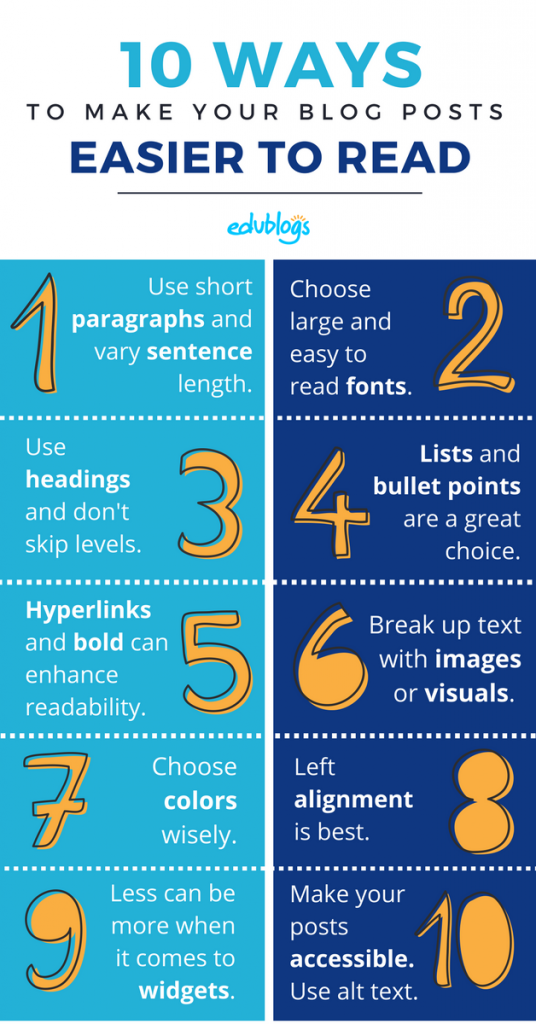
Tips For Writing Better Blog Posts
Reading online is different from reading on paper.
Ultimately, you want your content to be read. The easier to read and more engaging your posts are, the more likely they are to be read!
We’ve outlined five tips to help you write better posts on your class blog.
1. Use short paragraphs
Posts with really long paragraphs are harder to read online.
Consider these tips about paragraphs:
- Break your posts up with paragraphs.
- The more paragraphs the better.
- Short paragraphs are better than long (they can even be one or two sentences long).
- Make the first sentence of each paragraph make your readers want to read on.
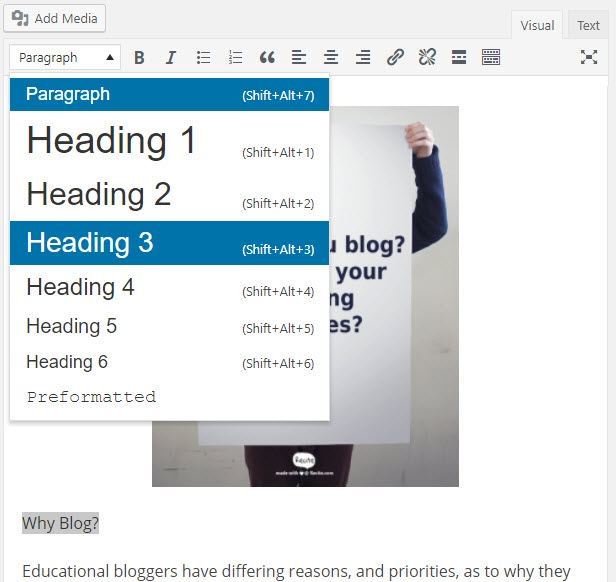
2. Use Headings
Use headings, and, where appropriate, bullet points and numbered lists, to break up the post into manageable bite-sized chunks.
To create a heading you simply:
- Highlight the text you want to change into a heading
- Select the Heading Style you want to apply from the advanced formatting toolbar (you access the advanced formatting toolbar by clicking on the Toolbar toggle icon). Heading 1 is your post title. Start at Heading 2, then Heading 3 for sub-headings under that and so on.
- Preview your post to make sure that Headings you’ve used have broken your post into manageable chunks
3. Remember to link
When you write about a website you should link to it as your readers often want to check it out in more detail. Refer to Add Links support page to see how to add a link or watch this video below.
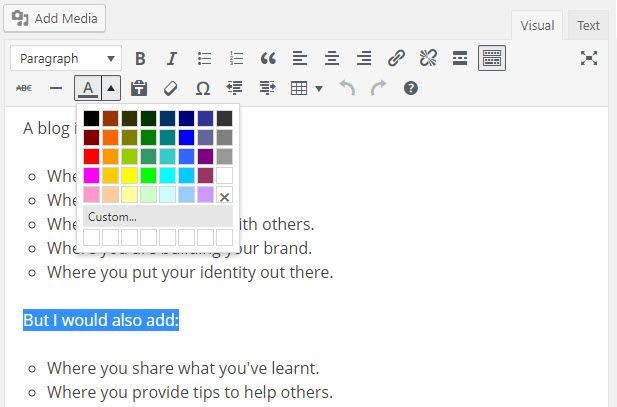
4. Consider colored text
While you’re less likely to use colored text in posts on a personal/professional blog, it can engage students and draw attention to specific information on posts on a class blog.
You’ll see examples of it used in posts on Miss Jordan’s Class blog and the Student Challenge blog.
You change the color of text as follows:
- Highlight the text you want to change
- Select the text color you want to apply from the advanced formatting toolbar (you access the advanced formatting toolbar by clicking on the Toolbar Toggle icon)
- Preview your post to make sure the text is readable and you like the color (darker colors are best).
5. Enhance posts with images and media
When you look at class blogs you’ll notice they enhance their posts with images and other types of media including videos and by embedding online tools.
We’ll show you how to add images, add videos, and embed content later in this professional learning series on class and student blogging.
Back to Top
Read more tips for making your blog posts easier to read.
Commonly Asked Post Questions
Here are the answers to commonly asked questions we receive into Edublogs Support:
Back to Top
What does the “Not found” message on my homepage mean?
By default, the front page of your blog is set to display your latest posts.
If you delete the default “Hello World’ post before you publish a new post then your front page will display ‘Nothing Found’, ’404 – Not Found Error’ or something similar depending on the theme you are using.
This message is displayed because there is nothing to display on your front page.

All you need to do is go to Posts > Add New and publish a new post.
Once the new post is published you’ll see it displayed on your homepage.
You’ll find more detailed step by step instructions on how to fix a Not Found message here.
How do you delete the Hello World Post?
Every newly created blog is the same default layout with posts displayed on its home page with a ‘Hello World’ post and and ‘Sample’ page.
You can delete this post at any time by going to Posts > All Posts.
Hovering your mouse over the title of the Hello World post brings up four action links.
Now just click on Trash. This sends it to your Trash folder where it is permanently deleted within 30 days of when you trashed it.
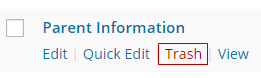
Remember if you delete all posts, and your homepage is your blog post page, you will see a “Not Found” message.
To remove that message you just need to publish a new post by going to Posts > Add New.
Back to Top
Is it possible to publish posts to different pages on my blog?
We’re often asked if it is possible to add posts to other pages, rather than just the front page of the blog. This is commonly asked by educators who want to use one blog for multiple classes or subjects.
And yes you can! But it does involve slightly advanced blogging skills.
You do it by sending posts to different pages on your blog by assigning different categories to posts, based on the class or subject, and using a custom menu to create links to the categories from your top navigation. When students and parents click on their category they’re taken to all the posts for that class or subject. Check out Mr. Cartlidge’s Science Blog to see how it works.
You’ll find step by step instructions on using categories to organize multiple classes or subjects on your blog here.
Remember, it does involve slightly advanced blogging skills — so leave a comment or email us at Edublogs Support if you need our assistance.
Your Task
Blogging is about sharing, collaborating, and learning from each other. Here’s your chance to ask a question, comment, and get involved!
Complete the following tasks:
- Check out the post examples and then publish your first post. Leave a link to your first post in a comment so we can have a look at how you went.
- Or, if you’ve already published a few posts, share an idea on how your introduced blogging to your students or how you’re integrating blogging into your curriculum.
- Read through the most recent comments in reply to this post and leave a response to another person’s comment.
523 comments on “Step 3: Write your first posts”
Check out my first post at pan4.edublogs.org.
https://drdriggers.edublogs.org/2025/01/21/welcome/?customize_changeset_uuid=0d3bfe31-8da6-43ff-9134-572c3bd85d84&customize_messenger_channel=preview-1
I like that I can give students a blog instead of paper/pencil assignment sometimes!
https://flippin4reading.edublogs.org/about-me/
My first post
My first post. https://kaustin343.edublogs.org/2024/11/02/welcome/
Step 3 offers a clear roadmap for class blogging, focusing on creating engaging posts to showcase student work and class activities. The tips on effective writing and blog features are practical and insightful. I’m excited to apply these strategies in my classroom.
https://l2mediafmp2024.edublogs.org/
Made loads of progress with posts and created a supporting site for resources to sit alongside their work.
Very creative and informative. So user friendly! I love it!
https://rieska82.edublogs.org/about/about-me/
https://tashielletam1.edublogs.org/
I will keep dreaming.
https://getreadytoday.edublogs.org/
I really like the layout of this page with the calender added in this useful
I like your quote /week idea!
Hello,
I am learning about edublogs.
Here is my first edublog post:
https://maria248.edublogs.org/2021/12/08/hello/
I love all your interesting widgets!
Here is my first blog post: https://stevensclassroom.edublogs.org/2021/09/03/welcome-to-our-classroom/
Feel free to comment!
Hello, great to see a photo of your classroom on your blog. I wonder what you will be learning next?
Regards,
Maria
Hi Maria and Mrs. Stevens,
I also really like how laid out your classroom was. I also love how she posted questions towards the bottom of her blog and people were commenting on her blog. I think being able to learn and comment on other’s blogs can be a valuable learning tool. It can also be a great way for parents and students to share more about themselves. I like how Mrs. Stevens blog was catching to the eye, easy to find what you need, and had images and short text. It looks like a fun 6th Grade classroom!
I do not see Supreme Google Webfonts plugin as an option. Any suggestions?
The Supreme Google Webfonts plugin has been deprecated, thanks for bringing this to our attention and apologies for the inconvenience! The page content has been updated.
Here’s my About the Teacher post. I’ve got it in the Home dropdown after About the Lab post. I feel like I’m getting the hang of things in Edublogs!
https://popcsmedialab.edublogs.org/2021/07/27/about-the-teacher/
Hey,
I think you are, Good Job!
Hello Tashielle, I checked your blog, love the aesthetics. Check out my first post!
https://studentsofknowledge610.edublogs.org/2022/11/26/myfirstpost/