Step 2: Setting Up Pages
Welcome to the second step in our free professional learning series on personal blogging!
The aim of this step is to:
- Help you understand how pages are used on personal educator blogs.
- Help you set up an About page and Contact page on your personal educator blog.
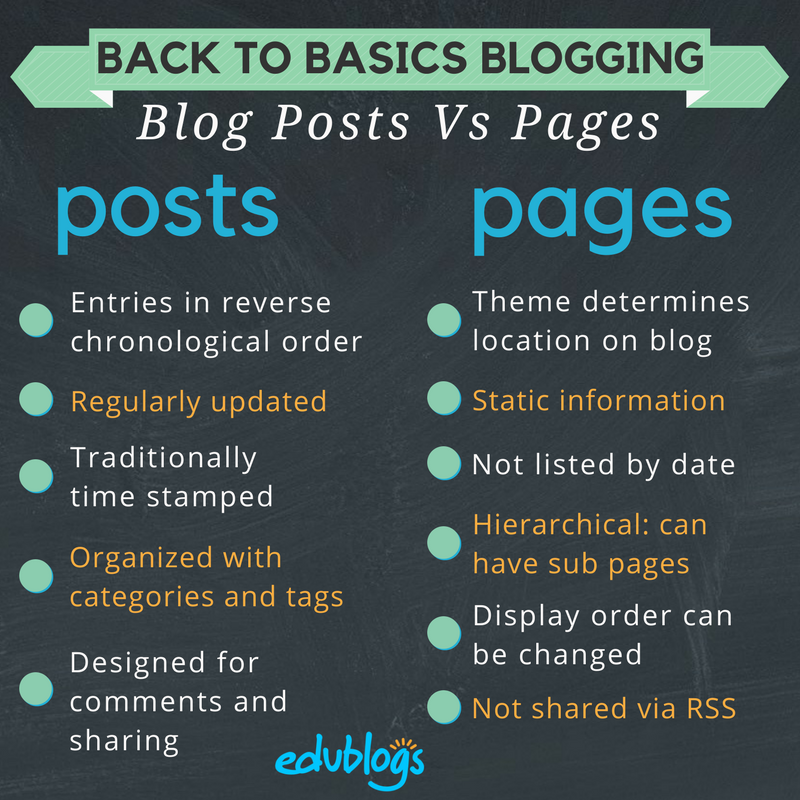
Introduction to pages
Pages on blogs are normally used for information that you want to share with your readers but don’t expect to update frequently.
The main things to remember are:
- Pages are best suited for information you rarely update such as your About and Contact pages.
- Situations where you want to discuss a question or topic are better suited to publish as a post and not a page.
- Too many pages can make information harder to manage and find.
If you look closely at a page you will see it is normally made up of:
- Page Title – tells the reader what the page is about.
- Your page content – this is information you want to share on this page
- Comments – most themes support comments at the bottom of the page. This allows your readers to add a comment to your page. There are situations where you don’t want comments on pages. Comments are disabled on pages by default and can be enabled.

Watch the following video to learn more about the difference between pages and posts.
Here’s a quick visual summary of the differences. We also have a post on The Edublogger that explains the differences between posts and pages further.
Why you need an About page
You never know how someone might find your blog — Google search, Twitter, Facebook, or a link from somewhere else.
One of the first things a new visitor looks for is your ‘About’ page.
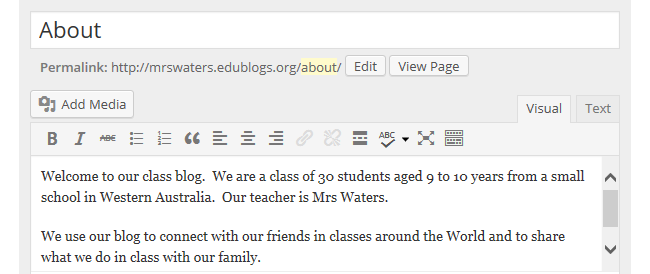
Your About page is all about letting people know who are you, what your interests are, and what you write about.
Start with telling people more about yourself as people are more likely to engage with your blog if they can relate to you as an individual. Then tell them about your blog and the reasons why you blog.
Not too long and not too short — include photos that help readers relate to you as a person.
Here’s my ‘About page’ on my personal blog.
What’s included on an About Page does vary depending on the type of blog and its intended audience.
Refer to these tips for writing About pages for Student and Class blogs.
Examples of About pages on personal blogs
Check out the following blogs for ideas on how About pages are used on personal educator blogs.
- Shelly Sanchez Terrell’s About page
- Kathleen Morris’ About page
- Vicki Davis’ About page
- George Couros’s About page
- Gwyneth Jones’ About page
Create your About page
 All newly created blogs come with a ‘Sample page‘ created.
All you need to do is edit the ‘Sample page’ to change it into your About page
Here’s how you create your About page:
1. Go to Pages > All Pages.

2. Hover your mouse over the Sample page title to bring up the action menus.
3. Now click on Edit.

4. Change the title of your page from Sample Page to About (or About Me).
5. Edit the permalink to change it to about.
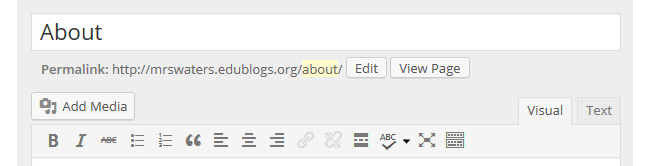
6. Now just add your information about yourself and when finished click Update.
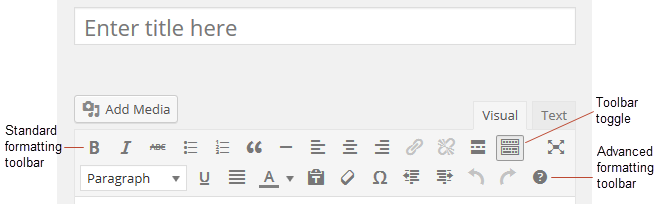
Overview of your visual editor
The area where you write your pages and posts is by default in Visual Editing mode which uses WYSIWYG (What You See Is What You Get) option for formatting.
It works similar to any Word processing software.
Write your post, highlight any text you want to format, and then click the appropriate button in the toolbar to add formatting such as bold, italics, or a numbered list.
The Toolbar Toggle icon is used to view the advanced formatting options in the second row including heading styles, underlining, font color, custom characters, undo, redo.
You switch between Visual Editing mode and HTML editing mode by clicking on the Visual or Text tab. Text or HTML editing mode is not something beginner bloggers need to worry about.
Below is a quick video tutorial on the visual editor.
Making contact easy
Those that visit your blog might also have a need to contact you.
Many teachers choose to create an entirely separate “Contact” page to go with the “About” page.
Here are some tips to consider:
- It’s best not to put your email address on your blog. A contact form (using a contact or form plugin) is better as it protects your email address from spammers.
- If you do want to provide your email, use text and something like support (at) edublogs (dot) org or an image of your email address to make it hard for spammers to pull your email address. Here’s an email icon generator you can use.
Other things to share might include Facebook, Twitter, or other social media profile information. Some of these are also shared by adding widgets to your blog. We’ll show you how this is done later in this series.
Create your contact page
Once you’ve decided what you want to include on your contact page, and if you want to use a contact form, it is just a case of creating a contact page using the Formidable Forms plugin.
- Here’s an example of what the Formidable Forms plugin contact form looks like on Unlocking the Universe.
Note: The Formidable Forms plugin is available for pro blogs only.
How to create a contact page using the Formidable Forms plugin
First, you will need to activate the Formidable Forms plugin as follows:
1. Go to Plugins.
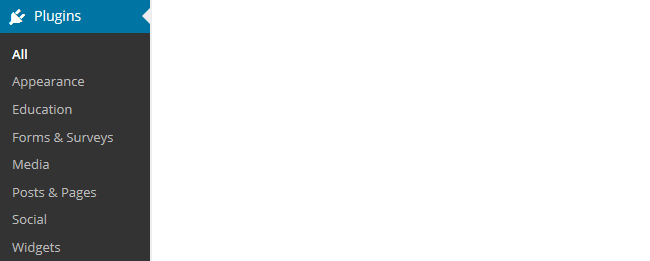
2. Activate the Formidable Forms plugin.
3. Go to Formidable > Forms.

For a comprehensive guide on using Formidable Forms with a pro subscription, you will find a step by step guide here.
Other types of pages
There are lots of different types of pages you can add to blogs.
The main things to remember are:
- Pages are best suited for information you rarely update such as your About, Contact, and First time visitor pages.
- Too many pages can make information harder to manage and find.
We’ll show you how to use posts in Step 3 of our personal blogging series.
Setting up links to pages
Some themes automatically add a link to pages in their top navigation while on other themes you need to add a pages widget or set up a custom menu to add the page links.
Personally, I prefer to set up my top navigation using a custom menu as links in the top navigation are easier for readers and it allows you to customize the links considerably more.
You’ll find step by step instructions for setting up custom menus here.
Frequently Asked Page Questions
These are some of questions about pages that we’re commonly asked.
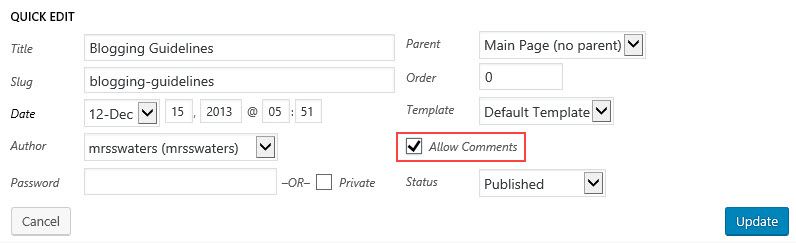
1. How do you enable comments on pages?
Most of our themes support comments on pages and by default, comments are disabled on pages.
You can enable comments on pages using Quick Edit as follows:
1. Go to Pages > All Pages

2. Locate the post or page you want to enable comments on.
3. Hover over its title to bring up its action menu and then click on Quick Edit.

4. Select ‘Allow Comments’ and then click on Update.
2. Why won’t comments display on pages?
Most of our themes support comments on pages, however, there are a few themes that don’t.
If the theme you are using doesn’t support comments on pages, and you would like this feature, then you will need to use an alternative theme.
Back to Top
3. What does the Nothing Found message on my front page mean?
By default, the front page of your blog is set to display your latest posts.
If you delete the default “Hello World’ post before you publish a new post then your front page will display ‘Nothing Found’, ’404 – Not Found Error’ or something similar depending on the theme you are using.
This message is displayed because there is nothing to display on your front page.

You’ll find step by step instructions on how to fix a Not Found message here.
Back to Top
3. Is it possible to publish posts to different pages on my blog?
We’re often asked if it is possible to add posts to other pages, rather than just the front page of the blog. This is commonly asked by educators who want to use one blog for multiple classes or subjects.
And yes you can! But it does involve slightly advanced blogging skills.
We will show you how you can do it by assigning categories to posts and using a custom menu for your top navigation in Step 3 of our personal blogging series.
Your Task
We’d like you to add your voice and ideas to our ongoing conversation about blogging by undertaking one or more of these tasks:
- About Page: Check out some of the personal educator blogs on our list and check out their About pages. Then, create or update your own About page. Leave a link to your About page in a comment so we can have a look at how you went.
- Contact Page: Check out some of the personal educator blogs on our list and look for their Contact pages. Then, create or update your own Contact page. Leave a link to your Contact page in a comment so we can have a look at how you went.
- Other Pages: Share a link to another type of page that you’ve seen on someone’s personal/professional educator blog. Tell us what you think of the page in a comment.
Also feel free to leave any questions you are having (or tips/advice) as well.
How to leave a comment: Scroll down to find the comment box. Write your comment, then enter your name and email address (email addresses are not published). Enter the anti-spam word. Press submit and we will moderate your comment ASAP.