Step 5: Adding Widgets
Welcome to the fifth step in our free professional learning series on class and student blogging!
The aim of this step is to:
- Explain how widgets are used on class blogs.
- Introduce you to the commonly used class blog widgets.
- Show you how to change widgets and add widgets to your sidebar.
What are widgets?
The term widget refers to any tool or content that you add, arrange, or remove from the sidebar(s) of your blog — these are the blocks that make up your sidebar.
Back to Top
How widgets are used on class blogs
Widgets are used for a wide range of purposes including to:
- Help students, parents, and visitors find information on the blog — e.g. Search widget, pages widget, category widget
- Track visitors to the blog. Visitor tracking widgets are used to highlight a blog’s global audience. This can be incredibly motivating for students and provides a built in geography lesson — e.g. Flag Counter, ClustrMaps, Revolver Map.
- Increase student engagement — e.g. Pet widget, Wonderopolis
- Provide information to help other classes learn more about your class — e.g. date widgets, date/time widgets
- Share the latest news — e.g. Twitter widget, Dogo Current Events widget (Tip: Many classes have their own class Twitter account and display their tweets using the Twitter widget).
- Share links to helpful resources, student blogs, and other class blogs — e.g. Links widget
- Show an Events Calendar for important dates — e.g. Google Calendar
- Compile book lists — Goodreads bookshelf
- Encourage signing up to email notifications of new posts — e.g. email subscription widget
- Display comments or posts recently posted — e.g. recent comments widget, recent posts widget
- Allow students to safely search for resources on the web — e.g. Photos For Class, KidRex Search Widget.
Widgets and blog design
There are hundreds of different widgets you can add to the sidebar of your blog using embed code in a text widget but when adding any widget you need to think about the design of your blog. Widgets can be noisy, take up a lot of space, and may distract readers.
When adding widgets think about whether it adds to your blog OR does it distract readers from your posts? You need to have a balance between widgets and your blog content; you want people to read your posts!
Back to Top
How to add widgets
Adding a widget is as simple as follows:
1. Go to Appearance > Widget.
2. Click on the arrow on the desired Sidebar to open up the sidebar (so you can add the widgets).
3. Drag the widget from the Available Widgets into the desired Sidebar.
You drag by clicking on the widget with your left mouse button and moving the widget.
4. Drop the widget when you see a dashed line appear –- this indicates the widget is in place.
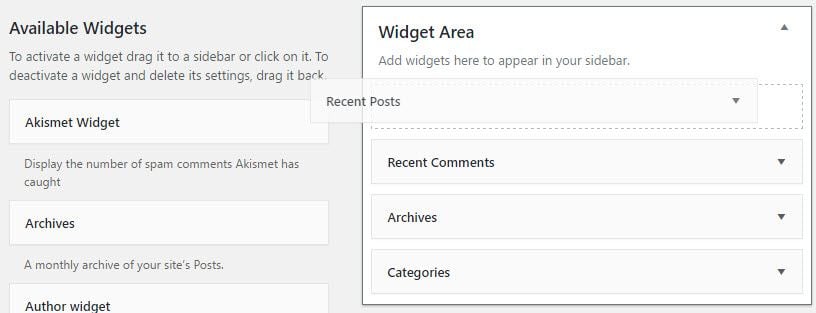
5. The widget will automatically open — just configure, click Save, and then Close.
Widget Video tutorial
How to remove widgets
Removing a widget is as simple as:
1. Go to Appearance > Widget.
2. Click on the small arrow on the right hand side of the widget you want to remove.
3. Click Delete.
This returns the widget to the Inactive Widget area.

Overview of Available Widgets
Here’s a summary of the main widgets you’ll find in your dashboard and what they are used for:
| Archives | Used to organize your previously published posts by month. Handy for readers who want to browse for older content. To save space on your sidebar, change the configuration to ‘Display as a dropdown’ |
| Blog Avatar | Used to display your blog avatar (uploaded via Settings > Blog Avatar). |
| Calendar | Displays links to your posts by date on a calendar. Can’t be used as an Events calendar. |
| ClustrMaps | A simple widget for quickly adding a ClustrMaps to your blog sidebar. It’s added when the Widget plugin is activated in Plugins. |
| Custom Menu | Allows you to display pages, categories, and custom links with a single widget. To use, you first need to set up your custom menu in Appearance > Menu. |
| Email Subscriptions | A simple widget for adding email subscription to your blog. When readers sign up, they get an email to let them know when you’ve published a new post. |
| Links | Used to display a list of links in your sidebar. It’s commonly used to share your favorite blogs or websites with your readers. |
| Meta | Simple widget for easy log in and log out of your blog, to access your dashboard and to locate your RSS feed. |
| Pages | Displays a list of your pages in the sidebar. Commonly used for themes that don’t have page links in the top navigation. |
| Recent Comments | Displays the most recent comments left on your blog by readers. |
| Recent Posts | Displays the most recent posts you have published. This makes it easier for readers to see what’s new on your blog. |
| Search | Adds a search box to your sidebar that makes it easier for readers to search the contents of your blog. |
| Tag cloud | Displays a cloud of the tags that you’ve assigned to posts. It helps your readers quickly see what topics you write about. |
| Text | Allows you to add text or embed code to your sidebar. This is a very useful widget because you can use it to add content from other sources to your sidebar using their embed code (Note: only available on Pro or CampusPress blogs). |
Some widgets are also added to your widget area when you activate plugins.
Add widgets using embed code in text widgets
The handiest widget you’ll find in your dashboard is the text widget.
You can add any other widgets you find on the internet by pasting their embed code into a text widget in your sidebar.
This is how you add widgets from Voki, Flag Counter, Google Calendar and so on!
We’ve added links to popular widgets in our Pinterest cool widgets board. Clicking on a widget takes you to the website where you can grab the embed code.
Adding a widget from another website is as simple as: 1, 2, 3….
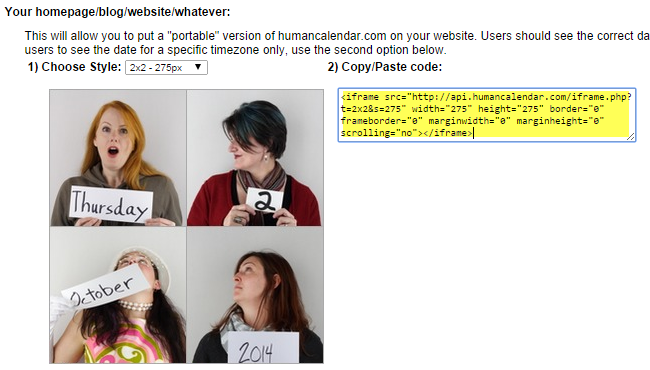
1. When on the widget website, copy the embed code for the widget you want to add. Highlight the code with your mouse or press Control A (Command A) to select all.
Then copy by right clicking on your mouse and selecting copy. Or, press Control C (Command C).
2. Go to Appearance > Widgets.
3. Drag a text widget into your sidebar.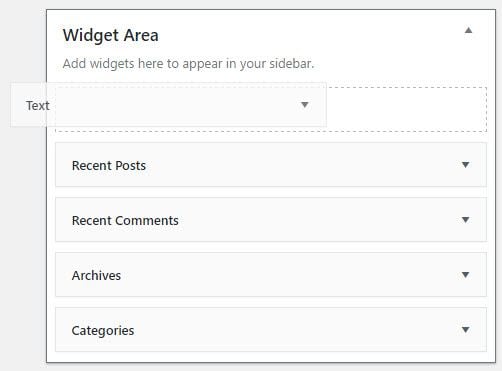
4. Click on the text tab in a text widget in your sidebar.

5. Paste the embed code into the text widget.
Right click on your mouse and select Paste. Or press Control V (Command V).
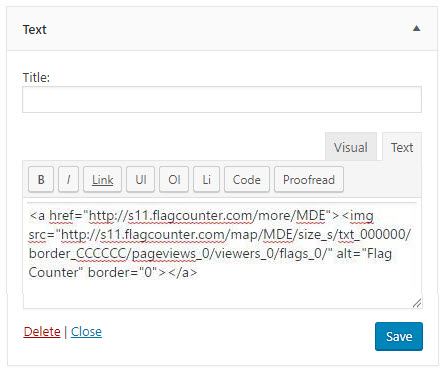
5. Click Save and Close.
6. You should now see the widget in your sidebar.
Commonly used visitor tracking widgets
Visitor tracking widgets are popular on class blogs because:
- Knowing you’re writing for a global audience is incredibly motivating for students.
- Realizing people from other countries are reading what’s been written increases students’ interest and excitement. This can motive students to blog.
- It also provides built-in geography lessons — many students constantly check for new visitors and enjoy finding out more about the countries where their visitors are from.
Class blogs often use more than one visitor tracking widget as each widget provides different information about visitors to the blog.
Here’s a quick overview of the most commonly used visitor tracking widgets on class blogs:
| ClustrMaps | ClustrMaps is a thumbnail hit counter map widget that shows the geographical location of all visitors to your blog. Number of visitors from a location is indicated by the relative size of the dot. |
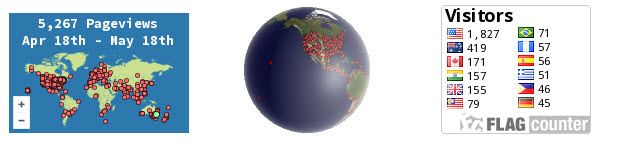
| Flag Counter | Flag Counter widget shows the total number of visitors from each country next to the country’s flag. Every time someone from a new country visits your site, a new flag will be added to your counter. Clicking on the flag counter takes you to your Flag counter page which provides more detailed charts and information about your visitors. |
| Revolver Map | Revolver Map displays all visitor locations and recent hits live and in realtime on a revolving globe of the Earth. A click on the widget opens the live statistics page. |
Read more about how to add these widgets to your sidebar.
Link widgets on class blogs
Links widgets are commonly used on a class blog to provide links to other class blogs, student blogs, and resources— they are designed to help you, your students, and other readers.
Traditionally, the most common type of link widget you’ll hear mentioned is a blogroll. Bloggers commonly use blogrolls to list their favorite blogs. Blogrolls help readers locate other blogs worth reading — you are saying, “These are some blogs I like which are worth checking out!”
Blogrolls on class blogs are used often used to provide links to student blogs, other class blogs they interact with, or resources.
Please note:
- If you are using the My Class tool, you add links to your student blogs by adding the Class Blogs widget to your sidebar. You don’t have to add each student blog individually.
- You can read about managing student blogs using My Class here!
Here is how you create links to websites or blogs:
1. Go to Links > Add New.

2. Add the name of the website or blog to the Name Module.
3. Add the URL to the Web Address module.
Best option is to copy/paste the URL from the address bar of your web browser as you are less likely to make a mistake.
4. Select Blogroll in the Category Module or create a new Category then click Add Link.
You use different categories if you organize your links in different locations in your sidebars.

Once you’ve created the links, you add them to your sidebar by adding the Links widget (via Appearance > Widgets).
Back to Top
Commonly Asked Widget Questions
Here are some answers to questions the Edublogs support team are frequently asked about.
Back to Top
1. I’m trying to remove a widget and I can’t find it listed in my sidebar in Appearance > Widgets. How do I remove it?
The most common reason why you may have trouble removing a widget, or see two of the same widget on a blog, is some themes hard code widgets into their sidebar. Hard coded widgets can’t be removed.
NotePad Chaos is an example of a theme with hard coded widgets. Pages, Categories, Links and a What is this Place are all coded into the theme.
Back to Top
2. Why don’t the categories I set up in Posts > Category display in my Category widget?
Categories and tags on posts are used to help readers locate information in different ways. When your readers click on a categories link on a post or in your sidebar, it loads a page with all posts that use that category.
Categories won’t display in your category widget until the category has been assigned to a published post.
Back to Top
3. Why are some tags in my tag cloud widget larger than others?
When your readers click on a tag link on a post or in your sidebar it loads a page with all posts that use that tag.
The larger the size of the word in the tag cloud, the more published posts that have been tagged using that term.
The Tag Cloud widget displays a list of your top 45 tags that you’ve assigned to published posts.
Back to Top
4. Why doesn’t my Calendar widget show the correct date?
The calendar widget creates a calendar in your sidebar with clickable links to your blog posts for particular dates. Dates that appear in bold type indicate dates you’ve posted.
It doesn’t let you set up a calendar of events. It’s only used is to display links to your posts by date.
If you want an Events calendar we recommend you add a Google Calendar to your sidebar or embed it into a page.
Alternatively, if you want to add a simple calendar use this Monthly Calendar.
Your Task
We’d like you to add your voice and ideas to our ongoing conversation about student blogging by completing the following:
- Try adding some of the widgets to your class blog. Leave a comment to tell us which of the widgets you added to your class blog and why.
- Read through the most recent comments in reply to this step and leave a response to another person’s comment.