This series is designed to guide you step by step through the process of learning to blog. The activities can be completed at your own pace and in any order.
The aim of this second activity is to:
- Create and upload a user avatar.
- Publish your first posts.
User Avatar
The user avatar, also known as your comment avatar, displays in places where you leave comments and next to posts you publish on some themes. Your avatar is an online representation of you.
Below is an example of a user avatar next to a comment which looks much nicer than using the default avatar.
Create your avatar
Your first task is to create your avatar using an online avatar tool.
Below are some online avatar tools you could try — Click on an image below and you will be taken to the website where you can create your own avatar:


Once you’ve created the avatar you save the avatar by either:
- Right click on the avatar and select “Save Image as” or “Save Picture as” to save a copy on your computer
- Take a screenshot of your image (use the Snipping Tool or PrnScrn)
Important Tips
Most online avatar tools create rectangular images whereas your user and blog avatar are square. Allowed image formats are jpg, gif, and png. For best results use jpg.
We recommend you edit your avatar or photo to 200 pixels wide by 200 pixels high using an image editing program such as Picture Manager, MS Paint or iPhoto before uploading. Remember to save it as a jpg.
If you still see the old avatar after uploading your new avatar it may be your web browser remembering your old image. Hold the Ctrl key and press F5 to clear your browser cache or right-mouse click and click Refresh (Reload).
Upload Your Avatar
Go to Users > Your Avatar (or Profile > Your Avatar)
Click on Choose File, select the avatar you want to upload, and then click on Open.
Click on Upload.
Expand the crop area to include your full image and click Crop image.
Now when you view a post where you’ve left a comment you will see your new comment avatar.
If you still see the old avatar your web browser may be remembering your old image. Right mouse click and select Refresh (Reload) to clear your web browser cache to view the latest version of your image.
You can also upload a blog avatar in Settings > Blog Avatar.
The blog avatar is displayed in your sidebar when you add the Blog Avatar widget in Appearance > Widgets and in the Class blog widget if the avatar option is selected.
Introduction to posts
Now you’ve changed your theme and set up your user avatar it’s time to write some posts so your teacher and other students can leave comments on your posts.
Your first post might be about why you are blogging, what you will be writing about in your blog or you could write a post about your avatar, how it represents you, and which website you used to create your avatar. Alternatively, your teacher may have given you a task to write a post on.
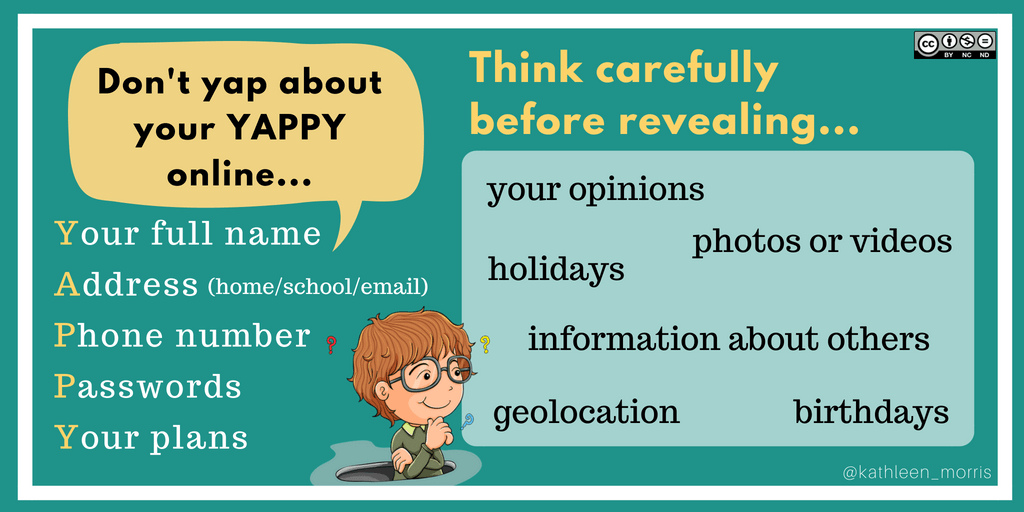
Stay safe online
Remember to be savvy online and don’t give out any private information:
Only ever use your first name. Don’t publish personal details about yourself such as your surname, your address, email address, phone number, or date of birth. Don’t share personal photos online. Be kind and compassionate. Don’t publish posts, photos, or videos that could hurt someone else.
This visual by Kathleen Morris might provide some useful reminders. While there are many things that definitely shouldn’t be shared in your blog posts (YAPPY), there are some grey areas. We recommend you think before you post and always discuss anything you’re unsure about with an adult before posting.
How to publish a post
Go to Posts > Add New.
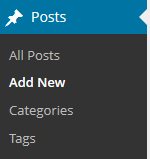
Give your post a title and click Save Draft.
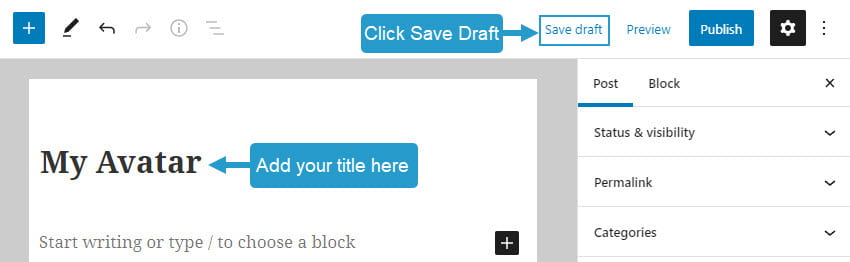
Add your first paragraph by typing what you want to say where it says “Start writing or type / to choose a block“.
Make sure you regularly click Save Draft as you write your post.
Each time you hit enter a new paragraph block is added which allows you to write your next paragraph.
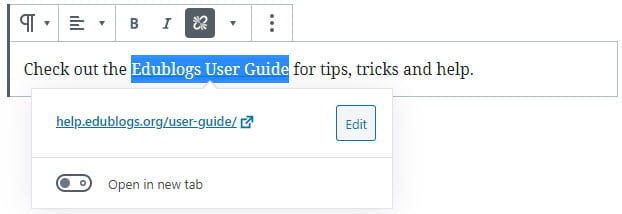
If you refer to a website, an article, or another person’s post you should link to it so readers can check out the site.
To add a link you need to copy the URL of the website you want to link to. Highlight the text in your post that you want to make a link and then you can either:
- Paste the URL you copied directly over the highlighted text using a keyboard shortcut like CTRL + V (PC) or CMD + V (Mac) OR
- Click on the insert link button in the block toolbar and paste your link when prompted.
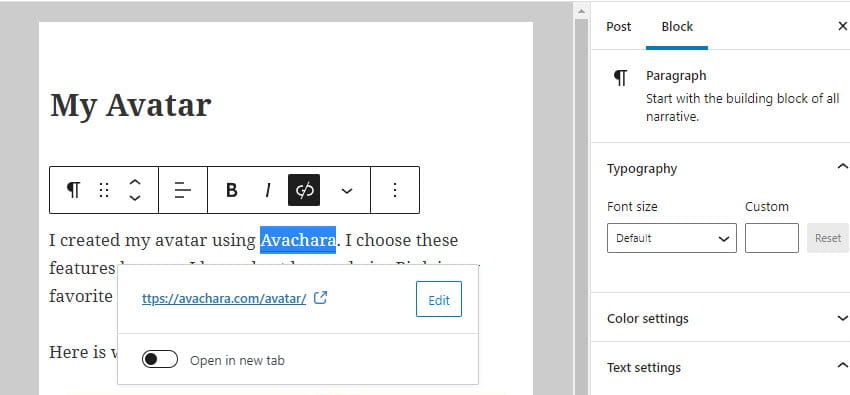
The example below shows linking the word Avachara to the URL http://avachara.com/avatar/
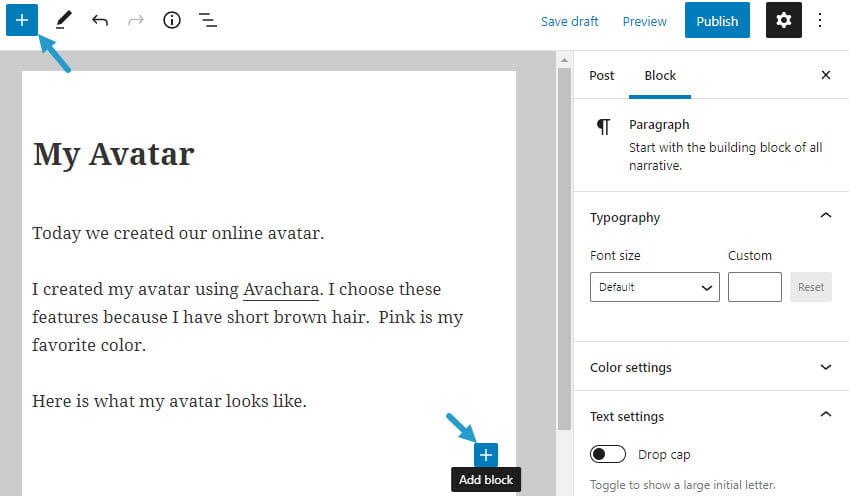
When you are ready to add an image or photo you place your cursor where you want to add the image and click on the +icon at the right of an empty block or at the top left.
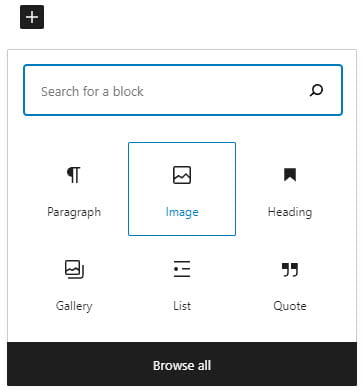
Now click on the Image icon to add an image block or add a Gallery block if you wanted to add a photo gallery.
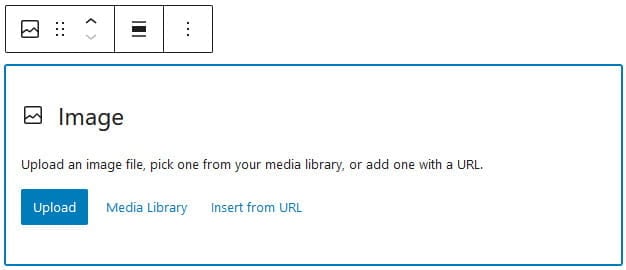
Click on Upload, select the image on your computer and then click Open.
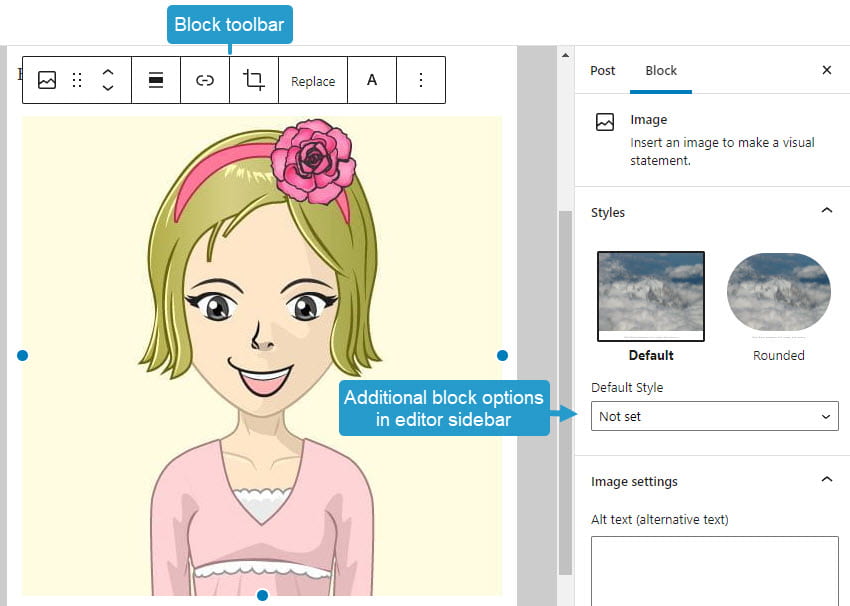
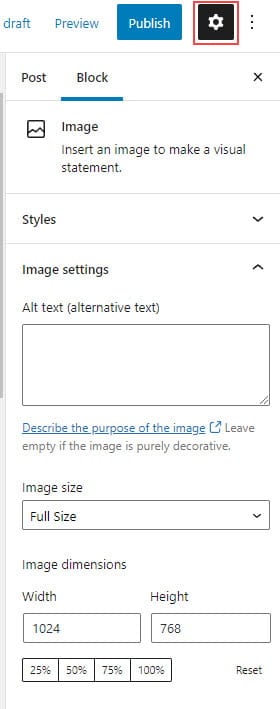
Once the image has been uploaded you use the block toolbar and additional block options in the editor sidebar to make changes to the image.
Click on the Settings icon next to the Publish/Update button if you don’t see the editor sidebar.

The image block toolbar includes options to change the alignment of the image, crop the image, replace the image and add text over the image.
When you have finished writing click Publish.
You need to click on Submit for Review after clicking Publish if your teacher has settings configured to check all posts before posts are published.
Once published your post will now display on your blog so others can read it!
Block Editor Overview
The area where you write your post and pages uses a block editor. You add content to your post or page using a block. Different blocks are used for adding paragraphs, images, galleries, videos, lists, tables, and more. You will find a complete list of all the different block types here.
Watch the following video to see how the block editor uses blocks to create posts and pages.
By default, the block underneath the post/page title is a paragraph block that you use for regular text and is designed to allow you to start writing straight away.
To add a new block you click on the + icon at the right of an empty block or at the top left.

Then click on the block for the type of content you want to add. For example, if you wanted to add a photo you would click on the Image icon or if you wanted to add a photo gallery you would click on the Gallery icon.
Each block type has options for adding that type of content. For example, when you add an image block you click on Upload or Media Library to add your image.
Upload lets you upload an image from your device while Media Library is used to select an image you’ve already uploaded to your site’s media library.
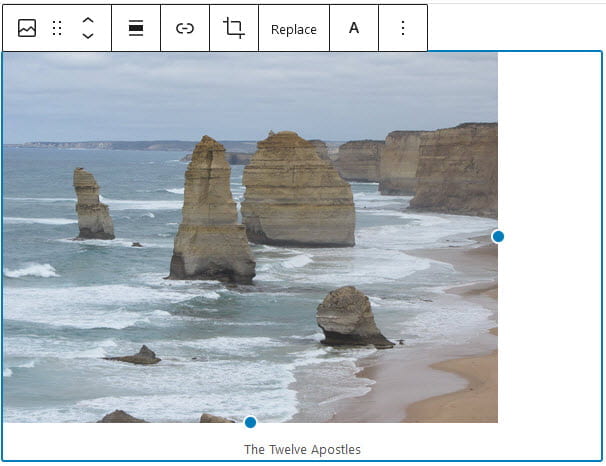
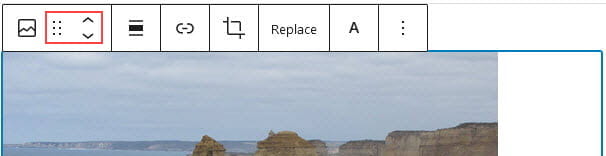
Once your image has been uploaded you can add the caption (optional).
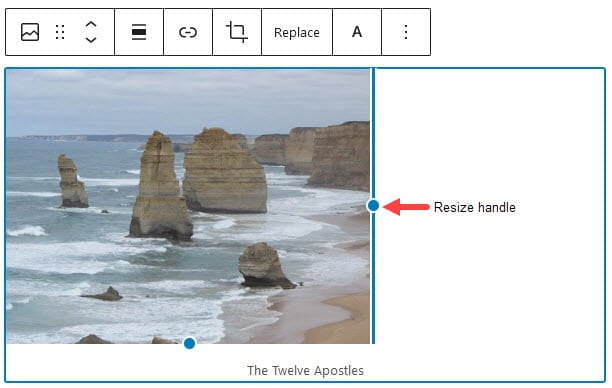
You can resize the image using the resize handles. Click on the resize handle and drag the image to your desired size.
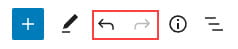
At the top of the block editor, there is an option to undo or redo.
You move a block up or down by dragging the block around by clicking and holding the six-dot-grid near the top left corner of the block toolbar or use the up and down arrow to move the block in the direction you want.
Each block has options in the editor sidebar that may provide extra customization in addition to the options found in the block toolbar. Click on the Settings icon next to the Publish/Update button if you don’t see the editor sidebar.
Below is an example of the Image block editor sidebar options.
You can transform each block into another similar or related block type by clicking on the Change Block Type or Style icon on the left-hand side of the block toolbar.
For example, you can change from an Image Block to a Gallery block by clicking on the Change Block Type or Style icon and then clicking on the Gallery icon.

To remove a block you select the block and click on the three dots on the block toolbar then click on Remove Block.

Putting it all together
Feel free to print the following PDF guide on how to publish a post, or download it to your computer.
 Loading...
Tips for writing better blog posts
Reading online is different from reading in a textbook.
The easier to read and more engaging your posts are the more likely they’ll be read and the better your message will be conveyed.
Here are some tips to help you write better posts:
#1 Use Categories and tags
Categories and tags on posts help readers locate content on your blog.
Categories are like chapters of a book; they provide a general overview of the topics you blog about. Whereas tags are more like the index at the back of the book and explode the topic into a million bits.
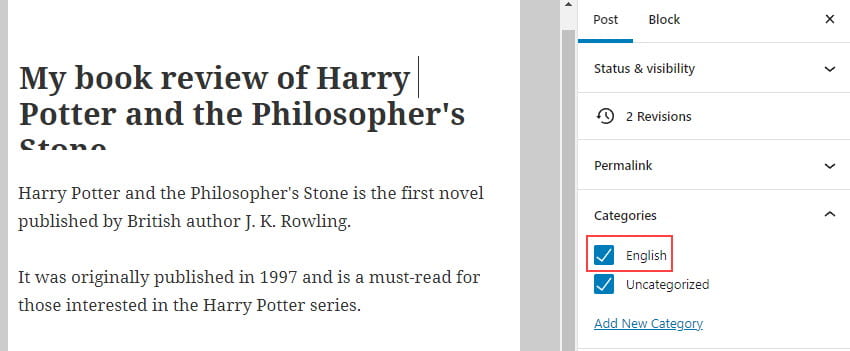
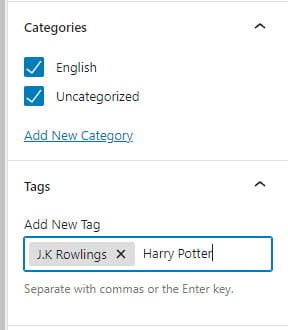
For example, you might use a category for each school subject such as English, Maths, Science, PE, English, Drama, Design, Art, and Random. The Random category is used for posts you publish on topics that you are passionate about that may not be school-related. Say you wrote a book review on ‘Harry Potter and the Philosopher’s Stone’ you might assign it the category English and tags might be J.K Rowling, Fantasy Fiction, Harry Potter.
Categories and tags are normally displayed at the top or bottom of the post using the Category widget and tag widget in your sidebar. You will be adding these widgets in Step 6: Add Widgets.
When your readers click on a category or tag link on a post or in your sidebar, it loads a page with all posts that use that tag or category.
On a post, you can add as many categories and tags as you need to make the post easier to locate.
Categories and tags are added before you publish a post using the document settings in the sidebar on the right of the block editor.
Click on Post to access the document settings options. Click on the Settings icon next to the Publish/Update button if you don’t see the editor sidebar.

Click on Category and select the category you want to use or create the new category using Add New Category.

Type in the new category and then click on the Add New Category button.
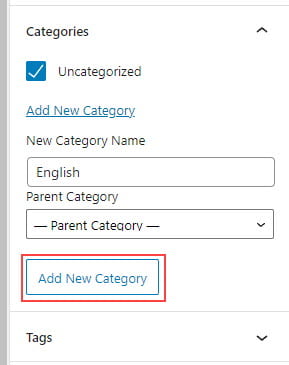
You should see that category selected in the Category module.
Click on Tag and add your tags by entering your tag terms with each tag separated by a comma and then click Add.
#2 Use short paragraphs
Posts with really long paragraphs are harder to read online.
The best options are:
- Break your posts up with paragraphs.
- The more paragraphs the better.
- Short paragraphs are better than long.
- If you need to make some paragraphs one or two sentences long so they are visually easier to read online then do it if needed!
- Make the first sentence of each paragraph make your readers want to read the rest of the paragraph.
#3 Use Headings
Use headings, and where appropriate bullet points and number lists, to break up the post into manageable bite-sized chunks.
For example, in a long post or page, you would use a Heading for each new topic and sub heading(s) within a topic to make the post easier to read. On this page “User Avatar” and “Introduction to Posts” are the main headings of a new topic and were created using an H2 heading whereas “Create your avatar” and “Upload your avatar” are topics within “User avatar” so were creating using an H3 heading.
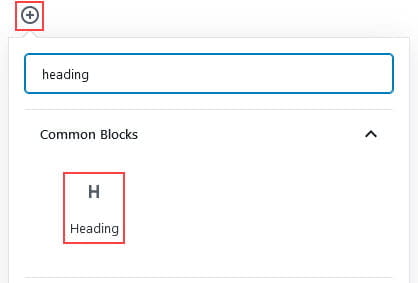
You create a heading by adding a heading block. To add a heading block to a page you click on the + icon at the left of an empty block or at the top left of the editor then search for heading and click on the heading icon.
Once you have added the heading block you type the text you want to appear in your heading.

You use H2 (heading 2) for the heading of a new topic and H3 (heading 3) for the heading of any subsection of your new topic.
#4 Add links
When you write about a website, refer to an online article or mention another blogger you should link to it so your readers can easily check out the information without needing to Google.
You add a link by copying the URL of the website you want to link to.
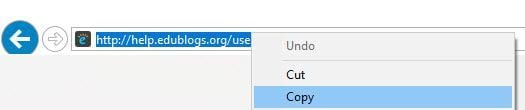
In the post/page you are writing highlight the text you want to link.

Paste the URL you copied directly over the highlighted text using a keyboard shortcut like CTRL V (PC) or CMD V (Mac). The link is automatically created. The highlighted text now appears underlined and is blue to confirm it is linked.
Select Open in a new tab if you want the link to open in a new tab.
YOUR TASK
Blogging is about sharing, collaborating, and learning from each other. Here’s your chance to ask a question, comment, and get involved!
Complete the following tasks:
- Create an avatar using an online avatar tool and upload it to Users > Your Avatar.
- Publish your first post or submit a post as pending review for your teacher to check. Your first post might be about why you are blogging, what you will be writing about in your blog or you could write a post about your avatar, how it represents you and which website you used to create your avatar. Check out Jade’s Week 1 – Avatars post to see how Jade wrote about her avatar.
- Leave a comment on this post and tell us how you went creating your avatar and writing your first post. Remember to leave a link to your post in your comment so we can have a look at your new post.
How I created my avatar will be included in the post.
https://yungbruh222.edublogs.org/
This was very cool and fun.
I created my avatar online using avachara. Here is my blog https://rparazine.edublogs.org/
amazing love it good job
https://toler5711055770.edublogs.org/2023/05/02/making-my-avatar/ My avatar looks as much like me as I could get it.
I chose to make my Avatar a collection of myself, a Moyai statue, as I believe they are a funny symbol of Ironic humor, and a Headset, as I myself enjoy gaming whilst in my free time.
s i m p l e.
https://town5709047668.edublogs.org/2023/04/27/why-i-chose-this-avatar/
It was nice.
https://town5710051270.edublogs.org/wp-admin/post.php?post=6&action=edit MY blog
https://hiers5718094993.edublogs.org/2023/04/25/title/ i like dis’
I used a picture of Kermit the Frog in a suit as my avatar.
Making this avatar was quick and easy!
i liked the process of making an avatar
Creating the avatar was the easy part, but figuring out how to put it on my post was the hard part.
It was pretty fun making my own avatar and creating my own post I hope I can create more in the future
I did not use a site to create an avatar, used a photo of my son. He is a mini representation of me. I think there is a lot more creative things that can be done with posts. Looking forward to experimenting with this site.
https://coachmadak.edublogs.org/
I created this avatar several years ago using Bitmoji. I have used it in my classroom and updated it annually. This updated Bitmoji reflects my positive attitude and love for pastels. I feel that adding an avatar gives you a more personal touch without adding a real photograph. My students love creating their own avatars, and I find it provides some insight as to how they view themselves.
Used cartoonify to create my avatar. It’s easy but not a close resemblance! My blog post is here https://lagunitasjumpstart.edublogs.org/2021/02/07/first-edublog/ with this password: learningtoblog.
That was fun
Hi guys
Really easy to make and use an avatar
I found making an avatar fun
ok
I did my avatar on my own by drawing it a while ago so I really wanted to put it to use now! But I love creating avatars.
Most of the time the instructions are easy to follow. It seems much easier to follow than Step 1
This awesome
I think i did a great job creating my avatar
That’s great!!!
To create my avatar, I just did a quick google search for an image of the Scars on Broadway self-titled album cover. For my first post, I just threw together the first 3 things that came into my head. Pretty simplistic.
Here’s the post link:
http://hughesnc14.edublogs.org/2019/04/30/dreaming/
Hi Hugh,
Well done on making a start with your blog. Remember, you can’t just use any images you find on the net. This Student Blogging Challenge post might help.
Thanks,
Kathleen
The blogging tips were very useful and showing the steps to making an avatar was also useful.
I wanted to use one of my own drawings as an avatar, so I didn’t use one of the avatar creation tools to create my avatar. This is a drawing that I’ve had for a while, so there’s not much to say other than the fact that I took a picture of it and uploaded it. I did check out Picassohead, though, and it was pretty fun to play with! I ended up posting on my Write Club blog to tell people about it in case they want something other than the default avatar, but don’t know what they want.
http://rhswriteclub.edublogs.org/2019/02/28/picassohead-for-avatars/
Thanks, I didn’t know how to change the color ( ͡ ͜ ʖ ͡ )
Creating my avatar was fun, but it does not really look like me. I wish there was more choices with hairstyles. Posting tips were very helpful.
Creating the avatar wasn’t that difficult. I found it fun actually. I wish there were more options to customize my character. Writing my first post was more difficult than I thought. I wasn’t exactly sure how to do the tags or categories because my first post was “about me”. Due to this I put it in a “random” category.
Creating my avatar was pretty fun. My first blog post was my welcome…to my students mostly…and not really for visitors to my blog. I’m not sure if that was a mistake or not. We’ll see.
It went well creating my avatar. At first I was confused but now I got it. It was fun making your own avatar, it shows how creative you could be with it. My first post went well learning how to add tags and categories. : http://sequansmith.edublogs.org/2019/01/11/practice-blog/
I personally did not like making a personal avatar because most of the websites didn’t have many options to customize.
I didn’t want to make a cartoon of me because I don’t like to depict myself, so I used the Rome skyline. Writing my first post was actually very easy
.aletapia.edublogs.org/2019/01/10/my-avatar/
I decided to upload my own picture as my avatar, I followed all the steps to uploading my picture. With my post i did it on what i wanted to learn in the class & how i want to improve & know more about in the class, & how its going to help me in the long run.
http://nykaylalilly.edublogs.org/2019/01/10/practice-blog/
fun and easy to do
When I was creating my avatar it was very easy, and I tried to make it look like me as much as possible, as with writing my post, it was simple and understanding.
http://skyste25.edublogs.org/2019/01/10/practice-blog/
I did not make an avatar i chose a picture of myself and i glad i got to choose my own picture.
I clicked on the avatar that seemed the most simple and made it look relatively like myself.
https://brebru2321.edublogs.org/wp-admin/users.php?page=user-avatar
The links to make your avatar were very helpful.
http://malcolmrose.edublogs.org/
that was interesting to learn
This so amazing you can make your self.
It sure can be fun, Abigail!
How I created my avatar will be in the post.
http://jaylthom8231.edublogs.org/2018/09/27/my-avatar/