Welcome to our free professional learning series on personal blogging! This series guides you step-by-step through the process of setting up your own personal or professional educator blog.
Refer our class and student blogging series if you want to set up a class blog.
The activities can be completed at your own pace and in any order.
Wherever you’re at — we’ll step you through the tasks designed to increase your skills while providing help to support your learning. Don’t stress, have fun, and remember to ask for help by leaving a comment any time you need assistance!
Optional workbook
Remember, we have a PDF workbook which you’re welcome to use to help keep you on track as you work through the course. Scroll down to find the ‘download’ button underneath the document.
📌 Download the PDF workbook here
The aim of this first activity is to:
- Help you learn more about what a blog is and why educators have their own personal or professional educator blog.
- Help you set up your blog, customize your settings, and change your theme.
What is a blog?
One of the biggest challenges educators new to blogging face is understanding the basics of how a blog works.
So we made this quick intro video to explain.
We recommend you start by watching the video. We’ve included explanations of key blogging vocabulary which will help as you work through this series including Footers, Headers, Menus, Pages, Posts, Comments, Sidebars, Theme, and Widgets.
Feel free to share this video on your own blogs with students, teachers, colleagues, or anyone else. Later in this series, we show you how easy it is to add videos to your blog.
Blogs? Websites? Portfolios?
Defining exactly “What is a blog?” is becoming harder to answer as the lines between blogs, websites, ePortfolios, and other online spaces blur. 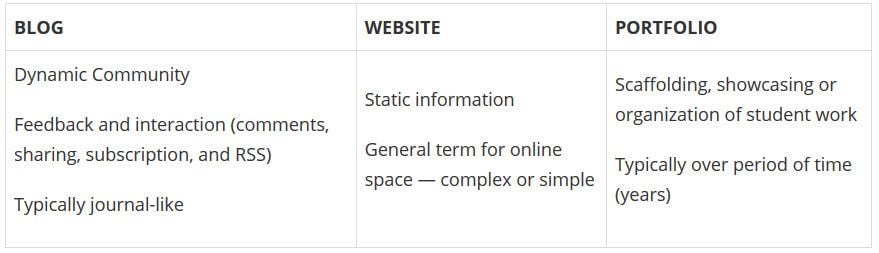 A blog is simply a website, although traditionally a website will have been more of a static space. What makes a blog different than a simple website?
- A blog traditionally would be updated fairly regularly and display posts in reverse chronological order.
- Comments have always been a key feature of blogs, providing an interactive space.
- Most blogs have pages where some key information is housed that isn’t updated very frequently (for example, an About Me page).
Nowadays, some people have a website that has a blog component; the home page doesn’t change but readers can click on a tab to view a regularly updated blog.
A blog is a blank canvas that you can use in any way to meet your needs!
Why educators use blogs
The main reasons why educators have personal/professional blogs include to:
- Share information and tips with other educators.
- Collaborate with a global audience. Increased collaboration with others leads to greater innovation and new perspectives.
- Reflect on their learning or their teaching/work practices.
- Learn how to blog themselves so they can use blogs effectively with their students.
- Create an ePortfolio.
- Document or remember professional development for their own use or accreditation.
Blogs are an important part of many educators’ PLN (Personal Learning Network).
Choosing your audience
Determining your audience is a useful first step when commencing any writing project.
Fortunately, when your writing is in the format of a blog, you have the flexibility to alter and adapt to different readers as your blog evolves.
The advantage of educational blogs is that the benefits come from the journey itself.
Despite this flexibility, it’s still advantageous to give your target audience some thought when starting a new blog.
Who will be reading your blog? Perhaps your audience will include:
- Local educators
- Global educators
- Student teachers
- Principals, administrators, and school leaders
- Parents (even if they’re not your target audience, they may read your work if you teach their child)
Stay open-minded as you embark on your blogging journey. Initially, you may choose your content for posts based on your perceived audience. As you get to know your audience more, and your own passions and interests develop, your content and writing style may evolve too. This is a natural pathway for many bloggers.
Refer to Who is Your Audience? Tips for Educators new to Blogging for more advice about choosing your audience. Back to Top
Examples of personal educator blogs
Your personal/professional blog extends your relationships outside of your school and allows you to connect with global educators who all willingly help each other.
Below are some examples of personal/professional educator blogs to see how they’re used.
This list is far from exhaustive! Be sure to tell us in a comment if you have any other favorite blogs by educators that aren’t on the list.
Click here to open this spreadsheet in a new window.
Sign up for your blog
Your first step if you don’t currently have your own blog, or you would like to use a new blog for this challenge, is to sign up for a blog.
You can use any blogging platform you would like including Edublogs, WordPress, and Blogger, however, when we write detailed instructions they will refer to Edublogs. You will be able to adapt this information to the blogging platform you are using.
Let’s go through some important things to consider before creating your blog.
1. Your Username
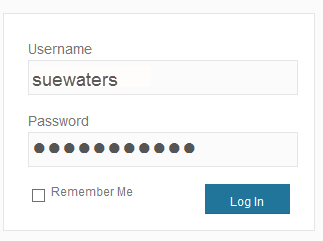 Your username is what you use to sign into your blog dashboard and is displayed on posts and comments you write.
While you can’t change your username, most blog platforms do allow you to change how your name is displayed on posts and comments.
Most teachers don’t allow students to use their first and last name online and often model this by using display names like Miss W or Mrs. Waters on their class blog.
With personal blogs, teachers are more likely to use their first and last name because their primary goal is often to connect with other educators.
Using their full name helps others connect with them better on a personal level. For example, your username might be like suewaters with a display name like Sue Waters.
2. Blog URL (Domain)
During the creation of your blog you have to select a URL (blog address).
When you want others to visit your blog you share your blog URL. For example, the URL for the Teacher Challenge blog is https://teacherchallenge.edublogs.org/
Think carefully about your blog URL. This can’t be easily changed and once your blog has an established audience, you’re less likely to want to change your blog URL.
A simple option is to use your name in the blog URL or use something that has meaning.
Examples:
- Sue Waters Blog ( http://suewaters.com/ )
- Larry Ferlazzo’s Websites of the Day ( http://larryferlazzo.edublogs.org/)
- The Edublogger ( http://theedublogger.com/ )
- Free Technology for Teachers ( http://www.freetech4teachers.com/ )
3. Blog Title
Your blog title is one of the first things a reader sees when visiting your blog. Choose a name that reflects the purpose of your blog or you might simply use your name.
Don’t stress too much about your blog title! You can always change it at any time via Settings > General in your dashboard.
Check out the list of personal educator blogs for ideas of blog titles other educators have used.
4. Password
Passwords are our line of defense for protecting our online accounts. The stronger your password, the more protected your accounts are. You should always use strong passwords for all accounts and use strong passwords that are different for each of your important accounts.
While remembering multiple strong passwords can be annoying, at least all your other accounts are protected even if a password is compromised for one account.
New guidelines suggest that a passphrase can be stronger than a traditional password. Here’s how to create a passphrase:
- Come up with four or more words such as mysterious triangle bingo nurse
- Avoid using personal information or well known quotes or song lyrics (these can be easily guessed).
- Add some uppercase letters, symbols or numbers if you wish eg. #MYsteriousTr1angle=Bin.go.nur5e
- Avoid making the passphrase too complex when you add the punctuation and numbers. It’s important that you can still remember it.
You’ll find more tips for creating strong passwords, passphrases, and using password managers here.
Create your blog
Now you’ve done all the research it’s time to create your blog! All you need to do is follow these instructions if you would like to set up your blog on Edublogs.
Prefer a video guide? This 15 minute tutorial is a simple orientation to blogging.
Update your profile
Your Profile page is where you can control the global settings for your username including where you set up your display name, change your password, and alter your email address.
Your Profile is most commonly used to update display name, password, and email address so we’ll focus on this.
You’ll notice there are lots of personal settings options in Your Profile and you can read more about each personal setting here.
The most important thing to update is your display name. Setting up a display name makes it easier for some who leaves a comment to quickly look at your first name to personalize their comment.
If your username is displayed on posts means they have to search to see if they work out your first name.
Here’s how to update your Profile:
1. Log into your blog dashboard.
2. Go to Users > Your Profile in your blog dashboard. 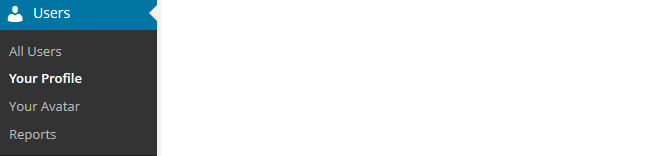
3. Scroll to near the bottom of the page to Nickname in the Name area.
4. Change the Nickname to the name you want to be displayed on posts and comments. 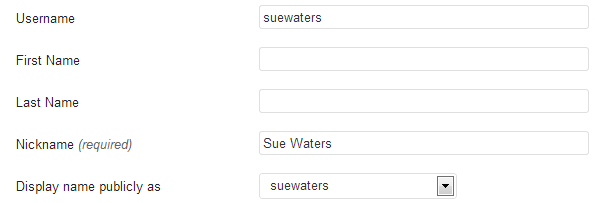
5. Click on the drop-down arrow and select your preferred publicly displayed name. 
6. Now, look at the email under Contact info. All comment notification and password reset emails are sent to this address. If you’ve set up your blog using our no email option it will look like this:

If you would like to receive comment notifications and be able to retrieve your password using the Lost Password link then we recommend you add your email address.
- Your email address is required. You may change this, but you can only use one e-mail address per username. This email address must be valid because to confirm that change an email will be sent to this address and it won’t be changed until you click on the link in the email.

7. Now scroll to the bottom of the page to the new password field. Change your password by clicking on Generate Password.
![]()
You can either use this automatically generated password or replace it with your own password.  There is no need to update your password (unless you want to). We just wanted to show you how it is done.
8. Now just click on Update Profile to apply the changes.
Remember to always click on Update Profile whenever you make any changes on Your Profile page!
Upload your user avatar
Your avatar is an online representation of you. The user avatar is also known as your comment avatar.
You upload the user avatar via Users > Your Avatar and it displays in places where you leave comments and next to posts you publish on some themes.
The default avatar set in Settings > Discussions automatically displays next to comments you leave unless you upload your own Avatar.
Your user avatar helps your readers visualize who you are. It helps create a personal connection with your readers. Below is an example of a user avatar and display name next to a comment.
You upload your avatar as follows:
1. Select a photo. Most educators use a photo of themselves on their personal blogs.
2. Resize your image to 200 pixels wide by 200 pixels high.
3. Go to Users > Your Avatar.
![]()
4. Click on Browse and locate the avatar you want to upload.
5. Click on Upload. ![]()
6. Move the crop area to one corner, then expand the crop area to include your full image and click Crop image. ![]()
7. Now when you view a post where you’ve left a comment, you will see your new comment avatar. Important tips:
- If you change your avatar and still see the old avatar it may be your web browser remembering your old image.
- Hold the Ctrl key and press F5 to clear your browser cache.
Check your settings
The General Settings is where you configure the broad settings of your blog including your blog title, tagline, blog admin email address, and timezone.
The most important setting to update in General Settings is your timezone. Educators often assume that blogs are automatically created set to their timezone and weeks later wonder why the post and comments date and times are weird.
The other important thing to consider is the blog admin email address. This email address is where all comment moderation emails are sent. If you want to receive comment moderation emails you should add your email address.
You’ll find more information on the configurations options in General Settings here.
Here’s how to change your timezone:
1. Go to Settings > General. 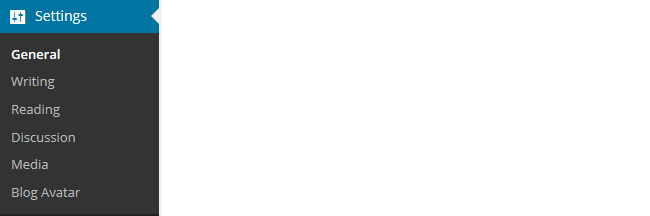
2. Select your timezone from the drop-down menu option.

3. Click Save Changes.
Customize your blog theme
Your theme is what controls the look and appearance of your blog; this is what people see when they visit your blog. This is how you give your blog its personal touch.
Like most things in life, first impressions count. Great blog themes make good impressions on readers so that visitors are more likely to check out your blog. Overwhelming themes detract from your blog content.
Every newly created blog normally has the same default theme. The last thing you want is to look like all the other blogs.
Customizing your blog theme is normally one of the first things most people want to do when they first log into their blog.
Tip: having a few posts on your blog may help you visualize your theme’s appearance better.
Let’s finish off getting your blog started by showing you how to customize your theme!
Using the theme customizer
With the theme customizer, you can customize your theme and see the results in real time before activating the theme.
Here’s how to change your theme using the theme customizer:
1. Go to Appearance > Themes
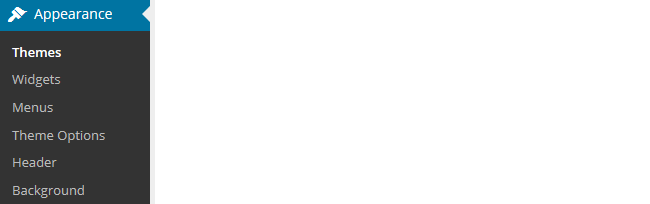
2. Click on ‘Live Preview‘ below the theme you want to use.

Or if you want to customize your current theme, click on ‘Customize‘ under the current theme.

3. This loads the customizer. Now all you do is work through the control panels on the left to customize the theme. You can then preview the theme changes in real time before activating it on your blog.
4. Once you’re happy with the changes you just click ‘Save & Publish’.
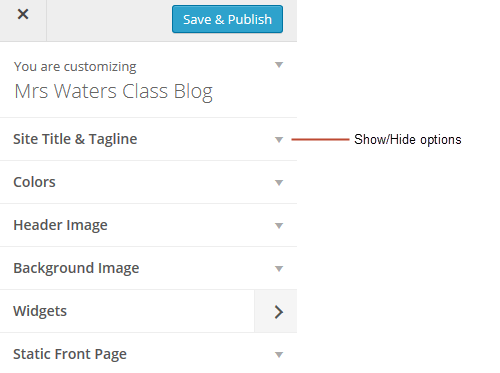
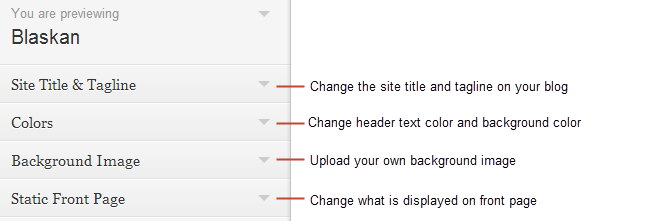
Here’s a quick summary of each customizer control panel:
We recommend you leave the static front page set to ‘Latest Posts’. Most personal blogs use a blog post page for their homepage. You’ll find more detailed information on using the customizer here.
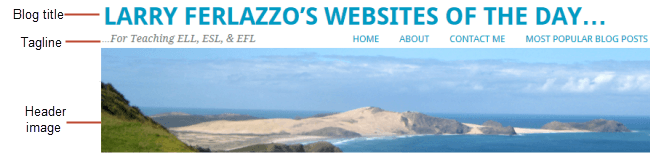
Almost all our themes include an option to upload your own custom image header. A custom image header means you can obtain a much more customized look and feel adding your “own personal touch” to your blog.
You upload your own custom header image as follows:
1. Click on Add new image in the header image section of the customizer. 
2. Choose an image from your media library or upload a new image from your computer.
- Only .jpeg, .gif, and .png files can be used for image headers.
- For best results, we recommend you re-size the image to the exact dimensions recommended for the theme before uploading using an image editing program.

3. Click on Select and Crop. 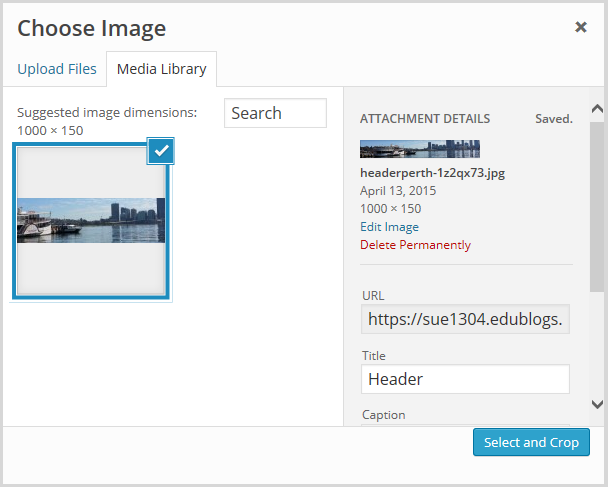
4. Click on Crop image. 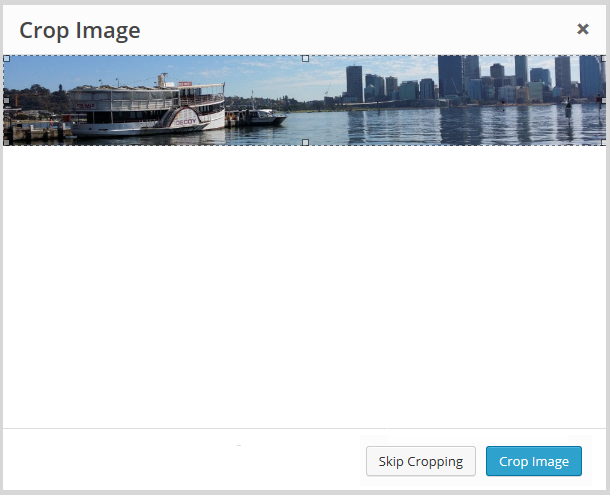
5. Your new header image should appear in your blog preview window.
6. Click Save & Publish on the Customizer to activate the new header on your blog. 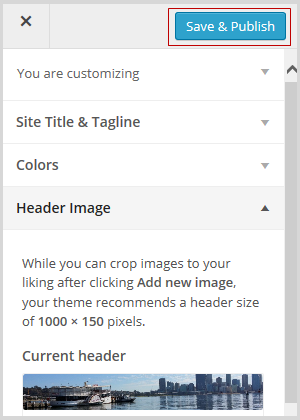 Back to Top
Uploading your own background image
Most themes allow you to add images to your blog’s background.
A background image is another great way of adding that personal touch to your blog. You upload your own custom background image as follows: Click on Background Image in the Customizer.
- If you don’t see the Background Header section in the Customizer, it means the theme doesn’t support this option.
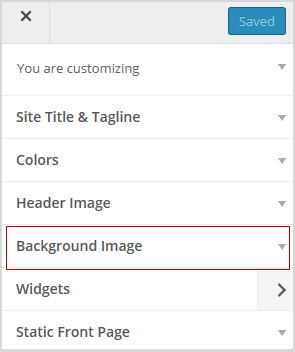
3. Click on Add new image.
4. Choose an image from your media library or upload a new image from your computer.
- Only .jpeg, .gif, and .png files can be used.
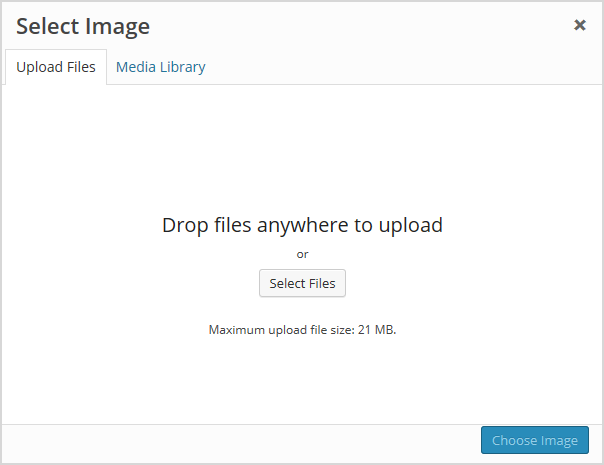
5. Click on Choose Image. 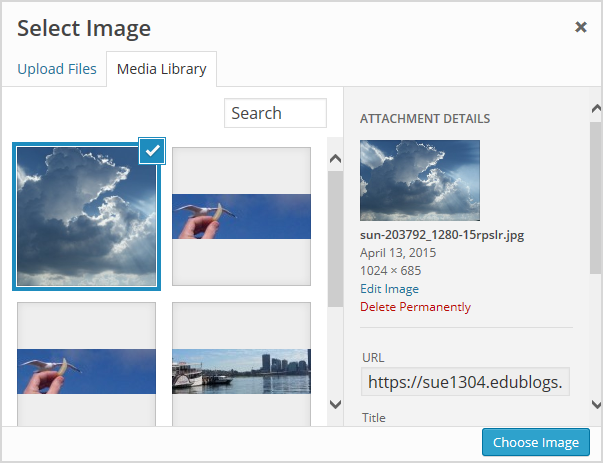
Once you have selected an image the background image options will appear:
- Background repeat: controls if the background image is repeated. Choices are:
- No Repeat — background image is only displayed once on the page.
- Tile — background image is tiled horizontally and vertically.
- Tile horizontally — background image only repeats horizontally.
- Tiled vertically — background image only repeats vertically.
- Background position: allows you to control the position of the background image. Options are left, center, and right.
- Background attachment: determines if you want the image to scroll with the content or to remain ‘fixed’ in place when a reader scrolls down the page.
For best results, we recommend you use Tile, left and Scroll.
6. Your new background image should appear in your blog preview window. \
7. Click Save & Publish on the Customizer to activate the new background on your blog. 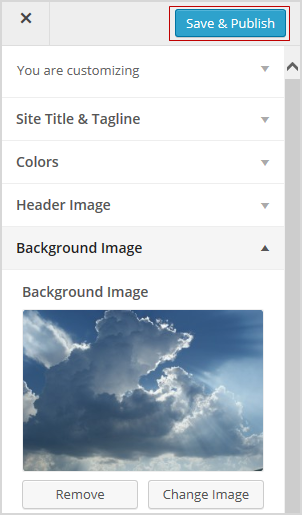
Commonly asked theme questions
Here are some answers to questions about themes we’re commonly asked.
1. Can I upload my own theme?
Because of the way blog platforms like Edublogs and Blogger work, you can only use the themes provided and can’t upload your own custom themes.
Remember that custom image headers and backgrounds are very effective ways of customizing your theme to meet your needs.
2. How do I change the font color, font size, and text color?
Some themes have extensive theme customization options which aren’t supported by the theme customizer.
They often include options to change font color, font size, and text color. These types of themes add a theme option menu item under Appearance once the theme is activated. To do more extensive customization, you go to Appearance > Theme Options.
You can also change font type, size, and color in posts or on pages using the Supreme Google Webfonts plugin. Back to Top
Your Task
Blogging is about sharing, collaborating, and learning from each other. Here’s your chance to ask a question, comment, and get involved!
We’d like you to add your voice and ideas to our ongoing conversation about blogging by undertaking one or more of the following tasks:
- Visit some of the blogs on the examples of personal educators blog list then leave a comment on this post to tell us which were your favorite blog(s) and why. Be sure to tell us if you have any other favorite blogs by educators that aren’t on the list.
- Leave a comment on this post and tell us how you went setting up your blog. For example, you could tell us what theme you chose and why? Or what you found easy? What aspects were hard and you would like to know more about?
- Leave a link to your blog in a comment on this post so we can have a look at your new blog.
How to leave a comment: Scroll down to find the comment box. Write your comment, then enter your name and email address (email addresses are not published). Enter the anti-spam word. Press submit and we will moderate your comment ASAP.
This is the first public blog that I’ve created, and I’m learning as I go. My theme is centered around books as I am blogging about my media specialist internship. I have my homepage customized the way I want, but it took some time to play around with the cropping to get the images the right size. I used images from Canva, so I want to make sure that they are copyright-approved.
I have a start on my new blog but will continue to edit as I go. This is all new to me.
My blog link is: https://cinnbacue.edublogs.org/
I enjoyed The Daring Librarian’s blog, and plan to look for other school librarian blogs in the future.
My theme is “Notepad Chaos” because it is cute and it goes well with my blog purpose, which is notes about my experience in school libraries this semester.
Creating a blog seems to be an excellent idea for educators to showcase their individuality but on a professional level. Which I feel it’s crucial for educators to continue to show up for themselves. The process of setting up a blog seems to be really tedious. However, I feel it could be worth using as a digital portfolio source. A blog is used to collaborate with others outside of the traditional face-to-face option. Ultimately a blog could be used as a creative resource for teachers to reflect on their teaching experiences.
Creating my blog went well. The link to my blog opus as follows. https://dasarayransberry.edublogs.org/wp-admin/edit-comments.php
I honestly don’t full understand setting it up.
Here is my page: https://tr0m3r07.edublogs.org/
I have set up my blog. It’s all very new to me. I have never written a blog before.
Hello, Everyone.
I am new to blogging.
I’m hoping to create a professional blog for my students and parents to enjoy.
I name it Variety and Vision because I have a variety of visions for my future students in their academic endeavors.
Have a great day!
Got It!
Setting up my blog is i think should be easy, however there is a lot of content to make it difficult and very confusing for me to shift through. I think if you are a 1st time blogger trying to create a blog maybe the information should not be so much.. its very overwhelming for me. But I have decided to make my blog in education for parparos.
When I was setting up my blog it was very difficult at first. I was confused. But as I read all the instructions and got the hang of it, it became very simple.
The link for my blog is
https://rieska82.edublogs.org
🙂
Hi
My favorite blog name and theme was Scenes from the Battleground.
The link to my blog is https://studentsofknowledge610.edublogs.org/
When I set up my blog it was a lot of trial and error. There was a theme I liked and then matching it with a color scheme was difficult. I finally got it put together and really like the results.
When I set-up my blog it was interesting, I really didn’t know the purpose for a blog, and it seemed not important to me. Now with it being a part of being an educator, I understand the importance and ready to dig dipper.
My bio link is:
https://kyrasavage.edublogs.org/wp-admin/index.php
Enjoy
https://kyrasavage.edublogs.org/wp-admin/index.php
https://arwazorba.edublogs.org/
I feel that setting up my blog was good, but it was time consuming. It took me a while to pick a theme and to chose and image that I could use as the header image for my blog. The process was simple and made easier by reading the information in this course.
jennifernesparza47.edublogs.edu
My favorite blog was The Daring Librarian by Gwyneth Jones. It catches your attention very quickly with all the different colors and pictures used. You could access many different links on it and it’s very easy to navigate!
Setting up the blog was simple because there is a step by step directions on what to easy. I really liked the theme Aldyde green, I thought it was a cute set up and has a good space to write as well as upload images. There was a blog that was my favorite which was “Crawling out of the classroom” I like the way it was organized and set up.
I felt that setting up my blog went well, all the steps were efficient and easy to use. I used the theme Adelle since it was a simple theme, and easy to identify when navigating to a different page.
https://haneeny123.edublogs.org/2022/10/15/hello-world/
One blog that I enjoyed would be Crawling out of the Classroom written by Ms. Lifshitz. Ms. Lifshitz wrote a letter on her blog for her students to read ending the school year. In her letter, Ms. Lifshitz writes about the struggles she and her students had during covid 19 while having their classes online. She also explained that even though they have went through a “learning loss,” she is still proud about how far they have come. She also explains about how much they have learned and that even though the school year has ended, the journey hasn’t. I feel that Ms. Lifshitz creatively used her blog in sending a message that they can read anytime when they feel they need motivation.
https://rchavousjourney.edublogs.org
https://bernetta1216.edublogs.org/wp-admin/
I really liked the blog “Edutech for Teachers”. The author had holiday themes. I think the technology integration ideas are perfect for upcoming holidays to make the activities more interesting.
My blog is https://amartin16.edublogs.org/
My favorite blog was Edutech for teachers, I liked the way her blog looked and it was easy to navigate. She also had great ideas in her posts!
comment will be visible after it has been approved.
My favorite blog was Teach tech newsletter by Alice Keeler. it was very easy to navigate her blog. My blog link is https://imaniwilson3.edublogs.org
My favorite blog was Teach tech newsletter by Alice Keeler. it was very easy to navigate her blog.
My blog link is imaniwilson3.edublogs.org
I love how this blog helps to keep track of my prfessional development.
I really liked the blogs: CoolCat Teacher and Shake up Learning. I will look at these for inspiration when making my blog!
The link for my blog is
https://moldingminiminds.edublogs.org/
the link for my blog is
https://ruthmangum.edublogs.org/
The blog that I enjoyed was Free Technology for Teachers by Richard Byrne. Technology is a great why to get students engaged in learning.
Link to my bio is https://sharnita.edublogs.org/
Some blogs I enjoyed viewing were “Excited Educator” by Lenny Dutton and Edutech for teachers. These were my top favorite because they were aesthetically pleasing to look at but also had valuable information.
The link for my blog is
https://educator21.edublogs.org/